
TECHNOLOGY
How to Select a Torchlight
HOW TO SELECT A TORCHLIGHT
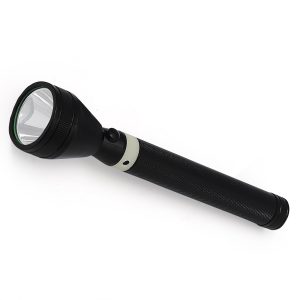
Selecting the torchlight that best suits your needs can occasionally be difficult due to the wide variety of types and variations available. We decided to present a list of the most crucial characteristics to look for in an LED torchlight because most of us aren’t looking to purchase ten different flashlights with all various qualities. Selecting these attributes will significantly reduce your options. With batteries and an electric bulb, a torchlight is a portable, handheld gadget that emits a beam of light. Small keychain lights and larger ones suited for outdoor sports or emergency scenarios are just two examples of the many sizes and styles available for torch lights.
How to Select a torchlight
An excellent torchlight has a number of features. For example, it’s critical that a flashlight fulfills its promises and endures for many years. Additionally, a flashlight must be easy to use and safe. Lastly, the flashlight ought to adhere to the relevant regulations. It’s critical that the requirements are honest and unambiguous. The needs and preferences you have will determine which torch light is best for you. When choosing a torch light, take into account the following factors:
1. Brightness

50-lumen light are used to quantify a torch light’s brightness. For your intended purpose, think about how bright your torch light has to be. For outdoor activities like hiking or camping, you might desire a torch light with a larger brightness output.
2. Battery life

The type of battery and brightness setting utilized can have a significant impact on how long a torch light lasts. Think about how long the torch light should endure between charges or sets of batteries.
3. Dimensions

The portability and use of a torch light can be affected by its dimensions and weight. Take into account the torch light’s comfort level, particularly if you intend to use it for prolonged periods.
4. Durability

Consider its durability if you intend to use the torchlight for outdoor activities or in challenging conditions. 3D Cell Maglites Make sure the torch lights you choose are impact-resistant or waterproof.
5. Extra features

Certain torch lights may come with extra functions like zoom capabilities, strobe lights, or adjustable brightness levels. Think about the characteristics that would help you with your particular demands.
6. Cost
The cost of torch lights varies greatly. When choosing a torch light that suits your demands, consider your spending limit and how much you are ready to spend.
7. Special Operating Modes

To alert rescue personnel in an emergency, certain flashlights incorporate an automated “beacon” mode that flashes. Others have laser pointers integrated into them, which enables employees to identify a location they’re pointing to.
8. Bright, high-efficiency

LED bulbs are used in the majority of modern flashlights, however more affordable incandescent are still accessible.
9. Rechargeable

The majority of flashlights have a short battery life. Therefore, if you use your flashlight frequently, a rechargeable lithium battery might save expenses.
Difference between torchlight and flashlight
Torchlight might imply a more straightforward, practical gadget, whereas a flashlight might imply a more expensive or sophisticated gadget with extra characteristics like waterproofing, zoom capabilities, or strobe lights.
Summary
If you have the proper torchlight, you’ll be ready to tackle tasks in the dark. You can learn more about the equipment and tools you need to keep your business operating efficiently by visiting the Know-how Equipment area.
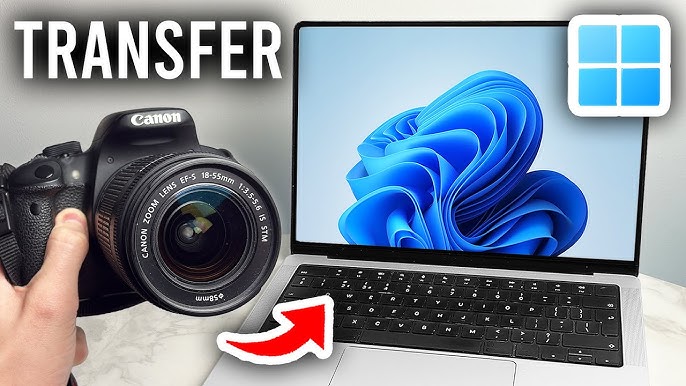
Video export from camera to computer. It’s simple to export videos from your camera to your computer. This makes it simple for you to access, modify, and distribute your video. You can guarantee a seamless and trouble-free transfer experience by adhering to these guidelines and best practices. enabling you to concentrate on expressing your imagination and making your video projects a reality.
VIDEO EXPORT FROM CAMERA TO COMPUTER
Use H.264 for 100% compatibility or HEVC (H.265) for better compression and smaller file sizes for high-quality video exports. Align the frame rate () and export resolution (1080p or 4K) with the source video. To guarantee clear, excellent results, aim for a higher bitrate (1080p). In the digital age, cameras have become powerful tools for capturing life’s moments in vivid detail. Whether you’re a professional filmmaker or an amateur enthusiast. To export videos from your camera to your computer is a fundamental skill that opens the door to editing, sharing, and preserving your precious footage. In this guide. We’ll walk you through the process of exporting videos from your camera to your computer, step by step.
Step 1: Connect Your Camera to Your Computer

The first step in transferring videos from your camera to your computer is establishing a physical connection between the two devices. Depending on your camera and computer, you may use a USB cable, memory card reader, or wireless transfer method. Ensure that your camera is powered on and in the appropriate mode for data transfer.
Step 2: Locate Your Videos;
Once your camera is connected to your computer, navigate to the folder or storage location where your videos are stored on the camera’s memory card or internal storage. This may vary depending on your camera model and settings. Look for a folder labeled “DCIM” (Digital Camera Images) or “Videos” to find your video files.
Step 3: Select and Copy Your Videos;

VIDEO EXPORT FROM CAMERA TO COMPUTER
With your videos located, you can now select and copy the files you wish to transfer to your computer. You can typically do this by clicking and dragging the video files from the camera’s storage folder to a folder on your computer’s hard drive. Alternatively, you can use the copy and paste commands or the import function in your computer’s file management software.
Step 4: Monitor the Transfer Process;
While your camera copies the video files to your PC. Keep an eye on the transfer process to make sure that every file is moved correctly and without any problems. Depending on the size and number of files, this process may take some time. Be patient and allow the transfer to complete before disconnecting your camera from your computer.
Step 5: Verify and Organize Your Videos;

VIDEO EXPORT FROM CAMERA TO COMPUTER
After the file process, pause to make sure all of the video files were successfully moved to your computer. Check the folder where you copied the files to make sure nothing was overlooked. This is also a good time to organize your videos into folders or directories based on date, event, or other criteria for easier access and management.
Step 6: Safely Eject Your Camera;

Before disconnecting your camera from your computer. It’s important to safely eject the device to avoid data corruption or loss. Depending on your operating system, you can typically do this by clicking on the eject. Or safely remove hardware icon in the taskbar or file explorer window. Once your camera is safely ejected, you can disconnect it from your computer.
Summary
Videos can be sent from a camera to a computer using Wi-Fi, a direct USB cable connection, or an SD card reader, which is the fastest method. Drag files from the DCIM or MP4_ROOT folder onto your computer after removing the memory card and inserting it into a card reader that is linked to the computer.

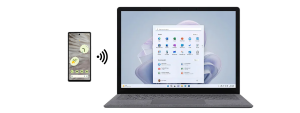
Phone and computer connection via Bluetooth. File transfers, screen mirroring, and data synchronization are made possible by connecting a phone to a computer by Bluetooth, Wi-Fi, or USB. For direct file access on Windows, utilize a USB cord or the Phone Link application. While iPhones primarily use Phone Link to sync calls and notifications, Android devices permit file transfers.
PHONE AND COMPUTER CONNECTION VIA BLUETOOTH
There are countless opportunities for smooth data transfer and communication when your PC and phone are connected via Bluetooth. Bluetooth technology offers a practical and effective way to stay connected across devices, whether you’re sharing files, tethering your internet connection, or managing media playback. You may maximize your wireless capabilities by simply establishing and maintaining Bluetooth connections between your computer and phone by following these easy steps.
Step 1: Enable Bluetooth on Your Phone and Computer;
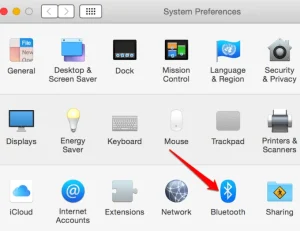
The first step is to ensure that both your phone and computer have Bluetooth capabilities enabled. On your phone, navigate to the settings menu and look for the Bluetooth option. Toggle the switch to enable Bluetooth. On your computer, access the Bluetooth settings through the system preferences or control panel and turn on Bluetooth.
Step 2: Pair Your Devices;
Once Bluetooth is enabled on both devices, it’s time to pair them. On your phone, go to the Bluetooth settings menu and select the option to search for nearby devices. Your computer should appear in the list of available devices. Select your computer from the list to initiate the pairing process.
Step 3: Verify the Pairing Code;
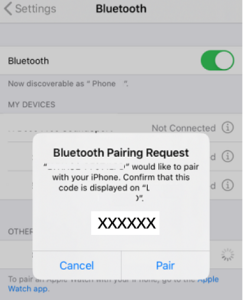
After selecting your computer, your phone may prompt you to enter a pairing code or confirm a passkey. Your computer will also display a pairing request notification. Verify that the pairing code or passkey shown on both devices matches and confirm the pairing.
Step 4: Complete the Pairing Process;
Once the pairing is confirmed, your phone and computer are now connected via Bluetooth. Depending on your device settings, you may need to grant permission for certain types of connections, such as file transfer or internet sharing. Follow any additional prompts to complete the pairing process.
Step 5: Test the Connection;
Phone and computer connection via Bluetooth
To ensure that the connection is successful, test the Bluetooth connection by transferring a small file between your phone and computer. You can also try using other Bluetooth-enabled features, such as tethering your phone’s internet connection to your computer or controlling media playback remotely.
Step 6: Disconnecting Your Devices;

Phone and computer connection via Bluetooth
When you’re done using the Bluetooth connection, it’s important to disconnect your devices to conserve battery life and prevent unwanted access. You can do this by turning off Bluetooth on either device or by selecting the option to disconnect or unpair the devices in the Bluetooth settings menu.
Summary
Connecting a phone to a computer enables file transfers, screen mirroring, and data syncing via USB cable, Bluetooth, or Wi-Fi. For Windows, use the Phone Link app or a USB cable for direct file access. Android devices allow file transfers, while iPhones mainly sync notifications and calls via Phone Link.
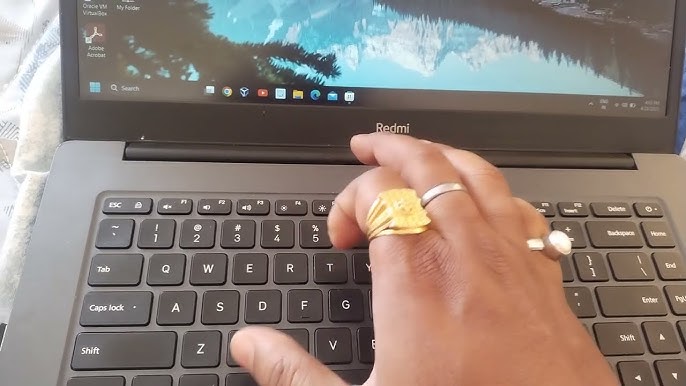
Tips for shutting down laptops. Data security and component durability are guaranteed when a laptop is properly shut down. Always shut down programs, save your work, and choose “Shut Down” from the Start Menu. To start a safe shutdown on Windows, press Alt+F4 on the desktop, press Win+X then U twice, or momentarily push the power button.
TIPS FOR SHUTTING DOWN LAPTOPS
Although shutting down your laptop can seem easy, doing it correctly will help preserve its functionality and increase its longevity. This thorough article will help you through the process of safely and effectively shutting down your laptop, regardless of your level of experience with technology.
Step 1: Save Your Work;

Before shutting down your laptop, it’s essential to save any open documents, projects, or applications to prevent data loss. Take a moment to close all programs and ensure that any unsaved changes are saved.
Step 2: Close All Applications;
Once your work is saved, close all open applications and programs running on your laptop. This not only frees up system resources but also ensures that no processes are interrupted during the shutdown process.
Step 3: Disconnect External Devices;
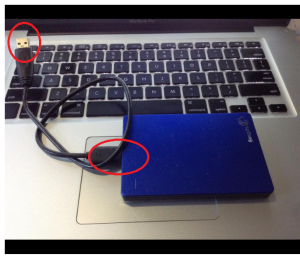
If you have any external devices connected to your laptop, such as USB drives, external hard drives, or peripherals, it’s a good idea to disconnect them before shutting down. This prevents potential data corruption and ensures a clean shutdown.
Step 4: Start the Shutdown Process;
To initiate the shutdown process, locate the power button on your laptop. Depending on your laptop model and operating system, the power button may be located on the keyboard, near the screen, or on the side of the laptop. Press and hold the power button for a few seconds until you see the shutdown options menu appear on the screen.
Step 5: Select the Shutdown Option;

Once the shutdown options menu appears, you’ll typically see several options, including “Shut down,” “Restart,” and “Sleep.” Use the arrow keys on your keyboard or the touchpad to navigate to the “Shut down” option and press the Enter key to select it.
Step 6: Wait for the Laptop to Power Off;
After selecting the shutdown option, your laptop will begin the shutdown process. Depending on your laptop’s hardware and the number of programs running, this process may take a few moments. Be patient and wait for your laptop to power off completely.
Step 7: Verify the Power Off;

TIPS FOR SHUTTING DOWN LAPTOPS
Once your laptop has powered off, verify that all lights on the laptop, including the power indicator light, have turned off. This indicates that the laptop has shut down completely and is no longer drawing power.
Step 8: Close the Lid;

TIPS FOR SHUTTING DOWN LAPTOPS
If you prefer, you can close the lid of your laptop after it has powered off. This helps protect the screen and keyboard from dust and debris when the laptop is not in use.
Summary
A straightforward yet crucial step in preserving your laptop’s functionality and extending its longevity is shutting it down correctly. You may guarantee a secure and effective shutdown procedure by following these guidelines, giving you the assurance and peace of mind to turn off your laptop.

Chatgpt side effects

Causes of nasal swelling

Lyrics for i will be here

A Step-by-Step Guide to Deleting Reels on Instagram

A Comprehensive Guide to Setting Up a YouTube Premiere

How to Create a WhatsApp Group
-

 Flight4 weeks ago
Plane Tickets Relevance
-

 Social media2 weeks ago
How to Delete Reels on IG
-

 Flight4 weeks ago
Airline Travellers and Baggage Allowances
-

 Social media1 week ago
Tips for likes and Followers on Facebook
-

 Music4 weeks ago
Lyrics for wetin you no fit do
-

 Social media1 week ago
Guidelines for Creating a Facebook Page