Social media
Guidelines for Uploading Videos on Youtube

Guidelines for uploading videos on youtube. A captivating title (less than 100 characters), a thorough description (up to 5,000 characters), and an eye-catching custom thumbnail are all necessary when uploading videos to YouTube. Setting visibility (Private, Unlisted, or Public), choosing the “Made for Kids” option, selecting the appropriate video category, and adding tags are important stages.
GUIDELINES FOR UPLOADING VIDEOS ON YOUTUBE
YouTube has emerged as a major global platform for content exchange in the current digital era. Uploading videos to YouTube is a skill worth acquiring, whether you’re a budding filmmaker, a company trying to reach a wider audience, or someone with a passion to share. Make an impression on the biggest video-sharing site in the world by following this detailed instructions.
1. Sign in to Your Account:


have a YouTube account. Sign in or create one if you haven’t already. Make sure you’re logged into the account you want to upload the video to.
2. Access the Upload Button:
Once you’re signed in, click on the “Create” button located at the top right corner of the YouTube homepage. From the dropdown menu, select “Upload Video.”
3. Select Your Video File:
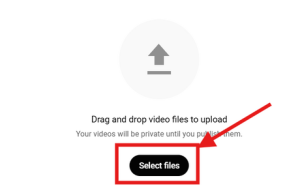

You’ll be prompted to select the video file you want to upload from your device. Click on “Select files to upload” and choose the video file from your computer or mobile device.
4. Add Video Details:
After selecting the video file, you’ll need to add some essential details:
– Title: Choose a descriptive and engaging title for your video.
– Description: Write a brief description of your video. Include relevant keywords to improve searchability.
– Tags: Add relevant tags to help users find your video when searching on YouTube.
– Thumbnail: Choose a captivating thumbnail that accurately represents your video. You can either select one of the suggested thumbnails or upload a custom one.
5. Set Visibility and Privacy Settings:
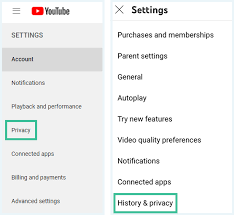

Decide whether you want your video to be public, unlisted, or private. Public videos are visible to anyone, unlisted videos are only accessible via direct link, and private videos are visible only to you and users you choose.
6. Choose Video Settings:
YouTube offers various settings to customize your video’s viewing experience:
– Audience: Specify whether your video is made for kids or not.
– Comments: Decide whether you want viewers to leave comments on your video.
– End Screens and Cards: Add end screens and cards to promote other videos, channels, or websites.
– Monetization: If your channel is eligible, you can enable monetization to earn money from ads displayed on your videos.
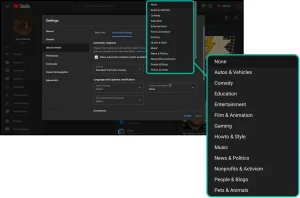
7. Select Video Category:

GUIDELINES FOR UPLOADING VIDEOS ON YOUTUBE
Choose the most appropriate category for your video. This helps YouTube recommend your video to the right audience.
8. Upload and Process:
Once you’ve filled in all the necessary details and settings, click the “Upload” button. The time it takes to upload and process your video depends on its length and file size. You can track the progress on the upload page.
9. Add Video Elements:
After the upload is complete, you can further enhance your video by adding elements such as end screens, cards, subtitles, and annotations using YouTube’s built-in editor.
10. Share Your Video:

GUIDELINES FOR UPLOADING VIDEOS ON YOUTUBE
Once your video is live, share it across your social media channels, embed it on your website, and encourage your audience to like, comment, and subscribe.
Summary
Your video has been successfully uploaded to YouTube. To expand your following and have an influence on YouTube, keep making and posting videos as well as sharing insightful information.