
TECHNOLOGY
Advantages of Students Laptops

ADVANTAGES OF STUDENTS LAPTOPS

Mobile computers that weigh about two kilograms and are fairly robust are called laptops or note books. The phrase “laptop” was first used in 1983. In the age of technology, schools and universities now employ computers to allow students to learn through multi media learning modules that creatively use all of the senses to teach subjects. Using laptops for instruction allows students to gain practical experience and develop their technological literacy. The World Wide Web is a knowledge highway. There are numerous ways that a laptop or notepad might help with learning. Laptops are popular due to their portability and the technological tools they provide
Advantages Of Students Laptops
Not only are they growing in popularity for usage at home, but many schools are also beginning to use them in the classroom. There are many benefits for students who use laptops, such as easier group work and study, quicker writing and editing, and more thorough and effective note keeping. All pupils, regardless of age or grade level, can benefit from laptops.
1. The laptop is constantly with you, along with your notes and references, and online libraries and other websites offer tools to assist students in formatting their assignments and references.
2. Students can type assignments, Digital Note-Taking share notes, collaborate on projects in groups, and take notes in class using a laptop.

3. Without paying exorbitant phone fees, students can converse and interact with friends and family over the internet.
4. Students can download music from the internet and see movies and video clips on laptops.
More Advantages
5. In order to make some extra cash, students can use laptops to design and develop software. Freelance writing is an option for people who are skilled in research or writing.
6. Students can download entire books from internet libraries and other websites. In addition to saving time and money, students can read texts from the 18th century to the present.
7. Laptops help kids become self-sufficient, teach them to type, help them manage their schedules, teach them how to budget using online planners, and help them become global citizens.

8. Students who have a laptop with an internet connection are more likely to learn and stay up to date on current events. The world is covered by online news sources, not simply a state or nation.
9. Students are encouraged by laptops to be IT experts. They stay up to date on the latest developments in the world.
10. Also, Convenience This portability is one of the biggest benefits of laptops. In contrast to desktop computers, which need a certain location and are immovable, laptops let you work, play, or access entertainment from almost anyplace.
Summary
Students’ learning and interactions with the outside world have been completely transformed by the usage of computers. The way students access, process, and interact with information has been completely transformed by computers. Students can communicate with people across the world, access and analyze information rapidly, and even produce their own digital content when they have access to the internet. In the future, computers will probably continue to be an essential component of modern schooling.







AI Benefits. By incorporating a variety of artificial intelligence (AI) skills that enable computers to understand, reason, learn, and behave similarly to people, this technological marvel transcends basic automation.By automating tedious operations, reducing errors, and analyzing vast volumes of data to make quick judgments, artificial intelligence (AI) offers significant advantages. It facilitates quicker work, cost savings, and the resolution of challenging issues in fields including daily work and health.
AI BENEFITS
Before discussing the advantages of artificial intelligence (AI), let’s first look at its definition. When viewed broadly, artificial intelligence (AI) allows a computer program to think and learn on its own. It mimics human intelligence in machines to carry out activities for which we frequently depend on humans.
1. Decrease in Human Error;

Reducing errors and improving accuracy and precision are two of artificial intelligence’s most important advantages. Every decision made by AI is based on a specific set of algorithms and previously collected data. Correct programming can decrease these errors to zero.
2. Making Decisions;
Making decisions is one of AI’s well-known advantages. AI improves decision-making by using massive data to spot trends and patterns that are frequently missed by humans. Businesses and people may make well-informed decisions fast and precisely by using machine learning algorithms, which can evaluate past data and forecast future events.
3. No Hazards;

AI Benefits
By allowing AI robots handle numerous dangers for us, humans can overcome them, which is another important advantage of AI. Machines having metal bodies can withstand hostile atmospheres and endure missions such as bomb defusing, space travel, and underwater exploration.
4. Online Support;
In order to reduce the need for human labor, some of the most modern organizations deploy digital assistants to engage with users. Conversational searches are made possible by the usage of digital assistants by many websites, which provide content in response to user inquiries. Sometimes chatbots are so intelligent that it’s hard to know if we’re speaking to a human or a machine.
5. Novelty;
AI Benefits
AI is the driving force behind many advances in almost every industry that enable people to solve the most difficult problems. For instance, new developments in AI-based technology have made it possible for medical professionals to identify breast cancer in women early.
Summary
The ability of a computer system or machine to carry out tasks that typically require human intelligence is known as artificial intelligence, or AI. Learning, reasoning, problem-solving, language comprehension, and image recognition are some of these tasks. On sites like Google AI, you may learn more about useful tools and developer initiatives.

Tech Trends to Look out for. Trends in technology to be aware of. The rate of change is accelerating due to the rapid advancement and change made possible by the rapid evolution of technology. IT workers are realizing that their careers won’t be the same in the contactless world of the future because not only are developing technologies and technology trends evolving, but much more has changed.
TECH TRENDS TO LOOK OUT FOR
Additionally, an IT worker in 2024 will be continuously learning, unlearning, and relearning—whether out of need or want. It means staying current with emerging technologies and their latest advancements. And it means anticipating what skills you’ll need to acquire in order to find a safe job tomorrow, as well as knowing how to get there.
What is a Technological Trend?

Technology trends refer to the prevailing developments, innovations, and advancements in the world of technology. These trends often shape the direction of industries, businesses, and society as a whole, influencing how we interact, work, and live.
Why is it Important?
Following technological trends is critical for both individuals and businesses because it keeps them competitive and relevant in a continuously changing digital market. Keeping up with changing technology allows you to make informed decisions about implementing new tools, enhancing processes, and capitalizing on growth prospects. Technology trends refer to current advances, inventions, and improvements in the field of technology.
Technological Trends to Watch out for;

Tech Trends to Look out for
1. AI-generated content. Artificial intelligence can create high-quality, creative content such as writing, photos, videos, and music. This technology uses algorithms like GPT (Generative Pre-trained Transformer) and DALL-E to comprehend and generate material that is relevant to human tastes.
2. Quantum Computing. Quantum computers use quantum mechanics to process information tenfold faster than conventional computers for specific tasks. which skills
Summary
Agentic AI systems that carry out multi-step activities on their own are important technological trends to keep an eye on. Advanced robotics and physical AI that combine vision and mechanics, Post-quantum cryptography, domain-specific language models, and IT infrastructure that is sustainable by design

Artificial Intelligence and the Future. Owing to constraints, this new field is now called “weak I.” But in the future, artificial intelligence will take the form of “creating powerful I.” I can currently only outperform humans in certain tasks, but it is expected that in the future I will be able to outperform humans in all cognitive tasks. The benefits and drawbacks of this development demonstrate how crucial it is to develop AI capabilities in order to carefully control and mold the future.
ARTIFICIAL INTELLIGENCE AND THE FUTURE
Precision healthcare, automated work forces, and embedded smart systems are all part of the future of AI. Global safety laws, customized compact models, and clever software agents are some of the major advancements.
What is intelligence?
Artificial Intelligence and the Future
Even the most complex insect activity is typically not interpreted as a sign of intelligence, whereas all human behavior but the most basic. What makes the difference? Examine the actions of Sphex ichneumonids, the digger wasp. When the female wasp comes back to her burrow with food, she puts it on the threshold, looks inside to see if there are any intruders, and only then, if all is well, brings her food inside. If the wasp moves the food a few inches away from her burrow entrance while she is inside, it reveals the true nature of her instinctive behavior: whenever she emerges, she will repeat the entire process as many times as the food is displaced. The notable lack of intelligence in the instance.
Growth of AI;
Artificial Intelligence and the Future
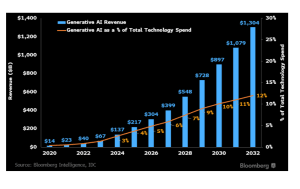
It is crucial to understand the definition and current state of artificial intelligence before exploring its future. AI is the capacity of computers or computer controlled robots to carry out tasks related to intelligence.” Thus, I am a branch of computer science whose goal is to develop intelligent machines that can mimic human behavior.
AI classification;
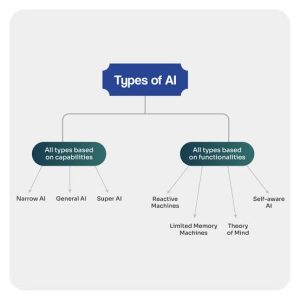
Based on its capabilities, artificial intelligence can be classified into three categories: Row I: Row II: Generic Row I:… Sub-I: computer
The Future;
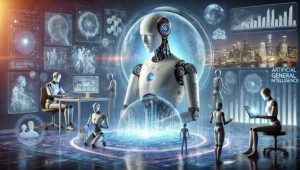
While artificial intelligence (AI) has a bright future, there are several challenges it must overcome. As technology advances, artificial intelligence (AI) is expected to become more and more commonplace, revolutionizing industries including finance, transportation, and healthcare. AI-driven automation will transform the labor sector and require new roles and competencies.
Summary
The capacity of computers and other devices to mimic human learning, thinking, and problem-solving is known as AI. Narrow AI, machine learning, and generative AI are important categories.

The Causes of Political Apathy

Child Neglect and Causes

Environment Care Tips

A Step-by-Step Guide to Deleting Reels on Instagram

A Comprehensive Guide to Setting Up a YouTube Premiere

How to Create a WhatsApp Group
-

 Business3 weeks ago
How to Promote your Business
-

 Fashion3 weeks ago
Fashion Guide for Beginners
-

 Business1 week ago
Customers Satisfaction
-

 Business3 weeks ago
Tips for Running Online Business
-

 Business2 weeks ago
Business Name Selection Tips
-

 TECHNOLOGY3 weeks ago
Artificial Intelligence and the Future