
TECHNOLOGY
A Guide to AR/VR Development

Augmented Reality (AR) and Virtual Reality (VR) are no longer confined to the realms of gaming. These technologies are transforming industries like education, healthcare, retail, and even real estate. With their immersive and interactive capabilities, AR and VR are shaping the future of how we work, learn, and play.
What is AR/VR Development?
– Augmented Reality (AR): Enhances the real-world environment by overlaying digital information, like images, sounds, and animations. Think Pokémon GO or IKEA’s Place app.
– Virtual Reality (VR): Creates fully immersive digital environments, allowing users to interact with a computer-generated world. VR headsets like Oculus Quest or HTC Vive offer these experiences.
AR/VR development involves creating applications, games, and experiences that leverage these technologies using specialized software and hardware.
Why AR/VR Development is Important

1. Demand Across Industries
– AR/VR is being used in healthcare for surgical simulations, in education for virtual classrooms, and in retail for virtual try-ons.
– Industries are investing in immersive tech to engage customers and improve efficiency.
2. Endless Creativity
– Developers can build worlds and solutions limited only by their imagination, blending art, design, and programming.
3. High Growth Potential
– With AR/VR’s global market expected to exceed $100 billion by 2030, skilled developers will be in high demand.
Skills Needed for AR/VR Development
To break into AR/VR development, you’ll need to master:
1. Programming

– Learn languages like C#, C++, and Python, which are commonly used in AR/VR projects.
2. Game Engines
– Tools like Unity and Unreal Engine are essential for creating 3D environments and interactive experiences.
3. 3D Modeling

•Knowledge of tools like Blender or Maya to design characters, objects, and environments.
4. AR/VR Frameworks
•Understand AR/VR-specific SDKs like ARCore, ARKit, and Vuforia for building applications.
5. UX/UI Design
•Design intuitive and immersive user experiences tailored for AR/VR interactions.
Steps to Get Started with AR/VR Development
1. Learn the Basics
•Begin with tutorials on Unity or Unreal Engine. Many platforms offer free AR and VR development courses.
2. Experiment with Hardware
•Invest in AR/VR devices like Oculus Quest, Microsoft HoloLens, or smartphones for AR testing.
3. Build Simple Projects
•Start small, such as creating a VR room or an AR app for object placement.
4. Join Communities
•Engage in AR’s/VR developer forums, GitHub projects, or hackathons to collaborate and learn.
5. Keep Learning
•AR/VR tech evolves rapidly; stay updated on new SDKs, tools, and trends.
The Future of AR/VR Development
As AR and VR technologies become more accessible, their integration into everyday life will expand. From virtual shopping malls to AR-powered fitness apps, the possibilities are endless. Developers who specialize in this field will not only have lucrative opportunities but also the chance to shape the way people interact with technology.
Now is the perfect time to dive into AR/VRs development and be part of this exciting journey into the future. With passion and persistence, you can create immersive experiences that leave a lasting impact!

Tips for eSIM installation. You may install an eSIM on your compatible device and take advantage of seamless connectivity wherever you go by following these simple steps. eSIM technology promises to make connecting our devices to cellular networks even simpler as it develops and spreads, opening the door to a more streamlined and connected digital experience.
TIPS FOR eSIM INSTALLATION
In recent years, the rise of eSIM activation technology has revolutionized the way we connect our devices to cellular networks. Unlike traditional SIM cards, which are physical, removable chips, eSIMs are embedded directly into devices, offering greater flexibility, convenience, and space-saving benefits. Whether you’re activating a new smartphone, tablet, smartwatch, or other compatible device, here’s a step-by-step guide on how to install an eSIM:
1. Check Device Compatibility;
Before attempting to install an eSIM, ensure that your device supports eSIM technology. Many modern smartphones, tablets, and wearable devices are equipped with eSIM capabilities, but it’s always best to verify compatibility with the manufacturer or your cellular provider.
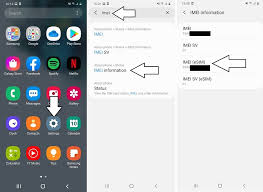
2. Obtain eSIM Activation Information;
Contact your cellular provider to obtain the necessary eSIM activation information, including the QR code or activation code required to provision the eSIM. This information is unique to your device and cellular plan and is essential for activating the eSIM.
3. Access eSIM Settings;
On your device, navigate to the settigs menu and locate the section related to cellular or mobile network settings. Depending on the device and operating system (iOS, Android, etc.), the location of the eSIM settings may vary. Look for options such as “Cellular,” “Mobile Network,” or “SIM & Network” to access eSIM settings.
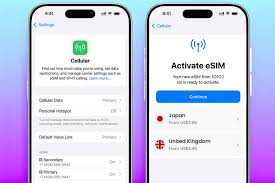
4. Add eSIM;
Once in the eSIM settings menu, look for an option to “Add eSIM” or “Add Cellular Plan.” Select this option to begin the eSIM activation process.
5. Scan QR Code or Enter Activation Code;

Depending on your cellular provider’s instructions, you will either need to scan a QR code or manually enter the activation code provided by your provider. Follow the on-screen prompts to complete this step.
6. Confirm esim Activation;
After scanning the QR code or entering the activation code, your device will prompt you to confirm the activation of the eSIM. Review the information carefully to ensure accuracy before proceeding.
7. Set Primary Line;

Tips for eSIM installation
If your device supports dual SIM functionality, you may have the option to set one of the SIM cards (physical or eSIM) as the primary line for calls, texts, and data. Choose your preferred configuration based on your usage preferences.
8. Complete esim Activation;
Once you’ve confirmed the activation details, your device will begin provisioning the eSIM with your cellular provider’s network settings. This process may take a few moments, so be patient and avoid interrupting the activation process.
9. Test Connectivity esim activation;
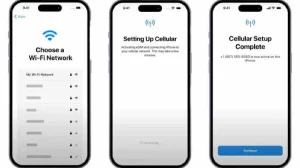
Tips for eSIM installation
After the eSIM activation is complete, test the connectivity of your device by placing a test call, sending a text message, or accessing the internet using cellular data. Ensure that all functions are working correctly before relying on the eSIM for regular use.
10. Enjoy Seamless Connectivity;

Tips for eSIM installation
With the eSIM successfully installed and activated, you can now enjoy the benefits of seamless connectivity without the need for a physical SIM card. Whether you’re traveling internationally, switching between multiple carriers, or simply streamlining your device setup, eSIM technology offers greater convenience and flexibility for modern users.
Summary
To install an eSIM, make sure your device is compatible, make sure your Wi-Fi connection is steady, then use your phone’s settings to scan the provider’s QR code. Install just before you leave or when you get there, making the QR code available in your photo gallery or email. When troubleshooting, do not remove the eSIM profile.

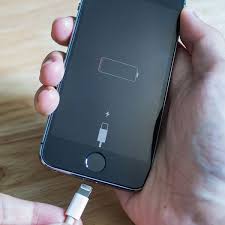
Phone charging mistakes. Use original or high-quality chargers, prevent excessive heat, and maintain charge levels between 20% and 80% to extend the life of your phone’s battery. Lithium-ion batteries are sometimes stressed when they are charged to 100% or allowed to drop to 0%, but their lifespan can be greatly increased—or even doubled—by restricting it to 80–85% (using built-in phone capabilities).
PHONE CHARGING MISTAKES
To charge your phone, insert a USB-C or Lightning cable that is compatible with the phone’s port and attach it to a power adapter that is plugged into a wall outlet. Use the original charger, store the phone somewhere cool, don’t use it, or activate Airplane Mode for quicker charging. By setting compatible devices on a charging base, wireless charging is another option.
1. Using Your Phone While It’s Being Charged;

Our dependence on our phones is great that we use them constantly, even when they are charging. When our mobile phones are charged, we use them a lot, which can strain the batteries. So try unplugging a call or sending someone a message.
2. Leaving Charger Attached To The Socket After Removing Mobile From It;
Maintaining a cellphone charger permanently plugged into the power can raise your electricity costs. In addition, it continues to release hear, which harm your charger and may possibly result in a short circuit.
3. Leaving Your Phone In A Case While Charging;
Phone charging mistakes
Our phone’s battery heats up during charging, and if we keep it covered or in a case, the heat gets trapped inside the device and damages the battery.
4. Installing Battery Saving Apps ;
The Google Play Store offers a wide selection of free battery-saving apps. You download them in the hopes that they may extend the life of your battery. However, in actuality, the majority of them likely to drain your battery more. Therefore, downloading these kinds of apps to your phone is not advised.
5. Allowing The Battery To Die Fully Before Charging;
Phone charging mistakes
As you may know, a notification to charge your phone appears when the battery is less than 20%. Consider the alert carefully, and make sure your phone is completely charged before using it again.This will shorten the battery’s lifespan. Additionally, avoid charging your battery more than 80% for regular use. However let your phone’s battery run completely flat for a month and then recharge it to 100% again.
Summary
We can prolong the charging process and increase the battery’s lifespan by avoiding the mistakes outlined below when charging our cellphones.

Tips for ring light usage. Ring lights are LED-powered, circular lighting devices intended for use in beauty, photography, and videography. With adjustable brightness and color temperature, they offer uniform, diffused illumination that lessens shadows on the subject. They are frequently used to create distinctive catchlights in the eyes and for close-ups and portrait photography.
TIPS FOR RING LIGHT USAGE
In order to minimize shadows and provide a “halo” effect, place the light directly in front of your face, just above eye level, with the camera centered inside the ring. Choose a color temperature of about 5600K for a natural daylight appearance, keep a distance of one to three feet from the subject, and adjust brightness to prevent washed-out skin.
HOW TO USE A RING LIGHT ;

Although, a ring light is a simple, relatively inexpensive way to get started with studio photography – and with the right approach, it can look really, really good. Here are just a few photos I’ve taken using a ring light:
But how can you use a ring light to create portraits like these? And furthermore, how can you go beyond standard ring light photography to capture photos that stand out from the crowd?
What is a ring light?

Meanwhile, a ring light is a circular, ring-shaped light designed to be placed directly in front of a subject. You then position your camera in the center of the ring and capture your photos.
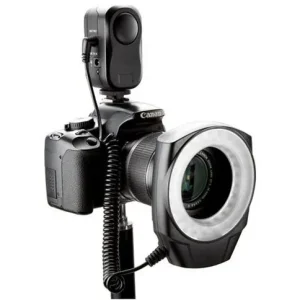
Here is a standard external ring light, photographed from the back (left) and front (right):
There are two types of rings lights you should be familiar with:
Off-camera ring lights, which attach to an external light stand, offer a wide band of illumination, and include a large aperture into which a camera can fit.
TWO EXAMPLES OF RING LIGHT
Smartphone ring lights;

Tips for ring light usage
Also, these compact ring lights are designed to be attached to smartphones so they are ideal if you enjoy taking photos on the go with your phone. They are typically lightweight and portable, making them convenient for spontaneous content creation
Macro ring lights;
Tips for ring light usage
However, these are specialised ring lights designed for macro photography. They attach to the front of macro lenses and provide close-up illumination for small subjects. Hard light is poor for macro photography so ring lights are essential for reducing shadows and emiting a soft light perfect for capturing intricate details.
Summary
In order to provide bright, even, shadow-free lighting, set your camera or smartphone in the center of a ring lamp placed immediately in front of your face or subject at eye level. Choose color temperatures that go well with your skin tone and adjust the brightness to prevent overexposure, usually from a distance of one to two feet.

Analysing kidney stones

Common causes of red urine

Honey benefits

A Step-by-Step Guide to Deleting Reels on Instagram

A Comprehensive Guide to Setting Up a YouTube Premiere


Pingback: Best Skills to Learn in 2025 - SimplExplainer
Pingback: Technical writing