Tech
Changing generator oil

Changing the oil in your generator is a critical maintenance task that ensures the engine runs smoothly and efficiently. Regular oil changes help prevent engine wear, overheating, and potential failure. Here is a step-by-step guide on how to change your generator’s oil:
Materials Needed
– Replacement oil (refer to your generator’s manual for the correct type and quantity)
– Use Oil filter (if applicable)
– Oil funnel
– Oil drain pan
– Wrench set
– Clean cloths or rags
– Disposable gloves
– Oil filter wrench (if applicable)
Step-by-Step Guide
1. Preparation
– Read the Manual: Before you begin, read your generator’s manual for specific instructions, oil type, and oil capacity.
– Gather Materials: Ensure you have all the necessary materials and tools within reach.
– Warm Up the Generator: Run the generator for a few minutes to warm up the oil. Warm oil drains more easily and carries more impurities out of the engine.
– Ensure Safety: Turn off the generator and disconnect it from any power sources. Let it cool slightly to avoid burns.
2. Drain the Old Oil
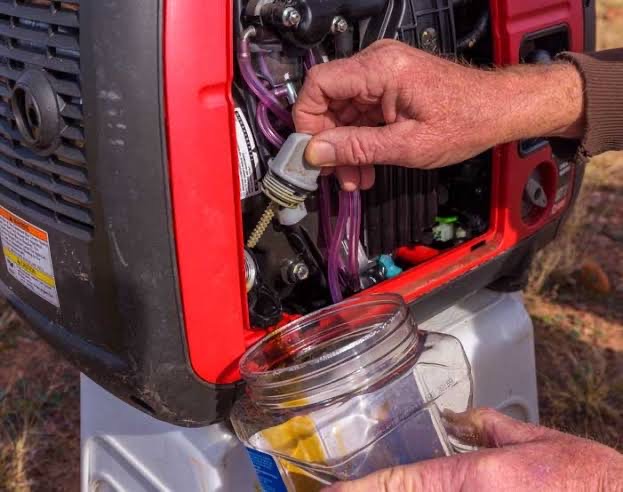

– Position the Generator: Place the generator on a flat, stable surface. Position the oil drain pan beneath the oil drain plug.
– Remove the Drain Plug: Using the appropriate wrench, carefully remove the oil drain plug. Allow the oil to drain completely into the pan. Be cautious, as the oil may still be hot.
– Remove the Oil Filler Cap: Removing the oil filler cap can help the oil drain more quickly by allowing air to flow into the crankcase.
3. Replace the Oil Filter (if applicable)
– Locate the Oil Filter: Refer to your generator’s manual to find the location of the oil filter.
– Remove the Old Filter: Using an oil filter wrench, remove the old oil filter. Be prepared for some oil spillage.
– Prepare the New Filter: Before installing the new oil filter, apply a small amount of fresh oil to the gasket on the top of the filter. This helps ensure a proper seal.
– Install the New Filter: Screw on the new filter by hand until the gasket contacts the mounting surface, then tighten it an additional half to three-quarters turn. Avoid over-tightening.
4. Refill with New Oil


– Replace the Drain Plug: Once the old oil has drained completely, replace and tighten the oil drain plug securely.
– Add New Oil: Insert a funnel into the oil fill hole and slowly add the recommended type and amount of oil. Pour gradually to avoid overfilling.
– Check Oil Level: Use the dipstick to check the oil level. The oil should be between the “low” and “full” marks. Add more oil if necessary, but avoid overfilling.
– Replace the Oil Filler Cap: Once the oil is at the correct level, securely replace the oil filler cap.
5. Check for Leaks and Clean Up
– Start the Generator: Run the generator for a few minutes to circulate the new oil. Check for any leaks around the oil filter and drain plug.
– Recheck Oil Level: After turning off the generator, wait a few minutes, then recheck the oil level and top up if necessary.
– Dispose of Used Oil Properly: Transfer the used oil to a sealed container and take it to a recycling center or an appropriate disposal facility. Never dispose of oil improperly, as it is harmful to the environment.
Tips for Effective Oil Changes
– Regular Maintenance: Follow the recommended oil change intervals specified in your generator’s manual. Regular oil changes are key to a long-lasting engine.
– Record Maintenance: Keep a log of oil changes, including the date, type of oil used, and any other maintenance performed. This can help you stay on top of your generator’s upkeep.
– Use Quality Oil and Filters: Always use the recommended oil type and high-quality filters to ensure optimal performance and protection for your engine.
By following these steps, you can keep your generator running smoothly and efficiently, ensuring it’s ready to provide reliable power whenever you need it.