
TECHNOLOGY
Environmental Impacts of Computers
ENVIRONMENTAL IMPACTS OF COMPUTERS
Environmental impacts of computers. Computers’ effects on the environment are a major worry in today’s technologically advanced society. The manufacture and disposal of computers and other electronic devices are contributing factors to several environmental problems. Computers have a significant impact on the environment, from the mining of raw materials for computer hardware to the energy usage of data centers. Promoting environmentally friendly design, manufacturing, and disposal methods for electronic devices is crucial to reducing the negative effects of computers on the environment.

ENVIRONMENTAL IMPACTS OF COMPUTERS
1. The Depletion of Resources
Also, Regarding the detrimental effects of computers on the environment, resource depletion is a significant worry. Significant amounts of natural resources, such as minerals, metals, and fossil fuels, are needed for the manufacture, usage, and disposal of computers.
2. Energy-related Use
The detrimental effects of computers on the environment and human health are largely related to energy consumption. Computer manufacturing and use consume a significant amount of energy, which contributes to greenhouse gas emissions.
3. Production of E-waste
In the modern world, the rapid growth of technology has led to the disposal of outmoded electronic gadgets, which has resulted in the generation of e-waste. The incorrect disposal of electronic waste can result in a number of health and environmental issues. In actuality, hazardous substances like lead, mercury, cadmium, and brominated flame retardants are found in electrical equipment.
4. Harmful Substances
Computers and other electronic equipment are produced and disposed of, contributing to the creation of e-waste, which presents serious health and environmental hazards. Among the main issues with e waste is the existence of hazardous compounds used in the production of electronic parts. Among these hazardous substances include lead, mercury, cadmium, and brominated flame retardants.
5. Implications of Computer
Use for Human Health Extended usage of computers can harm people’s health in a number of ways. Eye strain, which can cause headaches, impaired vision, and dry eyes, is one of the most prevalent health problems linked to computer use.

Tips for ring light usage. Ring lights are LED-powered, circular lighting devices intended for use in beauty, photography, and videography. With adjustable brightness and color temperature, they offer uniform, diffused illumination that lessens shadows on the subject. They are frequently used to create distinctive catchlights in the eyes and for close-ups and portrait photography.
TIPS FOR RING LIGHT USAGE
In order to minimize shadows and provide a “halo” effect, place the light directly in front of your face, just above eye level, with the camera centered inside the ring. Choose a color temperature of about 5600K for a natural daylight appearance, keep a distance of one to three feet from the subject, and adjust brightness to prevent washed-out skin.
HOW TO USE A RING LIGHT ;

Although, a ring light is a simple, relatively inexpensive way to get started with studio photography – and with the right approach, it can look really, really good. Here are just a few photos I’ve taken using a ring light:
But how can you use a ring light to create portraits like these? And furthermore, how can you go beyond standard ring light photography to capture photos that stand out from the crowd?
What is a ring light?

Meanwhile, a ring light is a circular, ring-shaped light designed to be placed directly in front of a subject. You then position your camera in the center of the ring and capture your photos.
Here is a standard external ring light, photographed from the back (left) and front (right):
There are two types of rings lights you should be familiar with:
Off-camera ring lights, which attach to an external light stand, offer a wide band of illumination, and include a large aperture into which a camera can fit.
TWO EXAMPLES OF RING LIGHT
Smartphone ring lights;

Tips for ring light usage
Also, these compact ring lights are designed to be attached to smartphones so they are ideal if you enjoy taking photos on the go with your phone. They are typically lightweight and portable, making them convenient for spontaneous content creation
Macro ring lights;
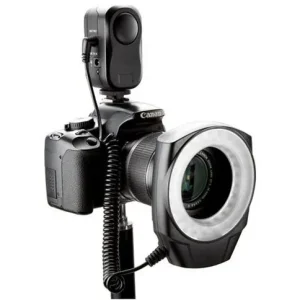
Tips for ring light usage
However, these are specialised ring lights designed for macro photography. They attach to the front of macro lenses and provide close-up illumination for small subjects. Hard light is poor for macro photography so ring lights are essential for reducing shadows and emiting a soft light perfect for capturing intricate details.
Summary
In order to provide bright, even, shadow-free lighting, set your camera or smartphone in the center of a ring lamp placed immediately in front of your face or subject at eye level. Choose color temperatures that go well with your skin tone and adjust the brightness to prevent overexposure, usually from a distance of one to two feet.

Tips for shutting down Iphone. It’s crucial to know how to correctly shut down your iPhone for a number of reasons, such as extending battery life, resolving problems, or just taking a break. You may confidently turn off your iPhone anytime needed by following the instructions in this article. Gaining proficiency with this fundamental feature will guarantee a more seamless interaction with your iPhone, regardless of your level of experience.
TIPS FOR SHUTTING DOWN IPHONE
To turn off an iPhone, hold down the side and volume buttons (or, on previous models, only the side button) until a slider displays. Then, drag to turn off the device. Alternatively, to turn it off, select Settings > General > Shut Down.
Step 1: Locate the Side Button

The side button, located on the right side of your iPhone, serves multiple functions, including powering on/off your device, activating Siri, and taking screenshots. It’s important to differentiate between a quick press and a long press for shutting down the device.
Step 2: Simultaneously Press Side Button and Volume Button
To initiate the power off process, simultaneously press and hold the side button and one of the volume buttons (either the volume up or volume down button) on your iPhone. Hold both buttons down at the same time until the “slide to power off” slider appears on the screen.
Step 3: Slide to Power Off

Tips for shutting down Iphone
Once the “slide to power off” slider appears, release the side button and volume button. You can then use your finger to slide the slider from left to right to power off your iPhone.
After sliding the power off slider, your iPhone will begin the shutdown process. Depending on your device model and any ongoing tasks, this process may take a few moments. Once shut down, your iPhone’s screen will go completely black, indicating that it is powered off.
Power On Your iPhone;

Tips for shutting down Iphone
To power on your iPhone again, simply press and hold the side button until the Apple logo appears on the screen. Your device will then boot up, and you can use it as usual.
Summary
Holding the side button and any volume button (Face ID) or only the side button (Home button) and sliding the slider will shut down your iPhone to improve efficiency and free up RAM. Use a forced restart (volume up, down, then hold the side button) for devices that are frozen. For optimal effects, leave it off for at least five minutes.
Video export from camera to computer. It’s simple to export videos from your camera to your computer. This makes it simple for you to access, modify, and distribute your video. You can guarantee a seamless and trouble-free transfer experience by adhering to these guidelines and best practices. enabling you to concentrate on expressing your imagination and making your video projects a reality.
VIDEO EXPORT FROM CAMERA TO COMPUTER
Use H.264 for 100% compatibility or HEVC (H.265) for better compression and smaller file sizes for high-quality video exports. Align the frame rate () and export resolution (1080p or 4K) with the source video. To guarantee clear, excellent results, aim for a higher bitrate (1080p). In the digital age, cameras have become powerful tools for capturing life’s moments in vivid detail. Whether you’re a professional filmmaker or an amateur enthusiast. To export videos from your camera to your computer is a fundamental skill that opens the door to editing, sharing, and preserving your precious footage. In this guide. We’ll walk you through the process of exporting videos from your camera to your computer, step by step.
Step 1: Connect Your Camera to Your Computer

The first step in transferring videos from your camera to your computer is establishing a physical connection between the two devices. Depending on your camera and computer, you may use a USB cable, memory card reader, or wireless transfer method. Ensure that your camera is powered on and in the appropriate mode for data transfer.
Step 2: Locate Your Videos;
Once your camera is connected to your computer, navigate to the folder or storage location where your videos are stored on the camera’s memory card or internal storage. This may vary depending on your camera model and settings. Look for a folder labeled “DCIM” (Digital Camera Images) or “Videos” to find your video files.
Step 3: Select and Copy Your Videos;

VIDEO EXPORT FROM CAMERA TO COMPUTER
With your videos located, you can now select and copy the files you wish to transfer to your computer. You can typically do this by clicking and dragging the video files from the camera’s storage folder to a folder on your computer’s hard drive. Alternatively, you can use the copy and paste commands or the import function in your computer’s file management software.
Step 4: Monitor the Transfer Process;
While your camera copies the video files to your PC. Keep an eye on the transfer process to make sure that every file is moved correctly and without any problems. Depending on the size and number of files, this process may take some time. Be patient and allow the transfer to complete before disconnecting your camera from your computer.
Step 5: Verify and Organize Your Videos;

VIDEO EXPORT FROM CAMERA TO COMPUTER
After the file process, pause to make sure all of the video files were successfully moved to your computer. Check the folder where you copied the files to make sure nothing was overlooked. This is also a good time to organize your videos into folders or directories based on date, event, or other criteria for easier access and management.
Step 6: Safely Eject Your Camera;

Before disconnecting your camera from your computer. It’s important to safely eject the device to avoid data corruption or loss. Depending on your operating system, you can typically do this by clicking on the eject. Or safely remove hardware icon in the taskbar or file explorer window. Once your camera is safely ejected, you can disconnect it from your computer.
Summary
Videos can be sent from a camera to a computer using Wi-Fi, a direct USB cable connection, or an SD card reader, which is the fastest method. Drag files from the DCIM or MP4_ROOT folder onto your computer after removing the memory card and inserting it into a card reader that is linked to the computer.

Exam success tips for waec

Tips for jamb success

Plastic water bottle hazards

A Step-by-Step Guide to Deleting Reels on Instagram

A Comprehensive Guide to Setting Up a YouTube Premiere

How to Create a WhatsApp Group
-

 Social media2 weeks ago
How to Delete Reels on IG
-

 Social media1 week ago
Tips for likes and Followers on Facebook
-

 Social media1 week ago
Guidelines for Creating a Facebook Page
-

 Photography1 week ago
Photography and Outdoors
-

 Social media2 weeks ago
Guidelines for Uploading Videos on Youtube
-

 Music1 week ago
Lyrics for Iké Nilé