Tech
How to connect flash drive with TV

In today’s digital age, smart TVs offer a plethora of features, including the ability to connect external devices for added convenience and entertainment. One such device is a flash drive, which allows users to access and enjoy media files directly on their TV screens. If you’re wondering how to harness the power of your smart TV with a flash drive, follow these simple steps to get started:
1. Check TV Compatibility:
Before connecting your flash drive, ensure that your smart TV supports USB connectivity. Most modern smart TVs come equipped with USB ports, typically located on the side or back of the TV. Consult your TV’s user manual or specifications to confirm the availability of USB ports.
2. Prepare Your Flash Drive:
Insert your flash drive into an available USB port on your smart TV. Ensure that the flash drive is formatted correctly and contains the media files you wish to access. Supported file formats may vary depending on your TV model, but common formats include MP4, AVI, MKV for video, and MP3 for audio.
3. Access the Media Player:
Once the flash drive is inserted, use your TV remote to navigate to the media player or file explorer application. This may be labeled differently depending on your TV’s manufacturer, but it is typically found in the main menu or home screen.
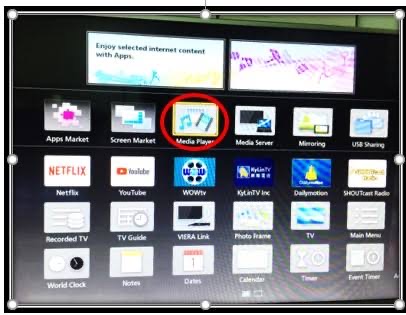
4. Locate and Play Media Files:
Within the media player or file explorer, navigate to the USB drive or external storage option. You should see a list of available media files on your flash drive. Use the remote to select the desired file and press the play button to begin playback. Depending on your TV’s capabilities, you may also have the option to organize files by category or create playlists for easy access.
5. Adjust Playback Settings (Optional): Depending on your preferences, you may want to adjust the playback settings such as audio language, subtitles, or aspect ratio. Use the on-screen menu or remote control to access these settings and make any necessary adjustments.
6. Eject Flash Drive Safely:
Once you’re finished using the flash drive, it’s essential to eject it safely to avoid data corruption or loss. Navigate to the USB settings or storage options on your TV. And select the option to safely remove the flash drive. Wait for the TV to indicate that it’s safe to remove the flash drive before physically unplugging it from the USB port.
With these simple steps, you can easily connect a flash drive to your smart TV. Enjoy your favorite media content directly on the big screen. Whether you’re watching movies, viewing photos, or listening to music. The ability to access external storage devices adds versatility and convenience to your smart TV viewing experience.


Review of wifi and laptop. The internal hardware and software of a laptop have a significant impact on its Wi-Fi performance; the most recent standards, such as Wi-Fi 6 or 6E, provide faster and more dependable connections. Though its hardware limits its gaming potential, reviews for particular laptops, such as the Primebook Wifi, emphasize its strong performance for daily tasks like browsing and streaming. A general review of “WiFi and laptop” depends on the specific laptop being examined, as reviews of laptops differ greatly depending on the model.
REVIEW OF WIFI AND LAPTOP
Identifying and fixing the root cause of your laptop’s Wi-Fi problems requires a methodical approach. You can frequently get a steady Wi-Fi connection back by making sure the network is operating properly, checking to see if Wi-Fi is enabled, updating drivers, reviewing network settings, and resolving interference or range problems. If the issue continues, it would be worthwhile to get expert technical assistance in order to identify and resolve any more complicated problems.
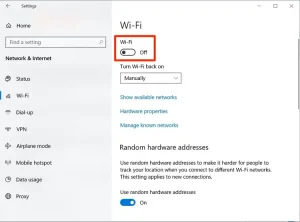
1. Wi-Fi is Disabled on Your Laptop;
REVIEW OF WIFI AND LAPTOP
Reason:
Sometimes, the Wi-Fi on your laptop might be disabled either through a physical switch or a function key.
Solution:
– Check Physical Switch: Some laptops have a physical switch or button to turn Wi-Fi on and off. Ensure it’s turned on.
– Use Function Keys: Look for the Wi-Fi icon on the function keys (usually F1-F12) and press the corresponding key, often in combination with the “Fn” key.
2. Wi-Fi Network Issues;

REVIEW OF WIFI AND LAPTOP
Reason:
The problem might not be with your laptop but with the Wi-Fi network itself.
Solution:
– Restart Router/Modem: Turn off your router and modem, wait for about 30 seconds, and then turn them back on.
– Check Other Devices: Ensure other devices can connect to the same Wi-Fi network. If not, the issue is likely with the network.
3. Incorrect Network Settings;

REVIEW OF WIFI AND LAPTOP
Reason:
Your laptop might have incorrect network settings, such as a wrong IP address or DNS server.
Solution:
– Forget and Reconnect to Network: Go to your Wi-Fi settings, select the problematic network, choose “Forget,” and then reconnect by entering the password again.
– Renew IP Address: Open Command Prompt and type ipconfig /release followed by ipconfig /renew to refresh your IP settings.
4. Outdated Wi-Fi Drivers;
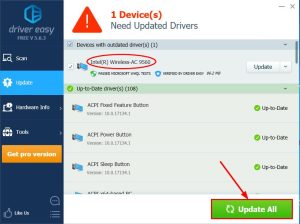
Reason:
Outdated or corrupt drivers can prevent your laptop from connecting to Wi-Fi.
Solution:
– Update Wi-Fi Drivers: Go to Device Manager, find your Wi-Fi adapter under “Network adapters,” right-click, and select “Update driver.” Follow the prompts to search for updated drivers.
– Reinstall Wi-Fi Drivers: If updating doesn’t work, uninstall the driver and restart your laptop. It should automatically reinstall the correct drivers.
5. Interference or Range Issues;

Reason:
Physical obstructions or interference from other electronic devices can affect Wi-Fi connectivity.
Solution:
– Move Closer to Router: Ensure your laptop is within a reasonable range of your Wi-Fi router, ideally in the same room or within a clear line of sight.
– Reduce Interference: Keep your laptop and router away from other electronic devices that might cause interference, such as microwaves or cordless phones.
Summary
Experiencing issues with your laptop’s Wi-Fi connection can be frustrating, especially when you need to be online for work or leisure. Here are five common reasons why your laptop might not connect to Wi-Fi and solutions to resolve each issue.

Iphone storage tips. You are aware of the inconvenience that comes with having insufficient space on your device. Receiving messages, installing new apps, taking pictures, syncing media files, installing iOS upgrades, and doing other tasks that require storage space are all rendered impossible when your iPhone’s storage is full. Additionally, your photos and apps may become erratic, and your iPhone may begin to erase messages on its own.
IPHONE STORAGE TIPS
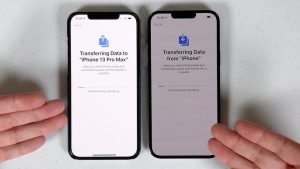
To ensure a seamless transition and increase the efficiency of your new phone, free up storage on your iPhone XR before moving data to an iPhone 13. Here are a few ways to make room on your iPhone XR. You can guarantee a seamless transfer to your new iPhone and clear up a substantial amount of space on your iPhone XR by following these instructions.
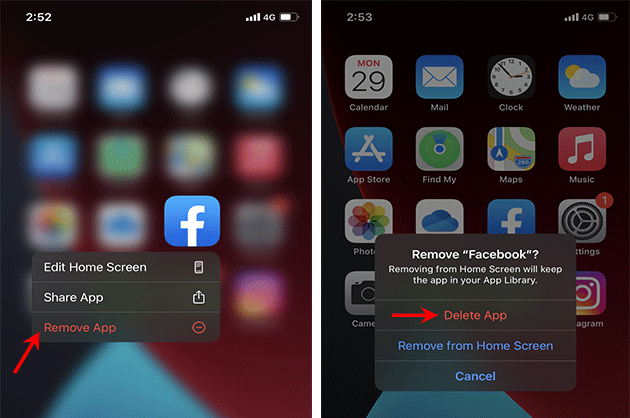
1. Delete Unnecessary Apps;
• Review Installed Apps: Go through your apps and delete any that you no longer use.
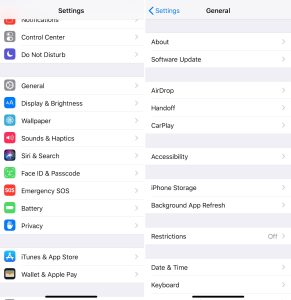
• Offload Unused Apps: This feature, found under Settings > General > iPhone Storage, removes the app but keeps its documents and data. You can reinstall the app later if needed.
2. Clear Cache and Data
• Safari Cache: Clear your Safari cache by going to Settings > Safari > Clear History and Website Data.
• App Cache: For some apps, you may need to go into the app’s settings to clear cached data.
3. Manage Photos and Videos on the storage;
– iCloud Photos: Enable iCloud Photos in Settings > [Your Name] > iCloud > Photos. Select “Optimize iPhone Storage” to store smaller versions on your device while keeping the originals in iCloud.
– Delete Unwanted Media: Go through your Photos app and delete any photos or videos you no longer need. Remember to empty the “Recently Deleted” album.
– Use Third-Party Storage: Transfer photos and videos to services like Google Photos or Dropbox and then delete them from your device.
4. Remove Old Messages;
– Message Attachments: Review large attachments in Messages by going to Settings > General > iPhone Storage > Messages and deleting any large attachments you don’t need.
– Message History: Set messages to delete automatically after a certain period. Go to Settings > Messages > Keep Messages and select either 30 days or 1 year.
5. Review Downloads and Documents;
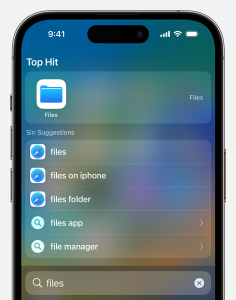
• Files App: Go through the Files app and delete any downloaded documents you no longer need.
• Email Attachments: Delete large email attachments or old emails with large attachments.
6. Manage Music and Podcasts;
• Music: Delete songs or albums you no longer listen to. You can also stream music instead of downloading it.
• Podcasts: Delete old podcast episodes that you have already listened to. Go to Settings > Podcasts to manage your download settings.
7. Use Storage Management Recommendations;

Iphone storage tips
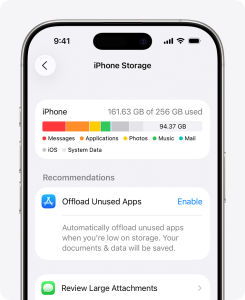
• iPhone Storage Recommendations: Go to Settings > General > iPhone Storage to see recommendations from Apple on how to save space. Follow these suggestions to free up additional space.
Final Steps to get more storage:
Backup and Transfer;

Iphone storage tips
– Backup Your iPhone XR:
Use iCloud or iTunes/Finder to back up your iPhone XR before transferring data to your iPhone 13.
– Transfer Data to iPhone 13:
Iphone storage tips
When setting up your iPhone 13, choose to restore from an iCloud backup or use the Quick Start feature to transfer data directly from your iPhone XR.
Summary
Manage apps by removing or unloading those that aren’t being used, and remove big data like attachments and videos to increase iPhone capacity. Optimize your Photos library by managing huge downloads from streaming and podcast apps, clearing the cache in Safari, and turning on iCloud Photos or offloading original files.

What is Motion graphics. With their dynamic animations, breathtaking visuals, and smooth text-graphics integration, motion graphics have emerged as a potent medium for visual storytelling. We’ll go into the intriguing realm of motion graphics in this post, looking at its history, uses, and creative potential.
What are Motion Graphics?
this is a typical example of it;

WHAT IS MOTION GRAPHICS
Animated graphics that combine sound, visual effects, and movement to improve narrative, elicit strong feelings, and transmit information are called motion graphics. As opposed to conventional animation, which frequently include characters and storylines. They are are primarily concerned with animated graphical elements—such as typography, shapes, and imagery that provide captivating visuals.
Origins of Motion Graphics:
They have their origins in the early stages of cinema. where moving images were produced using methods like optical effects and stop-motion animation. With the advent of computer technology and digital animation software in the late 20th century. It evolved into a distinct art form, finding applications in film, television, advertising, and digital media.
Applications:
Many different media outlets and sectors use it, including:
1. Advertising:

WHAT IS MOTION GRAPHICS
They are a popular choice for advertising campaigns, allowing brands to convey messages and showcase products in visually compelling ways. From animated logos to explainer videos, it help brands stand out and engage audiences in crowded markets.
2. Film and Television:
It plays a crucial role in film and television productions, from title sequences and visual effects to informational graphics and animated infographics. They help set the tone, enhance storytelling, and create immersive viewing experiences for audiences.
3. Digital Media:

WHAT IS MOTION GRAPHICS
In the digital age, they are everywhere, from social media posts and website banners to online presentations and interactive content. They grab attention, convey information quickly, and drive engagement, making them an essential tool for digital marketers and content creators.
4. Education and Training:

They are also used in educational and training materials to explain complex concepts, visualize data, and engage learners. Animated tutorials, instructional videos, and interactive simulations help make learning more accessible and engaging.
Creative Possibilities:

One of the most exciting aspects of it is its creative versatility. With the right tools and imagination, it’s artists can bring virtually any idea to life. From abstract animations and experimental art to corporate branding and commercial projects, the possibilities are endless.
Artists use a variety of software tools, including Adobe After Effects, Cinema 4D, and Blender. To create stunning visual effects, intricate animations, and seamless motion sequences. They combine design principles such as typography, color theory. And composition with animation techniques such as keyframing, easing, and timing to craft compelling motion graphics.
Summary
For visual storytelling, they are a dynamic and adaptable medium that provide countless creative opportunities across media platforms and industries. regardless of your level of experience or inexperience as an animation graphics artist. Investigating this realm reveals a realm of artistic expression, inventiveness, and originality. So gather your resources, let your creativity run wild, and explore its fascinating universe!
Multiple System Atrophy

Key Relevance of Monounsaturated Fats

Best Proteinous Fruits

A Step-by-Step Guide to Deleting Reels on Instagram

A Comprehensive Guide to Setting Up a YouTube Premiere