Tech
How to Delete Your Article on WordPress: A Step-by-Step Guide

Deleting an article on WordPress is a straightforward process, but it’s essential to proceed with caution to ensure that you’re removing the right content and avoiding any unintended consequences. Whether you’ve published a post with errors, outdated information, or simply changed your mind about its relevance, this step-by-step guide will walk you through the process of deleting your article on WordPress.
Step 1
Log in to Your WordPress Dashboard,
Begin by logging in to your WordPress dashboard using your username and password. Once logged in, you’ll be taken to the WordPress admin area where you can manage your website’s content, settings, and users.
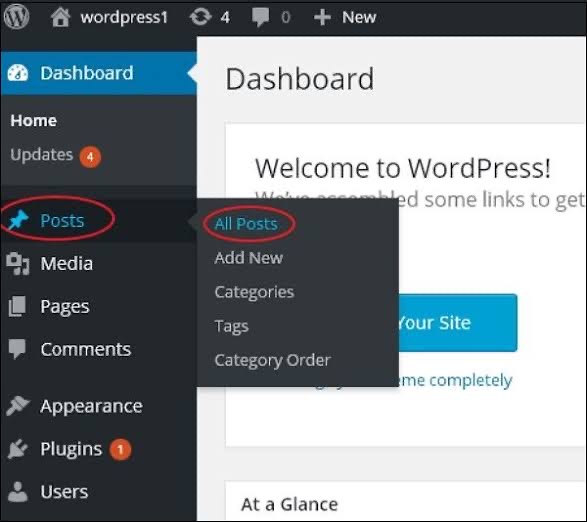
Step 2
Navigate to the Posts or Pages Section, Depending on whether your article is a blog post or a static page, navigate to the appropriate section in the WordPress dashboard. To delete a blog post, click on “Posts” in the left-hand menu. To delete a static page, click on “Pages” instead.

Step 3
Locate the Article You Want to Delete, Once you’re in the Posts or Pages section, locate the specific article you want to delete from your WordPress website. You can use the search bar or browse through the list of published articles to find the one you’re looking for.
Step 4
Edit the Article Hover your mouse over the title of the article you want to delete, and several options will appear beneath it. Click on the “Edit” option to open the article editor and make changes to the content if necessary. This step is optional but can be useful if you want to review the article before deleting it.
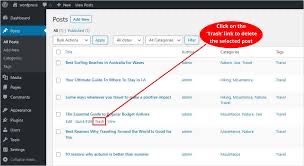

Step 5
Move the Article to Trash, After reviewing the article (if desired), click on the “Move to Trash” link located in the right-hand sidebar of the article editor. Confirm the action when prompted to move the article to the trash. Alternatively, you can also click on the “Trash” link directly from the list of articles in the Posts or Pages section and select the article you want to delete.
Step 6
Empty the Trash (Optional), Once you’ve moved the article to the trash, it will remain there until you permanently delete it. To permanently remove the article from your WordPress website, click on the “Trash” link in the Posts or Pages section, select the article, and click on the “Empty Trash” button. Confirm the action when prompted, and the article will be permanently deleted from your site.
Congratulations! You’ve successfully deleted your article on WordPress. By following these simple steps, you can remove unwanted or outdated content from your website and ensure that your WordPress site remains relevant and up to date. Remember to double-check the article you’re deleting to avoid accidentally removing valuable content, and consider archiving or updating articles instead of deleting them entirely whenever possible.