Tech
Adding Inbound Links to Your WordPress Articles

Inbound links, also known as internal links, play a crucial role in enhancing the user experience, improving SEO, and increasing the visibility of your content on WordPress. By strategically adding inbound links to your articles, you can guide readers to related or relevant content within your website, encourage exploration, and establish a logical hierarchy of information. In this guide, we’ll walk you through the process of adding inbound links to your WordPress article.
Step 1: Log in to Your WordPress Dashboard
Begin by logging in to your WordPress dashboard using your username and password. Once logged in, navigate to the post or page editor where you want to add the inbound link.
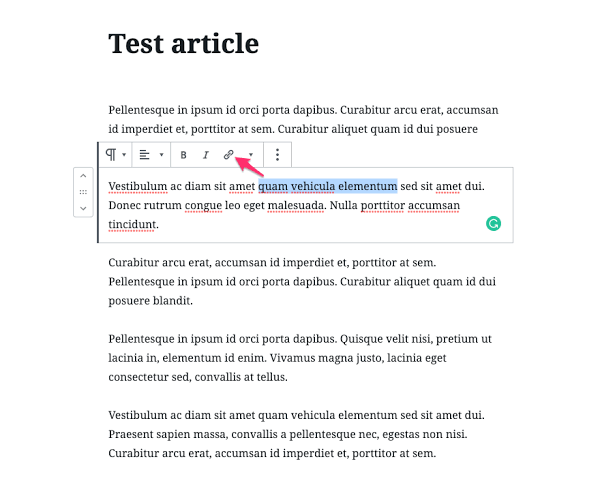
Step 2: Highlight the Text You Want to Link
Within the post or page editor, select the text that you want to turn into an inbound link. This could be a relevant keyword, phrase, or descriptive anchor text that provides context for the linked content.
Step 3: Click the Insert/Edit Link Button
After highlighting the text, click on the “Insert/Edit Link” button in the toolbar above the editor. It looks like a chain link icon and is typically located next to other formatting options like bold and italic.

WordPress inbound links guides
Step 4: Enter the URL of the Target Page
In the pop-up window that appears, enter the URL of the target page that you want to link to. You can either type the URL directly into the field or paste it from your browser. Make sure to include the full URL, including the “http://” or “https://” prefix.
Step 5: Add Link Options (Optional)
Optionally, you can configure additional link options before inserting the inbound link. These options include setting the link to open in a new tab, adding a title attribute for accessibility, and specifying link rel attributes for SEO purposes. Adjust these settings as needed, then click the “Add Link” button to insert the inbound link.
Step 6: Review and Publish Your Article
After adding the inbound link, review your article to ensure that the link appears as intended and functions correctly. You can do this by previewing the post or page in the WordPress editor or by viewing it on the frontend of your website. Once you’re satisfied with the placement and functionality of the inbound link, click the “Publish” or “Update” button to save your changes and make the article live on your website.
Congratulations! You’ve successfully added an inbound link to your WordPress article. By incorporating relevant internal links into your content, you can improve navigation, enhance SEO, and provide additional value to your readers by guiding them to related or relevant information within your website. Remember to regularly audit and update your inbound links to ensure that they remain accurate and beneficial to your audience.
Pingback: How to Delete Your Article on WordPress: A Step-by-Step Guide - SimplExplainer
Pingback: adding Wordpress media
Pingback: Pictures and Wordpress Content - SimplExplainer