TECHNOLOGY
How to Develop System Software
HOW TO DEVELOP SYSTEM SOFTWARE
How to develop system software. A software development process is more than just the process of creating a software product. It is a method of producing a high-quality solution by segmenting the job into smaller stages that can be completed either concurrently or sequentially. Getting a high-end product fast without sacrificing quality is its main objective.

HOW TO DEVELOP SYSTEM SOFTWARE
1. One is brainstorming
However, With so many new IT products and technical advancements in recent years, it can be difficult to come up with creative ideas. Product and project managers, together with engineers, must think worldwide in order to design a software program that is wanted in the market and, in general, offers something distinctive because of a number of unconventional solutions.
2. Examining business
Meanwhile, Before making a significant investment in the project, the CEO and every team member must conduct a feasibility study. The feasibility study can demonstrate how to make your software profitable over the long term and assess all technical and economic aspects that impact the project’s progress.
3. Choosing the tech stack and crew size
Also, You should create a comprehensive list of technologies to be used in software development after you know what to look for. The programming languages, tools, and frameworks needed for the project’s implementation should be determined by the operating system.
4. Design
However, The design phase of the SDLC is when the product is conceptualized. The design is created by the requirements that are outlined in the first two phases of software development.
5. Programming
Meanwhile, This is where developers begin their coding careers. Programmers are each responsible for their list of coding chores related to software development. It is project managers who oversee the software development process.
6. Integration
Also, Integrating all sources and settings is essential to determining how to develop software programs effectively since it allows for the timely identification of problems, conflicts, and faults.


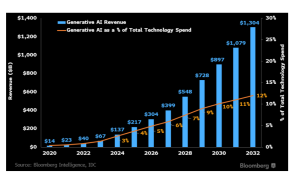
AI and the future. The ability of computing systems to carry out tasks commonly associated with human intellect, including as learning, reasoning, problem-solving, perception, and decision-making, is known as artificial intelligence (AI). It is a branch of computer science study that creates and examines techniques and software that allow machines to sense their surroundings and use intelligence and learning to conduct actions that optimize their odds of accomplishing predetermined objectives.
AI AND THE FUTURE
In industries like healthcare, finance, and manufacturing, AI’s advantages include increasing productivity, automating repetitive tasks, decreasing human error, and facilitating quicker, data-driven decisions that result in lower costs and better customer experiences. It can also handle hazardous jobs and personalize services. It increases productivity by enabling people to work creatively, provides round-the-clock access, and stimulates creativity through deeper insights and scalable solutions, revolutionizing everyday life and commercial operations.
What is intelligence?

AI AND THE FUTURE
Even the most complex insect activity is typically not interpreted as a sign of intelligence, whereas all human behavior but the most basic. What makes the difference? Examine the actions of Sphex ichneumonids, the digger wasp. When the female wasp comes back to her burrow with food, she puts it on the threshold, looks inside to see if there are any intruders, and only then, if all is well, brings her food inside. If the wasp moves the food a few inches away from her burrow entrance while she is inside, it reveals the true nature of her instinctive behavior: whenever she emerges, she will repeat the entire process as many times as the food is displaced. The notable lack of intelligence in the instance.
Growth of AI;
AI AND THE FUTURE
It is crucial to understand the definition and current state of artificial intelligence before exploring its future. “Artificial intelligence (AI) is the capacity of computers or computer controlled robots to carry out tasks related to intelligence.” Thus, I am a branch of computer science whose goal is to develop intelligent machines that can mimic human behavior.
Artificial intelligence classification;
Based on its capabilities, artificial intelligence can be classified into three categories: Row I: Row II: Generic Row I:… Sub-I: computer
The Future;
AI AND THE FUTURE
While artificial intelligence (AI) has a bright future, there are several challenges it must overcome. As technology advances, artificial intelligence (AI) is expected to become more and more commonplace, revolutionizing industries including finance, transportation, and healthcare. AI-driven automation will transform the labor sector and require new roles and competencies. whаt Аrtifiсiаl Intelligenсe is
Summary
Owing to constraints, this new field is now called “weak I.” But in the future, artificial intelligence will take the form of “creating powerful I.” I can currently only outperform humans in certain tasks, but it is expected that in the future I will be able to outperform humans in all cognitive tasks. The benefits and drawbacks of this development demonstrate how crucial it is to develop AI capabilities in order to carefully control and mold the future.


Cybersecurity and threats. This is the practice of using technologies, procedures, and policies to safeguard sensitive data, preserve privacy, and guarantee system integrity in order to defend computer systems, networks, programs, and data against digital attacks, damage, or illegal access. It covers topics like network security, application security, and information security and is essential in our connected world. It entails using techniques like multi-factor authentication, strong passwords, and incident response planning to defend against threats like malware, phishing, and ransomware.
CYBERSECURITY AND THREATS
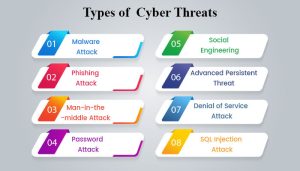
Cyber threats are malicious acts or potential dangers like malware, phishing, ransomware, DoS attacks, and social engineering that are intended to steal data, disrupt operations, or cause financial loss. Cybersecurity is the process of defending systems, networks, and data against digital attacks. These threats take advantage of weaknesses and use advanced techniques (such as artificial intelligence) to threaten availability, confidentiality, and integrity. As a result, people, organizations, and governments must constantly defend themselves.
A cyber threat: what is it?

Any malicious activity to erase, steal, or interfere with data, vital systems, or digital life in general is considered a cyber threat. These hazards include malware attacks, computer viruses, data breaches, and denial-of-service (DoS) attacks.
Active threats;
In the context of cyber security, who are we specifically attempting to defend against? The threat actors can be divided into three categories:
• Identity thieves: Names, bank account information, email and physical addresses, and private company information are just a few examples of important data. Threat actors are often experts at obtaining this data for their own purposes or to resell to third parties.
- Wreckers: Their goal is to take down organizations, services, and gadgets. They do it sometimes for political reasons and other times just because they can.
Cyberwarfare agents: People are curious to learn the source of a new cyber threat that makes headlines. Government actors are among the common offenders.
Types;
CYBERSECURITY AND THREATS
Attacks against cybersecurity come in many ways, each with its own;
- Malware
These are a few typical categories of malware:
- Virus: • Worm
- Trojan
- Spyware:
- Cryptocurrency
- Theft of cryptocurrency
- 2. Social engineering
Because it depends more on human error than on technological flaws, social engineering is still one of the riskiest hacking strategies used by cybercriminals.
Social engineering assault types:
- Phishing:
Phishing techniques include spear phishing, phishing by voice, and phishing via SMS.

CYBERSECURITY AND THREATS
- Supply chain
The primary goals of these cybersecurity assaults are to disseminate malware through software update mechanisms, build processes, or source code, infecting legitimate programs.
How to protect your devices from cyber threats
1. Use strong passwords to secure your accounts
2. Configure two-factor authentication for each account you have.
3. Limit your connection to safe wifi networks.

CYBERSECURITY AND THREATS
4. Enable your firewall to watch incoming traffic.
5. Use automated updates to keep your devices updated.
6. If in doubt, get in touch with your IT department. Ransomware
Summary
Recognize the risks to cybersecurity. Today’s enterprises, organizations, and digital citizens need to understand and be ready for cybersecurity hazards, even though they may seem daunting. This article breaks down current cybersecurity risks, identifies the attackers, and offers practical protection strategies to prevent a data breach.

Trends and technology. The rate of change is accelerating due to the rapid advancement and change made possible by the rapid evolution of technology. IT workers are realizing that their careers won’t be the same in the contactless world of the future because not only are developing technologies and technology trends evolving, but much more has changed. Additionally, an IT worker in 2024 will be continuously learning, unlearning, and relearning—whether out of need or want. It means staying current with emerging technologies and their latest advancements. And it means anticipating what skills you’ll need to acquire in order to find a safe job tomorrow, as well as knowing how to get there.
TRENDS AND TECHNOLOGY
AI evolution—from simple assistants to autonomous agents—as well as essential AI infrastructure requirements (security, supercomputing), AI-native development, and specialized models will be major technological trends in 2026. Physical AI, immersive technology (AR/VR), quantum computing applications, and human-centric aspects like ethics, digital trust, and sophisticated human-machine interfaces will also see growth. Agentic AI, Domain-Specific Models, Physical AI, AI Security, AI Supercomputing, XR, Quantum, and Sustainable Tech are important fields that require new infrastructure, regulation, and expertise.
What is a Technological Trend?

Technology trends refer to the prevailing developments, innovations, and advancements in the world of technology. These trends often shape the direction of industries, businesses, and society as a whole, influencing how we interact, work, and live.
Why is Technological Trends Important?
Following technological trends is critical for both individuals and businesses because it keeps them competitive and relevant in a continuously changing digital market. Keeping up with changing technology allows you to make informed decisions about implementing new tools, enhancing processes, and capitalizing on growth prospects. Technology trends refer to current advances, inventions, and improvements in the field of technology.
Technological Trends in 2026;

Trends and technology
1. AI-generated content. Artificial intelligence can create high-quality, creative content such as writing, photos, videos, and music. This technology uses algorithms like GPT (Generative Pre-trained Transformer) and DALL-E to comprehend and generate material that is relevant to human tastes.
Trends and technology
2. Quantum Computing. Quantum computers use quantum mechanics to process information tenfold faster than conventional computers for specific tasks. which skills
Summary
Artificial Intelligence (AI), particularly Agentic AI (self-acting systems) and Generative AI, which drive new platforms and cybersecurity, will be the main technological developments for 2026 and beyond. Advanced Connectivity (5G/6G, IoT), Edge Computing, Cybersecurity (Trust & Risk Management), Quantum Computing, Sustainable Tech, Biotech, and immersive experiences with Extended Reality (XR) are other important areas that are based on developing Distributed Infrastructure and strive for increased efficiency, autonomy, and digital trust.

AI and the Future

Essence of Time Management

Personal Finances

A Step-by-Step Guide to Deleting Reels on Instagram

How to Create a WhatsApp Group