
Social media
How to Start a YouTube Channel: 10 Brilliant Tips
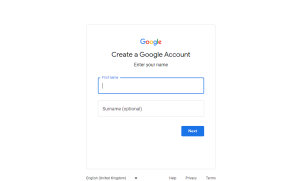
1. Create a Google Account
Here’s where it all starts. It’s really easy to create a Google account if you haven’t already. All you have to do is fill in your name.
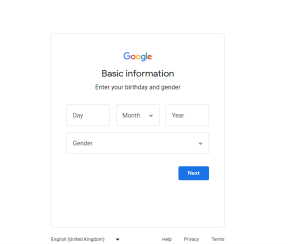
You next need to submit a few additional basic details about yourself.
2. Create a YouTube Channel in 4 Steps
Setting up your YouTube channel won’t require much time. Simply adhere to the instructions below!
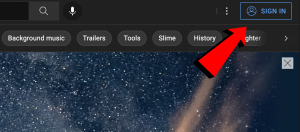
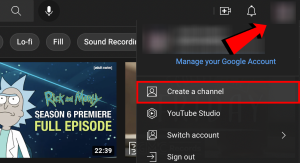
2. From the menu that appears, click your profile photo in the upper right corner and choose Create a Channel
3. Enter the name of your channel and upload a profile image.
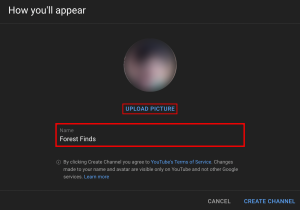
4. In the lower right corner, select “Create Channel.”

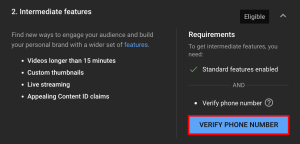
Verify Your Phone Number with YouTube
Verifying your phone number is the next step after creating your channel. You can now upload custom thumbnails, live stream, make films longer than fifteen minutes, and contest Content ID claims.
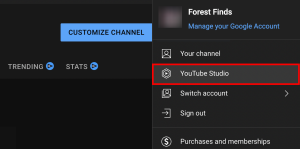
1. Click your profile image once more, then choose YouTube Studio from the menu to confirm your phone number
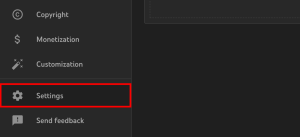
2. From the navigation bar on the left, select Settings.
3. Click the Channel tab, then select Feature Eligibility.
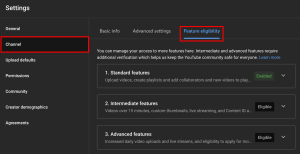
4. Select Verify Phone Number under Intermediate Features, then adhere to the on-screen instructions.
Add a Banner and Video Watermark to Your Channel
An extended, horizontal graphic that shows up at the top of your YouTube channel’s site is called a channel banner. If it’s well-designed, it will convey the topic of your films right away.
A tiny graphic that appears in every video’s lower-right corner is called a watermark. The picture will urge users to subscribe to your channel on YouTube when they click or hover over it. You can use this image as your channel’s logo or for any other branding purpose you see fit for your material.
3. Find Your YouTube Niche (Channel Topic)
The primary subject you’ll cover on your YouTube channel is your niche. The majority of viewers will watch your content for this reason as well, since certain viewers are drawn to particular subjects.
4. Identify Your Target Audience
Identifying your target audience for your videos becomes lot simpler once you’ve located your niche. You should take action on that as soon as possible.
5. Create a Value Proposition for Your Viewers
You now know the subject matter of your channel and who your audience is. It’s time to promise everyone who views your material what you intend to do now.
6. Find Your Competitors on YouTube
It’s critical for YouTube video creators to be aware of their rivals. It’s not like you have to fight with them constantly. Alternatively, attempt to outshine their films so that your channel receives more views than theirs.
7. Create a List of Video Ideas
After compiling a list of potential videos, it’s time to see how popular each one is on YouTube. Researching potential keywords is one approach to achieve this. This is how you find out what terms people use to look for videos on YouTube.
8. Test Your Video Ideas with Keyword Research
Having compiled a list of potential videos, it’s time to see how well-liked they are on YouTube. Researching keywords is one method you can accomplish this. This is the procedure for identifying the terms that users use to look for videos on YouTube.
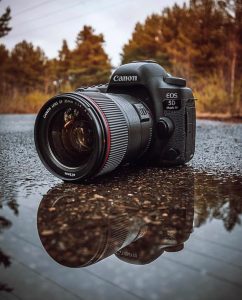
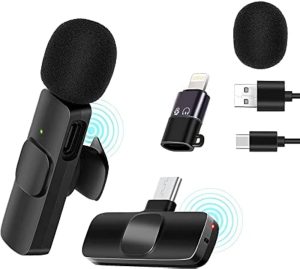
9. Get the Right Equipment for Your YouTube Needs
Realistically, you might need any of these items:
- DSLR video camera or smartphone for recording
- External microphone
- Lighting equipment
- Video editing app or desktop software
- External hard drive for storing video files
10. Post Your First Video
You’ve been waiting for this moment to publish your very first YouTube video. You’re prepared to make the move now that you’ve discovered a niche, determined who your audience is, created video concepts, and more.
Musicians and tiktok contents. A range of TikTok content can be produced by musicians, such as performance videos, behind-the-scenes glimpses into their music production, and involvement in challenges and trends. In order to interact with fans, develop their brand, and market their music, content ideas also include “behind the song” explanations, Q&A sessions, partnerships with other artists, and lessons. Successful content frequently makes use of the platform’s capabilities and algorithm while being captivating and genuine.
MUSICIANS AND TIKTOK CONTENTS
In addition to being singers or musicians, musicians can also be composers, arrangers, or directors of music. They can specialize in one genre or combine several styles, and they can perform alone or in ensembles. Singers, musicians, songwriters, and conductors are a few examples.
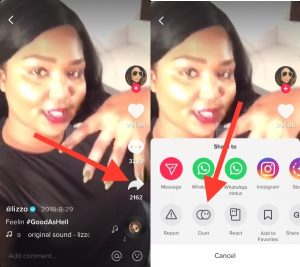
1. Duets & Collaborations;

One of the easiest methods to develop your TikTok account as a musician is to do duets and stitches. You can incorporate other users in your material and truly take off with your growth and music career by encouraging these duets and other user-generated content.
Perhaps you could make a beat and ask people to join you in it. Another option is to have users sing over your music. You can also ask other people to join you in dancing challenges as you play your own music.
2. Deconstruct Your Song;
Musicians and tiktok contents
We must begin considering the possibility of you uploading videos with your own music in an alternative setting. Here’s how you succeed on TikTok. It’s true that you could simply record a music video and release it, but where would the originality be in that?
One fantastic trend among TikTok music producers and performers is to break down their tracks and gradually reveal each layer and component until you reach the finished product. This gives the viewer a trip and is an excellent illustration of how to publish content that revolves around your music.
3. Your Top 5 Albums;
The key to successful music marketing is to connect with your audience. You must demonstrate your personality outside of your tunes. This is where you may produce personal content about what inspires you, as well as mention other artists. You could mention the 5 songs that inspired you the most, your best movies, your favorite video games… the list goes on.
4. Post Cover Versions Of Your Favourite Songs;

Musicians and tiktok contents
It should go without saying, but it had to be said since, when done correctly, it can be a terrific way to quickly gain more admirers. You don’t have to use covers as your main content approach; I understand that musicians don’t want to be known as cover artists. On TikTok, however, a well-executed cover can serve as a fantastic springboard for viral success.
5. Tell Your Story;
Musicians and tiktok contents
Inform others of your identity, origins, and future plans. You have to give your followers the chance to feel like they know you personally in order for them to become true members of your tribe. Don’t presume that everyone is familiar with your narrative! It can greatly clarify your purpose and the original motivation for your musical endeavors.
Summary
TikTok has a mixed review profile, highly praised for its engaging, personalized content and marketing potential, but criticized for safety concerns, poor customer service, and data privacy issues.
Tips formusic promotion on tiktok. Music marketing on tiktok is a strong tool that can go viral, especially for independent musicians, but requires strategic, creative, and continuous content rather than relying simply on the “Promote” option. Making engaging films, utilizing popular challenges and noises, working with influencers, and evaluating data to improve upcoming releases are all necessary for successful promotion. While organic promotion is highly effective, paid methods like targeted ads or influencer partnerships can expedite reach, but consumers should be aware of misleading services and hefty charges.
TIPS FOR MUSIC PROMOTION ON TIKTOK
TikTok has received mixed reviews; it is routinely condemned for safety problems, improper content, and data privacy issues, but it is also extensively commended for its effective content tailoring and addicting entertainment. Reviews frequently draw attention to the app’s effective “For You” tab and its usefulness for business marketing, but they also highlight certain drawbacks for younger users.
Add Your Song to Your Content;
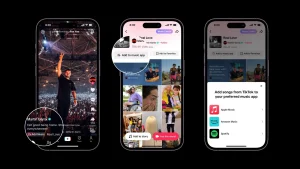
After your snippet is up on TikTok, you can begin progressively adding it to your content. It can serve as a background track for almost any type of material you believe your viewers will find entertaining.
Focus on the Music;

TIPS FOR MUSIC PROMOTION ON TIKTOK
Increase the effectiveness of your marketing by drawing attention to the track. Talking about songs with other artists is a tried-and-true successful tactic. Consider talking about the song’s theme and your inspiration for writing it. Perhaps you might also discuss the meaning of the lyrics. You could even post “making of” videos for the song that go behind the scenes.
Start a Challenge;

TIPS FOR MUSIC PROMOTION ON TIKTOK
Consider a creative technique to match your song’s lyrics to a music video. Maybe you could choreograph a lively dance routine to match the music. Using comedy or a topic related to the lyrics is another way to engage the audience. The idea is for them to make their own version of your video and incorporate your music into it for their TikTok video.
Source Suitable Influencers;
TIPS FOR MUSIC PROMOTION ON TIKTOK
Look for a hashtag that is relevant to you, your music, and your audience if you’re not sure which influencers to reach out to. Examine the videos that appear in the search results and watch them through.
Check out the creators’ accounts and audiences if you come across any content that you believe would be suitable for your audience.
To ensure that they’re a good fit, watch more of their videos. Next, enumerate every influencer with whom you might collaborate. Click here for more updates!
Summary
You may promote your songs on TikTok by using your own stream. This is great for emerging artists with little or no money. Additionally, a handful of musicians have found success with this strategy in the past. If you want to promote your own music on TikTok, these are the procedures to take.

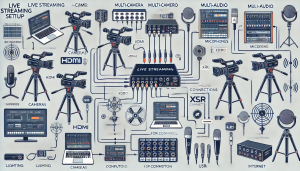
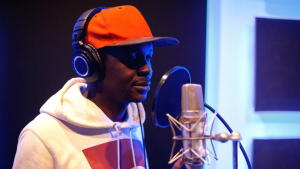
YouTube live streaming gears. Organizations in almost every industry now rely heavily on video content to grow. By 2025, 82% of all consumer internet traffic will consist of video content, according to research. Additionally, according to 85% of marketers, video is a powerful internet marketing tool. Therefore, it should come as no surprise that companies are using live streaming more and more as their go-to strategy for audience engagement and event delivery.
YOUTUBE LIVE STREAMING GEARS
For influencers, companies, and content producers that want to interact with their audience in real time, YouTube live streaming has become a vital tool. Having the proper equipment may significantly improve the quality of your broadcast, whether you’re streaming gaming sessions, hosting live Q&A sessions, or doing product demos. This post will discuss the necessary equipment you’ll need to take your YouTube live streams to the next level, from cameras and microphones to lighting and accessories.
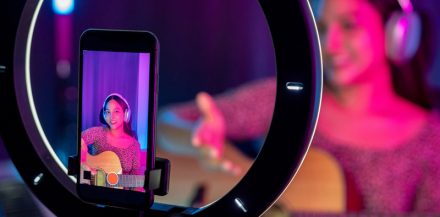
1. Camera:
YOUTUBE LIVE STREAMING GEARS
A high-quality camera is the foundation of any successful live stream. While many content creators opt for webcams or smartphone cameras for their broadcasts, investing in a dedicated camera can significantly improve the quality of your video. Look for a camera with features such as 4K resolution, clean HDMI output, and autofocus capabilities for crisp, clear footage. Popular options include the Sony A7 III, Canon EOS M50, and Panasonic Lumix GH5.
2. Microphone:
YOUTUBE LIVE STREAMING GEARS
Good audio quality is just as important as video quality when it comes to live streaming. Investing in a high-quality microphone can make your voice sound clear and professional, enhancing the overall viewer experience. Consider using a lavalier microphone for hands-free operation, a shotgun microphone for directional audio capture, or a USB microphone for simplicity and ease of use. Popular choices include the Rode Wireless Go, Blue Yeti, and Audio-Technica AT2020.
3. Lighting:
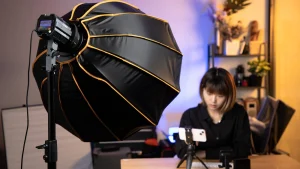
YOUTUBE LIVE STREAMING GEARS
Proper lighting can dramatically improve the look of your live stream, making your video appear more polished and professional. Invest in a set of LED lights or softbox lights to illuminate your set evenly and reduce harsh shadows. You can also use accessories like reflectors and diffusers to control the intensity and direction of light for a flattering effect. Popular lighting kits include the Neewer 660 LED Video Light, Godox SL-60W, and Elgato Key Light.4. Tripod or Mount:
A stable camera mount is essential for keeping your camera steady and secure during your live streams. Invest in a sturdy tripod or camera mount that can support the weight of your camera and accessories while allowing for flexible positioning and angle adjustments. Look for features such as height adjustment, pan and tilt functionality, and compatibility with your camera model. Popular options include the Manfrotto PIXI Mini Tripod, Joby GorillaPod, and Neewer Heavy Duty Video Tripod.
5. Internet Connection:

A reliable internet connection is crucial for streaming high-quality video without buffering or interruptions. Make sure you have access to a fast and stable internet connection with sufficient bandwidth for your live stream. Consider using a wired Ethernet connection for the most reliable performance, or invest in a high-quality Wi-Fi router with advanced features like MU-MIMO and beamforming for improved coverage and speed.
Summary
You may improve the caliber of your YouTube live streams and produce captivating, polished material that appeals to your audience by making the appropriate equipment purchases. Having the necessary equipment listed in this post will help you create exceptional live broadcasts that stand out from the competition and entice viewers to return for more, regardless of your level of experience as a content creator.
Multiple System Atrophy

Key Relevance of Monounsaturated Fats

Best Proteinous Fruits

A Step-by-Step Guide to Deleting Reels on Instagram

A Comprehensive Guide to Setting Up a YouTube Premiere


Pingback: Essential Gear for YouTube Live Streaming - SimplExplainer