Photography
HOW TO USE A RING LIGHT
HOW TO USE A RING LIGHT ( Rings)
A ring light is a simple, relatively inexpensive way to get started with studio photography – and with the right approach, it can look really, really good. Here are just a few photos I’ve taken using a ring light:

But how can you use a ring light to create portraits like these? And furthermore, how can you go beyond standard ring light photography to capture photos that stand out from the crowd?
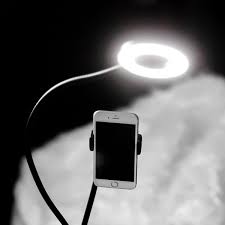
What is a ring light?
A ring light is a circular, ring-shaped light designed to be placed directly in front of a subject. You then position your camera in the center of the ring and capture your photos.

Here is a standard external ring light, photographed from the back (left) and front (right):
There are two types of rings lights you should be familiar with:
Off-camera ring lights, which attach to an external light stand, offer a wide band of illumination, and include a large aperture into which a camera can fit.

TWO EXAMPLES OF RING LIGHT
Smartphone ring lights
These compact ring lights are designed to be attached to smartphones so they are ideal if you enjoy taking photos on the go with your phone. They are typically lightweight and portable, making them convenient for spontaneous content creation
Macro ring lights ( rings)

These are specialised ring lights designed for macro photography. They attach to the front of macro lenses and provide close-up illumination for small subjects. Hard light is poor for macro photography so ring lights are essential for reducing shadows and emiting a soft light perfect for capturing intricate details.


Photography and income. Income from photography comes from a variety of sources, including passive income from selling prints, licensing stock pictures on websites like Shutterstock, Adobe Stock, and Getty Images, and producing digital products (presets, guides) or merchandise, as well as active activities like event, portrait, and commercial shoots. Weddings, real estate, and commercial work are lucrative areas, and creating several revenue streams (such as services, prints, digital goods, and teaching) offers stability in one’s finances. Marketing, expertise, and trend adaptation are all necessary for success.
PHOTOGRAPHY AND INCOME
Using a camera to collect light, typically on film or a digital sensor, is the art of photography as a source of revenue. People become photographers for a variety of reasons. Most of them start out as hobbies and don’t consider money at all. The allure of photography is that it appeals to those who wish to achieve something creative, enjoyable, and worthwhile. Although some photographers don’t think about money when working, it’s something to think about when things are tight.
What is photography?

The Greek words “photo” (light) and “graph” (to draw) are the roots of the English word “photography,” which means “drawing with light.”
However, Joseph Nicéphore Niépce took the first ever permanent photograph in France in 1826 (other accounts date it to 1827). It depicts the sun shining on a building’s roof.
Photography in StoneAge;
Below indicates an example of photography in modern world;
Photography in Modern Era;

However, there are different types of photography;
Types of photography
Nature photography;
This involves taking pictures of wildlife and the great outdoors
Landscape photography:

PHOTOGRAPHY AND INCOME
This entails lighting requirements of taking pictures of expansive deserts, deep forests, or stunning vistas.
Astography:
long exposure photography, is an excellent type of photography to go into if you find yourself gazing up at the night sky in awe.
Pet photography:

PHOTOGRAPHY AND INCOME
Get up close and personal with animals and take photos of people’s pets. Animal photography comes with its special challenges,
How can photography be a source of income?

PHOTOGRAPHY AND INCOME
- Sell prints on your website
- sell prints with a curated online shop
- offer digital editing services
- become an affiliate for brands you love to promote
- create digital downloads of your photography for passive income.
Summary
In addition to its more obvious applications in art, film and video production, leisure, hobbies, and mass communication, it is used in many branches of science, manufacturing (such as photolithography), and commerce. A photographer is a person who uses a camera to take pictures, and a photograph is the end product of the camera.
Tips for using point and shoot cameras. Point-and-shoot camera images can be improved by using natural light wherever possible, stabilizing the camera to reduce blur, and knowing how to utilize your flash (use it in low light, avoid it in bright daylight). Other pointers include reading your camera’s handbook to become familiar with its features, playing with different perspectives, utilizing optical zoom instead of digital zoom, and holding the shutter button halfway to lock focus.
TIPS FOR USING POINT AND SHOOT CAMERAS
Using a compact point-and-shoot camera can be straightforward, but there are common mistakes that users often make. Avoiding these pitfalls can help you get the most out of your camera and capture better photos. Here are six mistakes to avoid when using compact point-and-shoot cameras:
1. Ignoring Composition:

One of the most common mistakes is neglecting composition. Even with a compact camera, paying attention to composition principles like the rule of thirds, leading lines, and framing can significantly improve the quality of your photos. Take a moment to consider the framing and arrangement of elements within your frame before pressing the shutter button.
2. Not Adjusting Settings:
Compact cameras often have automatic modes that adjust settings like aperture, shutter speed, and ISO automatically. While convenient, relying solely on these modes can limit your creative control and result in suboptimal settings for certain situations. Take the time to explore the manual settings of your camera and learn how to adjust them to suit different lighting conditions and subjects.
3. Using Digital Zoom:

Tips for using point and shoot cameras
Compact cameras often come with digital zoom capabilities, which can extend the reach of your lens. However, digital zoom degrades image quality by interpolating pixels, resulting in loss of detail and increased noise. Instead of relying on digital zoom, try to get closer to your subject whenever possible or invest in a camera with optical zoom for better results.
4. Ignoring Lighting Conditions:

Tips for using point and shoot cameras
Lighting plays a crucial role in photography, and compact cameras can struggle in low-light situations. Avoid shooting in harsh midday sunlight or poorly lit environments without considering the impact on your photos. Experiment with different lighting conditions and learn how to use features like exposure compensation to adjust the brightness of your images.
7. Not Utilizing Image Stabilization:
Many compact cameras come with built-in image stabilization technology to reduce camera shake and blur, especially in low-light conditions or when using longer zoom lengths. However, some users may forget to activate this feature or may not realize its importance. Make sure to enable image stabilization when shooting handheld to ensure sharper images, particularly in situations where camera shake is more likely, such as when using slower shutter speeds or shooting at longer focal lengths.
8. Neglecting to Clean the Lens:

Tips for using point and shoot cameras
Compact cameras are often carried around in pockets, bags, or purses, which can expose the lens to dust, fingerprints, and smudges. These contaminants can degrade image quality by causing glare, flare, or softness in photos. To avoid this, regularly clean the lens with a soft microfiber cloth to remove any dirt or smudges. Additionally, consider using a lens cap or protective filter to shield the lens when not in use.
Summary
You can optimize your small point-and-shoot camera’s capabilities and make sure you’re always prepared to confidently and easily capture special moments by avoiding these extra blunders and exercising proactive control over your camera’s settings, upkeep, and accessories.

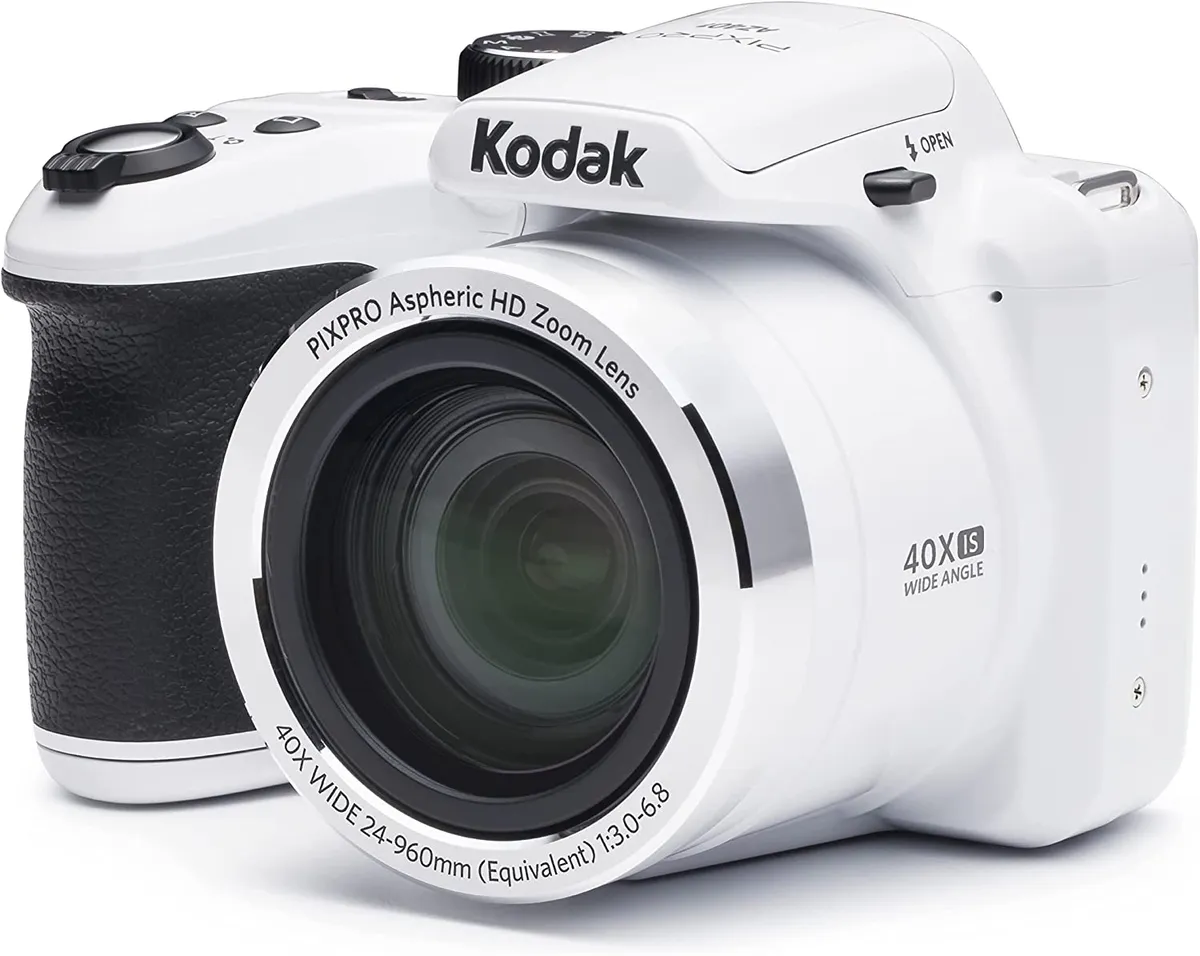
Tips for bridge cameras. To maximize the performance of a bridge camera, tuck it in at the elbows, use your non-dominant hand to support it, and utilize a tripod or monopod for extra stability, particularly when using high zoom. Avoid using your lens’s maximum zoom, which might produce softer images, and instead learn to use its entire range. For artistic effects, use camera settings like burst mode, focus peaking, and a tiny aperture () for depth of field. Additionally, don’t forget to use accessories like external flashes and polarizing filters.
TIPS FOR BRIDGE CAMERAS
Bridge cameras hold a special place in the photographic industry. providing a multipurpose, all-in-one solution that connects sophisticated interchangeable lens systems with small point-and-shoot cameras. because of their remarkable zoom powers, ergonomic designs, and features that are easy to use. Photographers who want simplicity, adaptability, and high-quality images prefer bridge cameras. Let’s look at some of the top choices if you’re looking to buy a bridge camera so you can make an informed choice:
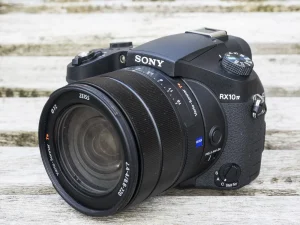
1. Sony Cyber-shot RX10 IV;
TIPS FOR BRIDGE CAMERAS
– Widely regarded as one of the best bridge cameras on the market, the Sony RX10 IV boasts a powerful 24-600mm equivalent zoom lens with a fast f/2.4-4 aperture.
– It features a 20.1-megapixel 1-inch Exmor RS stacked CMOS sensor, BIONZ X image processor, and advanced autofocus system with 315 phase-detection points for lightning-fast focusing.
– The RX10 IV offers 4K video recording, 24 frames per second continuous shooting, built-in Wi-Fi and NFC connectivity, and a tilting touchscreen LCD for easy composition and navigation.
2. Panasonic Lumix FZ1000 II;

TIPS FOR BRIDGE CAMERAS
– The Panasonic FZ1000 II combines a versatile 16x zoom lens (25-400mm equivalent) with a 20.1-megapixel 1-inch MOS sensor and Venus Engine image processor for stunning image quality.
– It features 4K video recording at 30 frames per second, 5-axis Hybrid Optical Image Stabilization (OIS), and a high-resolution electronic viewfinder (EVF) with 0.39-inch OLED display.
– The FZ1000 II offers intuitive manual controls, customizable function buttons, built-in Wi-Fi and Bluetooth connectivity, and a 3-inch free-angle LCD touchscreen for flexible shooting angles.
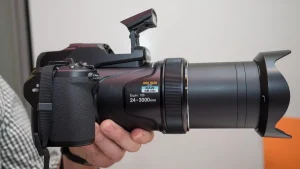
3. Nikon Coolpix P1000;
TIPS FOR BRIDGE CAMERAS
– The Nikon P1000 stands out for its impressive 125x optical zoom lens, equivalent to 24-3000mm in 35mm terms. Making it the ultimate superzoom bridge camera for capturing distant subjects.
– It features a 16-megapixel back-illuminated CMOS sensor, EXPEED image processor. And Dual Detect Optical VR (Vibration Reduction) for sharp, blur-free images and videos.
– The P1000 offers 4K UHD video recording, RAW file support, built-in GPS and Wi-Fi connectivity, and a high-resolution electronic viewfinder (EVF) with 0.39-inch OLED display.
4. Canon PowerShot SX70 HS;
– The Canon SX70 HS combines a versatile 65x optical zoom lens (21-1365mm equivalent) with a 20.3-megapixel CMOS sensor and DIGIC 8 image processor for excellent image quality.
– It features 4K UHD video recording at 30 frames per second, 10 frames per second continuous shooting, and Dual Sensing IS for steady handheld shooting.
– The SX70 HS offers built-in Wi-Fi and Bluetooth connectivity, a 3-inch vari-angle LCD touchscreen. And a high-resolution electronic viewfinder (EVF) with 0.39-inch OLED display.
5. Fujifilm FinePix HS50EXR;

– The Fujifilm HS50EXR features a 42x optical zoom lens (24-1000mm equivalent) with optical image stabilization and a 16-megapixel 1/2-inch EXR CMOS II sensor for impressive image quality.
–
Summary
Take into account aspects like zoom range, image quality, performance, functionality, and price when selecting the ideal bridge camera for your requirements. Bridge cameras come in a variety of styles to fit your needs and make it easy for you to take beautiful pictures and movies, whether you’re an experienced photographer searching for a multipurpose travel companion or a novice looking for a simple all-in-one solution.

Tips for Skin Breakage
Lip Breakage Causes and Treatments

Can Tremor be Cured?

A Step-by-Step Guide to Deleting Reels on Instagram

How to Create a WhatsApp Group