
WRITING
Pictures and WordPress Content
 Picturs and wordpress content. Adding photos to your WordPress media is crucial for capturing your audience’s attention and improving the user experience in today’s visually-driven online environment. Adding relevant and high-quality images to your blog posts, articles, or product pages can enhance their appeal and memorability. Don’t worry if you’re unfamiliar with WordPress or don’t know how to add images to your website. We’ll walk you through the steps of adding images to your WordPress article in this comprehensive guide.
PICTURES AND WORDPRESS CONTENT
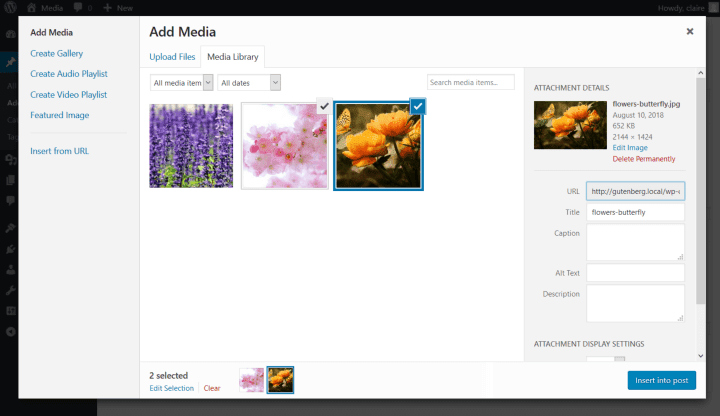
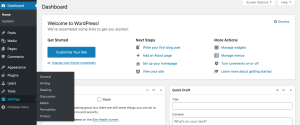
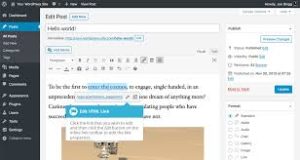
In WordPress, you have two options for adding content: either add a picture to your media library first, or use the picture block (or the Add Media button in the traditional editor) to upload it straight into a post. Click the “Add Media” button or the plus icon to add a photo. Then, upload a file from your computer or choose an already-existing image from your media library and add it to the content.
Step 1: Log in to Your WordPress Dashboard;
PICTURES AND WORDPRESS CONTENT
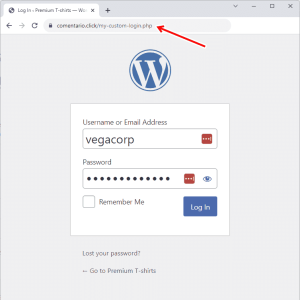
To get started, log in to your WordPress dashboard by entering your username and password. Once logged in, you’ll be taken to the WordPress admin area where you can manage your website’s content, settings, and media.
Step 2: Navigate to the Post or Page Editor;
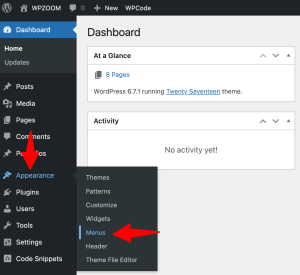
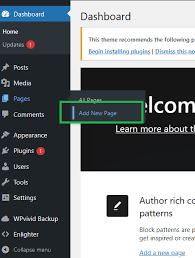
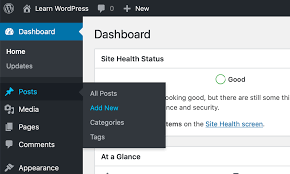
Next, navigate to the post or page editor where you want to add images. You can do this by selecting “Posts” or “Pages” from the left-hand menu and then clicking on the “Add New” button to create a new post or page. Alternatively, you can edit an existing post or page by selecting it from the list of published content.
Step 3: insert the image block;
PICTURES AND WORDPRESS CONTENT
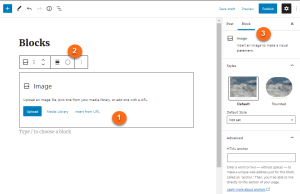
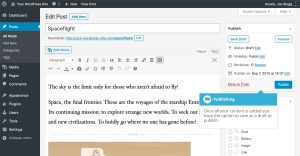
Once you’re in the post or page editor, place your cursor where you want to insert the image and click on the (+) icon to add a new block. In the block inserter menu, select the “Image” block option. This will create a new image block where you can upload or select an existing image from your media library.
Step 4: Upload or Select an Image;
After inserting the image block, you’ll have the option to upload a new image or select an existing image from your media library. To upload a new image, click on the “Upload” button and select the image file from your computer. To select an existing image from your media library, click on the “Media Library” tab and choose the desired image.
Step 5: Customize Image Settings;
Once you’ve uploaded or selected an image, you can customize its settings to fit your needs. You can adjust the image alignment, size, and caption by clicking on the image block and using the toolbar options that appear above it. Additionally, you can add alternative text (alt text) for accessibility purposes by clicking on the image block and entering a description in the “Alt Text” field.
Step 6: Preview and Publish Your Content;
PICTURES AND WORDPRESS CONTENT
After adding and customizing your image, preview your content to see how it looks on the frontend of your website. If everything looks good, you can go ahead and publish your post or page by clicking on the “Publish” button. Your image will now be visible to your website visitors when they view your published content.
Summary
You may improve your website’s visual attractiveness and produce captivating content that draws in visitors by following these easy steps. Whether you’re publishing articles, sharing blog entries, or presenting products, using pertinent and excellent photographs is essential to leaving a lasting impact on your audience.

Inbound links and wordpress articles. Backlinks, sometimes referred to as inbound links, are hyperlinks pointing straight to your WordPress articles from other websites. They serve as a “vote of confidence,” letting search engines like Google know that your material is reliable, authoritative, and pertinent. Improving the Search Engine Optimization (SEO) of your WordPress website requires knowing how to obtain external inbound connections and how to organize your internal “inbound” links.
INBOUND LINKS AND WORDPRESS ARTICLES
A web content management system is called WordPress. It was first developed as a tool for publishing blogs, but it has since expanded to facilitate the publication of other online material, such as more conventional websites, mailing lists, online forums, media galleries, membership sites, learning management systems, and online shops.
Step 1: Log in to Your WordPress Dashboard

Begin by logging in to your WordPress dashboard using your username and password. Once logged in, navigate to the post or page editor where you want to add the inbound link.
Step 2: Highlight the Text You Want to Link
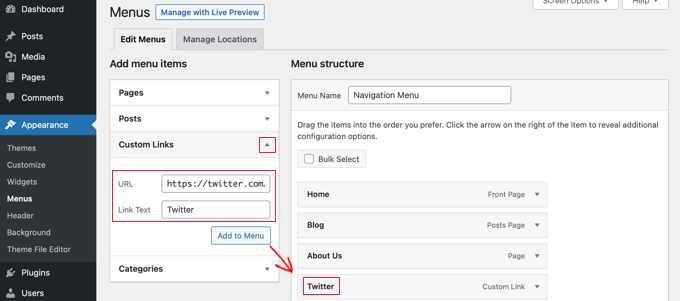
Within the post or page editor, select the text that you want to turn into an inbound link. This could be a relevant keyword, phrase, or descriptive anchor text that provides context for the linked content.
Step 3: Click the Insert/Edit Link Button
After highlighting the text, click on the “Insert/Edit Link” button in the toolbar above the editor. It looks like a chain link icon and is typically located next to other formatting options like bold and italic.
WordPress inbound links guides;
Step 4: Enter the URL of the Target Page
In the pop-up window that appears, enter the URL of the target page that you want to link to. You can either type the URL directly into the field or paste it from your browser. Make sure to include the full URL, including the “http://” or “https://” prefix.
Step 5: Add Link Options (Optional)
Inbound links and wordpress articles
Optionally, you can configure additional link options before inserting the inbound link. These options include setting the link to open in a new tab, adding a title attribute for accessibility, and specifying link rel attributes for SEO purposes. Adjust these settings as needed, then click the “Add Link” button to insert the inbound link.
Step 6: Review and Publish Your Article
Inbound links and wordpress articles
After adding the inbound link, review your article to ensure that the link appears as intended and functions correctly. You can do this by previewing the post or page in the WordPress editor or by viewing it on the frontend of your website. Once you’re satisfied with the placement and functionality of the inbound link, click the “Publish” or “Update” button to save your changes and make the article live on your website.
Summary
Hyperlinks from an external website to a page on your own website are known as inbound links, or backlinks. They serve as “votes of confidence,” assisting search engines in determining the authority of your website, generating direct referral traffic, and greatly raising your search engine results.

Key phrase density tips. It is important for SEO since it tells search engines how relevant a webpage’s content is. By deliberately inserting important keywords and phrases into their material while retaining a natural and engaging writing style. Owners of websites can increase their organic traffic and exposure in search engine rankings.
KEY PHRASE DENSITY TIPS
In the ever-evolving landscape of search engine optimization (SEO), key phrase density remains a crucial factor in determining a webpage’s relevance and visibility in search engine results. Key phrase density refers to the frequency at which a specific keyword or phrase appears within a piece of content relative to the total word count. While maintaining an optimal key phrase density can improve a page’s ranking in search engine results, it’s essential to strike the right balance to avoid over-optimization and potential penalties from search engines.
Understanding the Role of Key Phrase Density:

Key phrase density plays a significant role in SEO because search engines use algorithms to analyze the content of webpages and determine their relevance to specific search queries. Site owners can inform search engines that their content is pertinent to the subjects being searched for by deliberately inserting pertinent keywords and phrases into their webpage’s meta tags, headings, and URLs.
However, it’s essential to approach key phrase density with caution and avoid keyword stuffing. Which involves excessively repeating keywords or phrases in an attempt to manipulate search engine rankings. Keyword stuffing is considered a black hat SEO technique and can result in penalties from search engines. Including lower rankings or removal from search engine results altogether.
Finding the Right Balance:

Key phrase density tips
Achieving the optimal key phrase density involves finding the right balance between incorporating relevant keywords and phrases. Naturally into the content while ensuring readability and user experience are not compromised. Rather than focusing solely on keyword density, website owners should prioritize creating high-quality. Valuable content that resonates with their target audience.
Keyword research is a critical component of effective SEO strategy. By identifying relevant keywords and phrases that align with the topics and themes of their content. Website owners can strategically incorporate them into their content in a way that feels organic and seamless. Additionally, leveraging long-tail keywords, which are more specific and less competitive. Can help target niche audiences and improve the relevance of a webpage’s content.
Monitoring and Adjusting Key Phrase Density;

Key phrase density tips
Monitoring key phrases density and performance metrics is essential for optimizing SEO efforts over time. SEO tools and analytics platforms can provide insights into how well specific keywords are performing in terms of search engine rankings, organic traffic, and user engagement.
Website owners should regularly review their content to ensure that key phrases are used appropriately and effectively. This may involve updating existing content with new keywords. Optimizing meta tags and headings, and creating new content to target emerging search trends and topics.
Summary
Avoiding over-optimization is crucial. Additionally, give top priority to producing valuable, high-quality material that appeals to users. by finding the ideal mix and consistently assessing and modifying their SEO initiatives. In the cutthroat world of the internet, website owners can set themselves up for long-term success.

Media incorporation into articles. In order to improve understanding and retention, increase shareability and virality, improve engagement, and improve SEO performance, you must incorporate media into your content. Whether you’re writing blog posts, news pieces, instructional materials, or marketing collateral, including pertinent and excellent images can improve your writing and meaningfully engage your readers. You may write articles that connect with readers, increase website traffic, and eventually accomplish your content marketing objectives by utilizing the power of multimedia content.
MEDIA INCORPORATION INTO ARTICLES
Incorporating media into your articles can be a game-changer for grabbing and holding readers’ attention in the current digital era, where attention spans are short and competition for online visibility is intense. Multimedia material, which includes everything from pictures and videos to infographics and interactive features, improves the reader experience and effectively reaffirms your point. Here are four compelling arguments for including media in your articles:
1. Enhances Engagement;

Visual media, such as images and videos, have the ability to grab the attention of your audience and make your content more engaging and memorable. Research has shown that articles with relevant images receive significantly more views and shares than those without visuals. By incorporating media into your articles, you can break up large blocks of text, create visual interest, and keep readers engaged from start to finish.
2. Improves Comprehension and Retention;

Multimedia content has been shown to improve comprehension and retention of information compared to text-only articles. Visuals help to illustrate complex concepts, reinforce key points, and provide context for the written content. Incorporating charts, graphs, and infographics can make data more digestible and easier to understand for readers. Additionally, videos allow you to demonstrate processes, showcase products, or tell stories in a dynamic and engaging way, enhancing the reader’s overall understanding and retention of the content.
3. Increases Shareability and Virality;

Media incorporation into articles
Articles with compelling visuals are more likely to be shared on social media platforms, leading to increased exposure and virality. Visual content is inherently more shareable and eye-catching in social media feeds, making it easier for readers to engage with and amplify your message to their networks. By including shareable media in your articles, you can extend the reach of your content and attract new audiences who may not have discovered your articles otherwise.
4. Boosts SEO Performance;

Media incorporation into articles
Search engines prioritize content that is rich in multimedia elements, as they enhance the user experience and increase dwell time on your website. Articles with relevant images, videos, and other media are more likely to rank higher in search engine results pages (SERPs) and attract organic traffic. Additionally, alt text, captions, and descriptive filenames associated with media elements provide valuable metadata that search engines use to index and rank your content more effectively.
Summary
Including media in articles increases reader engagement, breaks up long material, and works with digital platforms that rely on algorithms. Digital content and images are now essential to the conveyance of information in the modern era.
Foods Rich in Zinc

Appetite Enhancement Tips

Nutritional Value of Rolled Oats

A Step-by-Step Guide to Deleting Reels on Instagram

A Comprehensive Guide to Setting Up a YouTube Premiere

How to Create a WhatsApp Group
-

 Health4 weeks ago
Harmful side effects of earphones
-

 Self esteem4 weeks ago
Tips for self esteem improvement
-

 Exercise4 weeks ago
Regular physical activities importance
-

 Health4 weeks ago
Headphones safety tips
-

 Business3 weeks ago
Local business promotion
-

 Entertainment3 weeks ago
Women and British dance music