Health
Tiger Nuts Milk

TIGER NUTS MILK
Tiger nuts milk. In North and South America, tiger nuts are also cultivated for their frequent usage in animal feed. Tiger nuts have just started to become more well-known as a health food in the West. The tiger nut is a tuber, not a nut, as its name suggests. A part of a plant’s stem that often rests below the soil’s surface is called a tuber. Although they are often thicker, tubers resemble roots in appearance. Tiger nut milk, a creamy and nutty beverage, has become increasingly popular due to its rich flavor and nutritional benefits.
TIGER NUTS MILK
Tubers include things like potatoes and Jerusalem artichokes. Although tiger nuts have long been utilized in traditional medicine, scientists have not thoroughly investigated their potential health advantages. greater research on tiger nuts is probably going to reveal greater health advantages because of their vitamin content. If you’re looking to explore this dairy-free alternative, follow this simple guide to create your own homemade tiger nut milk.
Ingredients
1. 1 cup of tiger nuts
2. 3-4 cups of water (for soaking)
3. 4 cups of water (for blending)
4. Sweetener of choice (optional) – dates, honey, or maple syrup
5. Vanilla extract (optional)
6. Cinnamon or other flavorings (optional)
Instructions
1. Soak the Tiger Nuts

• Place the tiger nuts in a bowl and cover them with water.
• Allow them to soak for at least 12 hours or overnight. This softens the nuts and makes them easier to blend.
2. Rinse and Drain
• After soaking, rinse the tiger nuts thoroughly under cold water.
• Drain the water used for soaking and prepare the nuts for blending.
3. Blend with Water

• In a blender, combine the soaked tiger nuts with 4 cups of fresh water.
• Blend on high speed for 2-3 minutes until the mixture becomes smooth.
4. Strain the Mixture
• Place a nut milk bag, cheesecloth, or fine-mesh strainer over a bowl or jug.
• Pour the blended mixture through the strainer, separating the liquid from the pulp.

5. Squeeze or Press
• If using a nut milk bag or cheesecloth, squeeze to extract as much liquid as possible. If using a strainer, press the pulp with the back of a spoon.
6. Sweeten and Flavor
• Add sweeteners like dates, honey, or maple syrup to taste.
• Enhance the flavor with vanilla extract or a sprinkle of cinnamon, adjusting quantities based on your preference.

7. Refrigerate
• Transfer the strained tiger nut milk into a clean container or bottle.
• Refrigerate for at least 1-2 hours before serving. Shake or stir before use, as it may naturally separate.
8. Enjoy

• Your homemade tiger nut milk is ready to be enjoyed! Use it as a dairy-free alternative in coffee, tea, cereal, or simply on its own.
Tips
– Experiment with flavorings to find your preferred taste – try adding a dash of cinnamon, nutmeg, or a pinch of salt.
– Adjust the sweetness to suit your palate.
– Save the leftover tiger nut pulp – it can be dried and used as a gluten-free flour in baking.
Creating tiger nut milk at home allows you to control the ingredients and customize the flavor to your liking. With its creamy texture and delightful taste, this dairy-free alternative might just become a staple in your kitchen. Enjoy the process of crafting this nutritious and delicious beverage!
Summary
Tiger nuts are an intriguing addition to a diet that promotes health, while not being a nut in the traditional sense. They help maintain healthy digestion, are high in nutrients, and may offer protection against infections and diseases including diabetes and heart disease. Remember that while these tubers are high in fiber, people who want to include them in their diet should do so gradually to prevent any uncomfortable bloating or gas.


How to quit smoking. Smoking is the inhalation of smoke from burning tobacco (usually from pipes, cigars, or cigarettes), which spreads nicotine and more than 7,000 compounds throughout the body, including at least 69 recognized carcinogens. It damages almost every organ, especially the heart and lungs, and is the greatest preventable cause of death in the United States, accounting for around 480,000 deaths each year.
HOW TO QUIT SMOKING
Most tobacco users either want to smoke or have strong cravings for tobacco goods. But you can fight these urges. When you have a strong want to use tobacco, keep in mind that the need will likely go away in five to ten minutes, regardless of whether you indulge in a cigarette or a chewing tobacco dip. Every time you overcome a desire to smoke, you get one step closer to giving up tobacco use permanently.
1. Consider utilizing nicotine replacement;

Inquire with your physician about nicotine replacement treatment. The available choices consist of Prescription nicotine in the form of an inhaler or nasal spray Over-the-counter nicotine patches, gum, and lozenges Prescription non-nicotine stop-smoking medications including bupropion
2. Avoid triggers;
Desires to smoke or chew tobacco are probably stronger in the settings where you used to smoke or chew tobacco, like bars or parties, or during stressful moments while you’re drinking coffee. Identify your triggers and make a plan to either avoid or deal with them.
3. Delay;

Tell yourself to hold off on giving in to your urge for tobacco if you feel like you need to wait ten minutes. Then, throughout that period, engage in some self-distraction.
4. Chew on it;
To help you avoid the need to smoke, give your mouth something to do. Enjoy chewing gum or hard candy. Alternatively, nibble on crunchy and delicious raw carrots, almonds, or sunflower seeds.
5. Don’t have ‘just one’;

How to quit smoking
If you feel a yearning for tobacco, you could be tempted to have just one cigarette. However, do not deceive yourself into believing that you should end there. Having one almost often results in having more. Additionally, you might start smoking again.
6. Get physical;
Engaging in physical activity can assist you in avoiding smoke cravings. A few quick movements, like rushing up and down the stairs, will help quell an urge for tobacco. Take a jog or a stroll outside.
7. Try relaxation techniques;

How to quit smoking
You might have used smoking as a stress-reduction strategy. It might be stressful to combat a tobacco urge on its own. Try these relaxation techniques to help you de-stress, like deep breathing, yoga, massage, muscular relaxation, visualization, and relaxing music.
Summary
Setting a specified “Quit Day,” using nicotine replacement therapies (patches, gum, lozenges) or prescription drugs (bupropion, varenicline), and altering daily routines to avoid triggers are the best ways to stop smoking. Cravings can be controlled with the support of friends, therapy, and methods like the “4 Ds” (Delay, Deep Breathe, Drink Water, Do Something Else).

Calluses causes. Usually on the hands or feet, calluses are thickened, hardened, and frequently painless patches of skin brought on by constant pressure or friction, such as from wearing poorly fitted shoes, going barefoot, or using tools. Skin that is flaky, dry, or rough can be treated by soaking, lightly filing with a pumice stone, and wearing appropriate footwear. While consequences are uncommon but can include infection, particularly in people with diabetes or poor circulation, risk factors include wearing shoes that are excessively thin or going barefoot.
CALLUSES CAUSES
By decreasing friction and pressure on the skin through the use of orthotics, moisturizer, and well-fitting, cushioned shoes, calluses can be avoided. Wearing gloves when performing hard labor, utilizing pads (moleskin) to protect sensitive regions, and switching up footwear every day are important tactics. Additionally, regular, mild exfoliation with a pumice stone aids in preventing accumulation.
Causes of it;

Calluses often develop on the hands and feet, as these areas are most exposed to repetitive activities. Common causes include:
– Wearing tight or ill-fitting shoes.
– Walking barefoot or in high heels.
– Manual labor or activities like gardening, weightlifting, or playing musical instruments.
How to Prevent;

CALLUSES CAUSES
Prevention is key to avoiding discomfort. Here are some tips:
– Wear Proper Footwear: Ensure shoes fit well and provide adequate cushioning.
– Use Gloves: Protect your hands during activities that involve gripping tools or equipment.
– Moisturize Regularly: Keep your skin hydrated to prevent dryness and cracking.
Caring for Calluses;

CALLUSES CAUSES
If you already have calluses, these steps can help:
– Soak and Exfoliate: Soak the affected area in warm water to soften the skin, then gently scrub with a pumice stone.
– Apply Moisturizers: Use lotions containing urea or salicylic acid to soften the skin.
– Avoid Cutting: Do not attempt to cut or pick at calluses, as this can lead to infection.

CALLUSES CAUSES
If a callus becomes painful or shows signs of infection, consult a healthcare provider for treatment.
With proper care and attention, you can manage calluses and keep your skin healthy.
Summary
Thickened patches of skin known as calluses develop naturally as a result of constant pressure, friction, or discomfort. Although they are usually not dangerous, if addressed, they can be unpleasant and ugly.

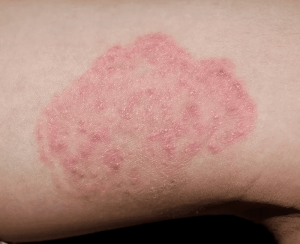
Signs of Fungal infections. Mycosis, another name for fungal infection, is a condition brought on by fungi. Traditionally, different varieties are classified as superficial, subcutaneous, or systemic based on the bodily portion that is impacted. Yeast infections like pityriasis versicolor and common tinea of the skin, including tinea of the body, groin, hands, feet, and beard, are examples of superficial fungal diseases. Eumycetoma and chromoblastomycosis are examples of subcutaneous kinds that typically affect tissues in and beneath the skin.
SIGNS OF FUNGAL INFECTIONS
Common skin problems known as fungal infections are brought on by fungi that prefer warm, humid settings. The skin, nails, and even internal organs can all be impacted by these illnesses. Yeast infections, ringworm, and athlete’s foot are typical occurrences.Cryptococcosis, histoplasmosis, pneumocystis pneumonia, aspergillosis, and mucormycosis are examples of more dangerous systemic fungal infections. There is a wide range of signs and symptoms.
Why Are Fungal Infections Important to Address?
1. Contagious Nature:
SIGNS OF FUNGAL INFECTIONS
Many fungal infection, such as ringworm and athlete’s foot, are highly contagious and can spread through direct contact or contaminated surfaces. Prompt treatment helps prevent spreading to others.
2. Discomfort and Irritation:

SIGNS OF FUNGAL INFECTIONS
Fungal infection often cause uncomfortable symptoms like itching, redness, and flaking. Addressing them quickly reduces discomfort and prevents the condition from worsening.
3. Potential Complications:
If left untreated, some fungal infection can lead to more severe complications, including deeper skin infection and damage to the affected area.
Prevention and Treatment of fungal infections;

SIGNS OF FUNGAL INFECTIONS
Practicing good hygiene, keeping skin dry, and using antifungal creams or medications are key to managing and preventing fungal infection. Seeking early treatment from a healthcare provider ensures effective recovery and reduces the risk of spreading.
Summary
Maintaining healthy skin and general wellbeing can be facilitated by being aware of fungal infections and taking preventative action. Although fungi are present everywhere, only a few of them can cause illness. Spores can enter the body through the skin, such as by an injection, cut, or wound, or they can be inhaled. People with weakened immune systems are more likely to experience it. This includes those suffering from diseases like HIV/AIDS and those using medications like steroids or cancer therapies.

Cold Weather Coping Mechanisms

How to Quit Smoking

Life Stages

A Step-by-Step Guide to Deleting Reels on Instagram

How to Create a WhatsApp Group