Social media
Tips for Uploading Youtube Videos

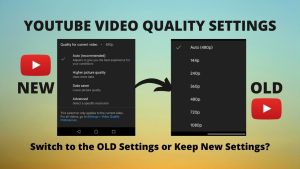
Tips for uploading YouTube videos. With over 2 billion monthly users, YouTube is the second most popular social media platform. If you are considering starting a YouTube channel to promote your brand or products, you are on the right track. However, keep in mind that 62% of businesses use YouTube to post video content, so the competition is fierce. Therefore, you may be wondering, “How to attract the audience and get traffic in such a high competition?” This blog post offers some tips to help your video stand out as well as the steps involved in uploading a YouTube video.
TIPS FOR UPLOADING YOUTUBE VIDEOS
The secret to success on YouTube is not just producing high-quality videos; it also involves optimizations and astute business strategies. In today’s digital age, YouTube has become a powerhouse platform for sharing content with the world. Whether you’re a budding creator, a business looking to expand your reach, or someone with a passion to share, uploading videos on YouTube is a skill worth mastering. Follow this step-by-step guide to make your mark on the world’s largest video-sharing platform.
1. Sign in to Your Account

have a YouTube account. Sign in or create one if you haven’t already. Make sure you’re logged into the account you want to upload the video to.
2. Access the Upload Button
Once you’re signed in, click on the “Create” button located at the top right corner of the YouTube homepage. From the dropdown menu, select “Upload Video.”
3. Select Your Video File
You’ll be prompted to select the video file you want to upload from your device. Click on “Select files to upload” and choose the video file from your computer or mobile device.
4. Add Video Details

After selecting the video file, you’ll need to add some essential details:
– Title: Choose a descriptive and engaging title for your video.
– Description: Write a brief description of your video. Include relevant keywords to improve searchability.
– Tags: Add relevant tags to help users find your video when searching on YouTube.
– Thumbnail: Choose a captivating thumbnail that accurately represents your video. You can either select one of the suggested thumbnails or upload a custom one.
5. Set Visibility and Privacy Settings:
Decide whether you want your video to be public, unlisted, or private. Public videos are visible to anyone, unlisted videos are only accessible via direct link, and private videos are visible only to you and users you choose.
6. Choose Video Settings
YouTube offers various settings to customize your video’s viewing experience:
– Audience: Specify whether your video is made for kids or not.
– Comments: Decide whether you want viewers to leave comments on your video.
– End Screens and Cards: Add end screens and cards to promote other videos, channels, or websites.
– Monetization: If your channel is eligible, you can enable monetization to earn money from ads displayed on your videos.
7. Select Video Category
Choose the most appropriate category for your video. This helps YouTube recommend your video to the right audience.
8. Upload and Process

Once you’ve filled in all the necessary details and settings, click the “Upload” button. The time it takes to upload and process your video depends on its length and file size. You can track the progress on the upload page.
9. Add Video Elements
After the upload is complete, you can further enhance your video by adding elements such as end screens, cards, subtitles, and annotations using YouTube’s built-in editor.
10. Share Your Video

Once your video is live, share it across your social media channels, embed it on your website, and encourage your audience to like, comment, and subscribe.
Summary
Congratulations! You’ve successfully uploaded your video to YouTube. Keep creating and uploading videos on YouTube and also sharing valuable content to grow your audience and make an impact on the platform.


Marketing in social media. Investigating social media marketing. In the digital age, social media has fundamentally altered how we interact, communicate, and consume content. These websites have grown into online marketplaces with tremendous potential for businesses seeking to engage with their target audience, raise brand awareness, and improve sales. Businesses can now connect with a global network of potential customers thanks to social media marketing. This article will examine social media marketing and teach us about its significance, key strategies, and impact on modern businesses. network of computers
MARKETING IN SOCIAL MEDIA
By sharing useful content, running targeted advertisements, and encouraging two-way conversations with followers, uses platforms like Facebook, Instagram, X, and LinkedIn to build brands, engage audiences, increase website traffic, and boost sales. In the end, SMM creates devoted customers and accomplishes business objectives. Content production, community management, performance measurement, and smart advertising are all part of this continuous process.

MARKETING IN SOCIAL MEDIA
Exploring The World of Social Media;
1. Although, Global Reach: Social media offers unrivaled access to a wide and varied audience, with billions of individuals actively using sites like Facebook, Instagram, Twitter, LinkedIn, and YouTube. Businesses may engage with people from many locations, cultures, and demographics thanks to their worldwide reach.
2. Brand Awareness:

MARKETING IN SOCIAL MEDIA
Businesses can establish a distinctive identity and strong online presence using social media channels. User recognition and recall of a brand can be increased by active contact, consistent branding, and engaging content.
3. Meanwhile,
Social media platforms provide businesses with sophisticated targeting options for targeted advertising, which enables them to contact consumers based on their demographics, interests, habits, and geographic location. Marketing efforts are guaranteed to reach the most relevant potential clients thanks to this focused approach.
More Exploration:

4. However, Enhanced Customer Engagement:
It facilitates direct communication between businesses and their customers in both directions. Positive customer experiences, loyalty, and trust are all increased when comments, messages, and feedback are addressed.

5. Although, influencer marketing: Brand exposure and credibility can be increased by partnering with influencers and micro-influencers who have sizable fan bases in specialized areas. Influencers can increase traffic and conversions by promoting goods and services to their interested audiences.. advertising Internet
Summary
The term refers to interactive digital platforms (apps and websites such as Facebook, Instagram, TikTok, X) that enable users to create, share content (text, photos, and videos), create communities, and network online. These platforms are an essential component of contemporary communication for public, professional, and personal life, connecting billions of people worldwide for socializing, information sharing, and trends.

Musicians and tiktok contents. A range of TikTok content can be produced by musicians, such as performance videos, behind-the-scenes glimpses into their music production, and involvement in challenges and trends. In order to interact with fans, develop their brand, and market their music, content ideas also include “behind the song” explanations, Q&A sessions, partnerships with other artists, and lessons. Successful content frequently makes use of the platform’s capabilities and algorithm while being captivating and genuine.
MUSICIANS AND TIKTOK CONTENTS
In addition to being singers or musicians, musicians can also be composers, arrangers, or directors of music. They can specialize in one genre or combine several styles, and they can perform alone or in ensembles. Singers, musicians, songwriters, and conductors are a few examples.
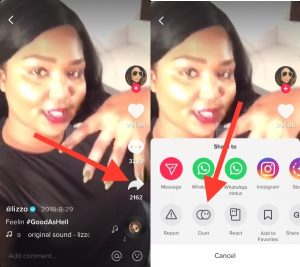
1. Duets & Collaborations;

One of the easiest methods to develop your TikTok account as a musician is to do duets and stitches. You can incorporate other users in your material and truly take off with your growth and music career by encouraging these duets and other user-generated content.
Perhaps you could make a beat and ask people to join you in it. Another option is to have users sing over your music. You can also ask other people to join you in dancing challenges as you play your own music.
2. Deconstruct Your Song;

Musicians and tiktok contents
We must begin considering the possibility of you uploading videos with your own music in an alternative setting. Here’s how you succeed on TikTok. It’s true that you could simply record a music video and release it, but where would the originality be in that?
One fantastic trend among TikTok music producers and performers is to break down their tracks and gradually reveal each layer and component until you reach the finished product. This gives the viewer a trip and is an excellent illustration of how to publish content that revolves around your music.
3. Your Top 5 Albums;
The key to successful music marketing is to connect with your audience. You must demonstrate your personality outside of your tunes. This is where you may produce personal content about what inspires you, as well as mention other artists. You could mention the 5 songs that inspired you the most, your best movies, your favorite video games… the list goes on.
4. Post Cover Versions Of Your Favourite Songs;

Musicians and tiktok contents
It should go without saying, but it had to be said since, when done correctly, it can be a terrific way to quickly gain more admirers. You don’t have to use covers as your main content approach; I understand that musicians don’t want to be known as cover artists. On TikTok, however, a well-executed cover can serve as a fantastic springboard for viral success.
5. Tell Your Story;

Musicians and tiktok contents
Inform others of your identity, origins, and future plans. You have to give your followers the chance to feel like they know you personally in order for them to become true members of your tribe. Don’t presume that everyone is familiar with your narrative! It can greatly clarify your purpose and the original motivation for your musical endeavors.
Summary
TikTok has a mixed review profile, highly praised for its engaging, personalized content and marketing potential, but criticized for safety concerns, poor customer service, and data privacy issues.

Tips formusic promotion on tiktok. Music marketing on tiktok is a strong tool that can go viral, especially for independent musicians, but requires strategic, creative, and continuous content rather than relying simply on the “Promote” option. Making engaging films, utilizing popular challenges and noises, working with influencers, and evaluating data to improve upcoming releases are all necessary for successful promotion. While organic promotion is highly effective, paid methods like targeted ads or influencer partnerships can expedite reach, but consumers should be aware of misleading services and hefty charges.
TIPS FOR MUSIC PROMOTION ON TIKTOK
TikTok has received mixed reviews; it is routinely condemned for safety problems, improper content, and data privacy issues, but it is also extensively commended for its effective content tailoring and addicting entertainment. Reviews frequently draw attention to the app’s effective “For You” tab and its usefulness for business marketing, but they also highlight certain drawbacks for younger users.
Add Your Song to Your Content;
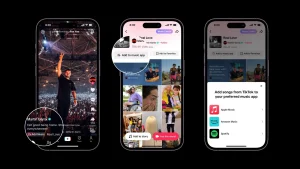
After your snippet is up on TikTok, you can begin progressively adding it to your content. It can serve as a background track for almost any type of material you believe your viewers will find entertaining.
Focus on the Music;

TIPS FOR MUSIC PROMOTION ON TIKTOK
Increase the effectiveness of your marketing by drawing attention to the track. Talking about songs with other artists is a tried-and-true successful tactic. Consider talking about the song’s theme and your inspiration for writing it. Perhaps you might also discuss the meaning of the lyrics. You could even post “making of” videos for the song that go behind the scenes.
Start a Challenge;

TIPS FOR MUSIC PROMOTION ON TIKTOK
Consider a creative technique to match your song’s lyrics to a music video. Maybe you could choreograph a lively dance routine to match the music. Using comedy or a topic related to the lyrics is another way to engage the audience. The idea is for them to make their own version of your video and incorporate your music into it for their TikTok video.
Source Suitable Influencers;

TIPS FOR MUSIC PROMOTION ON TIKTOK
Look for a hashtag that is relevant to you, your music, and your audience if you’re not sure which influencers to reach out to. Examine the videos that appear in the search results and watch them through.
Check out the creators’ accounts and audiences if you come across any content that you believe would be suitable for your audience.
To ensure that they’re a good fit, watch more of their videos. Next, enumerate every influencer with whom you might collaborate. Click here for more updates!
Summary
You may promote your songs on TikTok by using your own stream. This is great for emerging artists with little or no money. Additionally, a handful of musicians have found success with this strategy in the past. If you want to promote your own music on TikTok, these are the procedures to take.

Capable God Lyrics

Glorious God Lyrics

Ancient of Days Lyrics

A Step-by-Step Guide to Deleting Reels on Instagram

How to Create a WhatsApp Group