Connect with us

Tech

How to Use a Lancet for Blood Testing

Published

on

A lancet is a small, sharp instrument used to make a quick, shallow puncture in the skin, usually for the purpose of drawing a small amount of blood. This is commonly used by individuals with diabetes for blood glucose monitoring, as well as in various medical and laboratory settings. Using a lancet correctly is crucial to ensure an accurate blood sample and minimize discomfort. Here’s a step-by-step guide on how to use a lancet effectively and safely.

Materials Needed:

– Lancet device (also known as a lancing device)
– Lancets (disposable needle tips)
– Alcohol swabs or soap and water
– Cotton ball or gauze
– Blood glucose meter or testing strip (if applicable)
– Sharps disposal container

Step-by-Step Instructions:

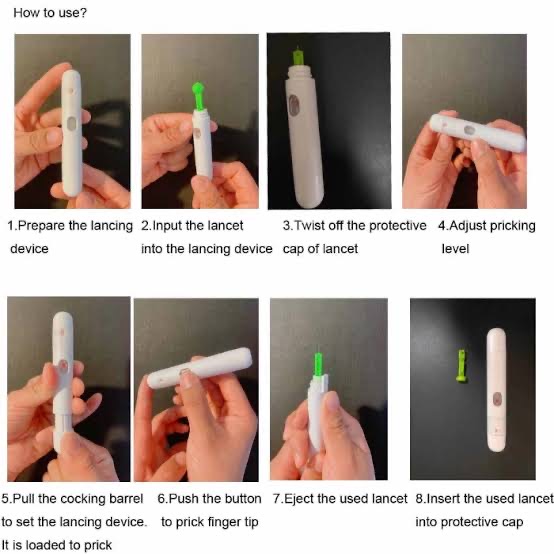
1. Prepare the Lancet Device

– Wash Your Hands: Begin by washing your hands thoroughly with soap and warm water to prevent infection and ensure an accurate reading. If soap and water are not available, use an alcohol swab.

– Load the Lancet: Insert a new, sterile lancet into the lancing device. Most devices have a cap that unscrews to reveal a compartment for the lancet. Insert the lancet firmly, then twist off its protective cover. Replace the device’s cap.
Lancet

– Adjust the Depth Setting: Many lancing devices allow you to adjust the depth of the puncture. For most adults, a medium depth setting is appropriate. Children or individuals with delicate skin may require a shallower setting.

2. Choose a Puncture Site

– Select a Site: The fingertip is the most common site for blood testing. Alternate sites can include the forearm or palm, but these may provide less accurate readings for blood glucose testing.

– Rotate Sites: To prevent soreness and calluses, rotate between different fingers or sides of the fingertip with each test.

3. Clean the Puncture Site

– Sanitize the Area: Use an alcohol swab to clean the chosen puncture site. Allow it to air dry completely, as alcohol residue can affect the test results.


4. Perform the Puncture

– Position the Lancet Device: Hold the lancing device firmly against the side of the fingertip, avoiding the pad of the finger where there are more nerve endings.
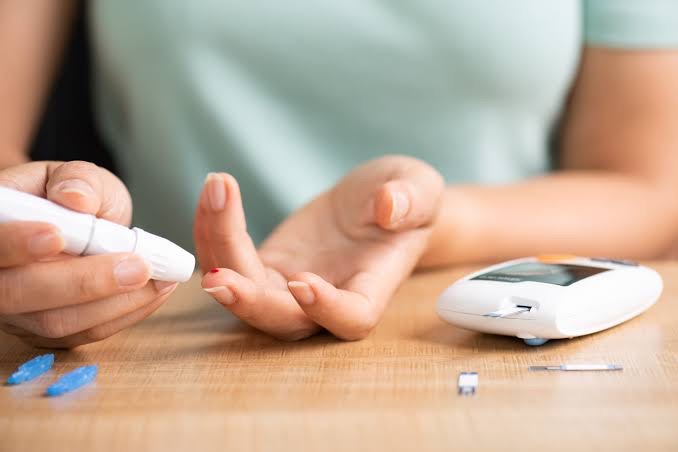
– Activate the Device: Press the release button to activate the lancet. This will quickly puncture the skin and draw a small drop of blood.


5. Collect the Blood Sample

– Encourage Blood Flow: If necessary, gently massage your finger from the base toward the tip to encourage a sufficient drop of blood.

– Collect the Blood: If you are using a blood glucose meter, touch the testing strip to the blood drop. For other tests, use the designated collection method.

6. After the Puncture

– Stop the Bleeding: Apply a cotton ball or gauze to the puncture site to stop the bleeding.

– Dispose of the Lancet: Remove the used lancet from the device and dispose of it in a sharps disposal container. Never reuse lancets, as this can increase the risk of infection.

Tips for Reducing Discomfort:

– Warm Your Hands: Warm hands can increase blood flow and make it easier to obtain a sample.

– Use the Sides of Fingers: These areas are generally less sensitive than the pads.

– Maintain Good Hydration: Being well-hydrated can improve blood flow, making it easier to get a sample.


Safety and Hygiene Considerations:

– Single Use Only: Lancets should be used only once to prevent infection and ensure sharpness.

– Proper Disposal: Always dispose of used lancets in a designated sharps container to prevent injury and contamination.

– Regular Cleaning: Keep your lancing device clean according to the manufacturer’s instructions to maintain hygiene.

Using a lancet may seem daunting at first, but with practice, it becomes a quick and routine process. Proper technique not only ensures accurate test results but also minimizes discomfort and the risk of infection. By following these steps and maintaining good hygiene practices, you can efficiently manage your health monitoring needs.

Whether you’re monitoring blood glucose levels or collecting blood for other tests, mastering the use of a lancet is an essential skill. Remember to consult with a healthcare professional for personalized advice and guidance tailored to your specific needs.

Continue Reading
Click to comment

Leave a Reply

Your email address will not be published. Required fields are marked *

Tech

How to Choose the Right Blogging Niche

Published

on

HOW TO CHOOSE THE RIGHT BLOGGING NICHE

How to choose the right blogging niche. The topic or issue your blog concentrates on is known as its niche. It’s the main idea that connects all of the posts on your site.

HOW TO CHOOSE THE RIGHT BLOGGING NICHE

HOW TO CHOOSE THE RIGHT BLOGGING NICHE

Blog Niche Ideas to Consider

1. Meanwhile, style and Beauty Online customers looking for advice, guides, product suggestions, etc. are drawn to the beauty and fashion area. And it’s enormous.

2. However, product Evaluations In-depth and frank reviews are highly sought after given the abundance of brands and new product releases.

Meanwhile, a site with extensive reviews of skincare, hair care, makeup, and fashion products will draw a lot of readers who are trying to make educated purchases.

3. Although, Makeup Tutorials: Detailed makeup instructions are very well-liked. particularly in video formats that can be uploaded to YouTube and posted on a blog. Having a blog with simple instructions for all styles and abilities will assist you in developing a loyal readership.

4. Also, hair Care Advice Many ask for tips on keeping their hair healthy and attractive. create a blog A site that offers advice on products, styles, and care regimens.

More Tips;

5. Although, there are tips for Skincare A blog with professional skincare advice can draw readers from a variety of backgrounds, including those looking for specific problem solutions as well as those wishing to build a skincare regimen.

6. However, trends in Fashion For individuals who value style, staying on top of trends is essential because fashion changes quickly. A style-conscious audience can be drawn to a blog that examines and presents the latest and emerging trends in apparel, and accessories.

7. Company

Also, there are a ton of specialty blog ideas in this category that can be used to offer insightful commentary about managing a business.

more people starting businesses


Continue Reading

Children

Nigeria Education System

Published

on

NIGERIA EDUCATION SYSTEM

The Federal Ministry of Education is in charge of overseeing education in Nigeria. Local government is in charge of carrying out state-mandated policies about public education and state schools. Kindergarten, Primary, Secondary, and Tertiary education are the four divisions of the education system.

What is Education?

Education in simple terms, refers to both the act of teaching knowledge to others and the act of receiving knowledge from someone else.

NIGERIA EDUCATION SYSTEM

NIGERIA EDUCATION SYSTEM

There are various levels of the educational system in Nigeria. these include;

Primary Education System

For most Nigerians, primary education starts around age 5. After completing six years of primary school, students receive their first certificate of school leaving.

Subjects Offered in Primary Education:

Mathematics, English, Christian and Islamic religious knowledge, agricultural science, home economics, and one of the three major indigenous languages and cultures Hausa-Fulani, Yoruba, and Igbo are among the subjects taught at the primary school level. Private schools also offer

French, Fine Arts, and Computer Science. To be eligible for admission to private, state, and federal government secondary schools, primary school students must take the Common Entrance Examination.

Secondary Education System in Nigeria:

The second official level of education, secondary school, commonly referred to as high school, typically lasts from the ages of 11 to 13 to the ages of 15 to 18. However, It is the formal education provided before college and after primary school. Although classes 6–8 may also be included in middle school, secondary school normally consists of grades 9–12.

In Nigeria, education is vital and has a big impact on both individual growth and the country’s advancement.

Education in Nigeria has voluminous benefits and these include the below;

Importance of Education;

1. Investment in Human Capital: The foundation for building human capital is embedded in education.

2. Mitigating Poverty: One effective strategy for reducing poverty is the education system.

3. Economic revamp: An educated public is a beneficial force for economic growth.

4. It exposes individuals to life realities.


Continue Reading

Tech

How to free up iphone storage

Published

on

By

Freeing up storage on your iPhone XR before transferring data to an iPhone 13 can help ensure a smooth transition and make your new phone more efficient. Here are several methods to free up space on your iPhone XR:

1. Delete Unnecessary Apps

Review Installed Apps: Go through your apps and delete any that you no longer use.
Offload Unused Apps: This feature, found under Settings > General > iPhone Storage, removes the app but keeps its documents and data. You can reinstall the app later if needed.

2. Clear Cache and Data

• Safari Cache: Clear your Safari cache by going to Settings > Safari > Clear History and Website Data.
• App Cache: For some apps, you may need to go into the app’s settings to clear cached data.

3. Manage Photos and Videos on the storage

– iCloud Photos: Enable iCloud Photos in Settings > [Your Name] > iCloud > Photos. Select “Optimize iPhone Storage” to store smaller versions on your device while keeping the originals in iCloud.

– Delete Unwanted Media: Go through your Photos app and delete any photos or videos you no longer need. Remember to empty the “Recently Deleted” album.

– Use Third-Party Storage: Transfer photos and videos to services like Google Photos or Dropbox and then delete them from your device.

4. Remove Old Messages

– Message Attachments: Review large attachments in Messages by going to Settings > General > iPhone Storage > Messages and deleting any large attachments you don’t need.

– Message History: Set messages to delete automatically after a certain period. Go to Settings > Messages > Keep Messages and select either 30 days or 1 year.

5. Review Downloads and Documents

Files App: Go through the Files app and delete any downloaded documents you no longer need.

Email Attachments: Delete large email attachments or old emails with large attachments.

6. Manage Music and Podcasts

Music: Delete songs or albums you no longer listen to. You can also stream music instead of downloading it.
Podcasts: Delete old podcast episodes that you have already listened to. Go to Settings > Podcasts to manage your download settings.

7. Use Storage Management Recommendations

iPhone Storage Recommendations: Go to Settings > General > iPhone Storage to see recommendations from Apple on how to save space. Follow these suggestions to free up additional space.

Final Steps to get more storage: Backup and Transfer

Backup Your iPhone XR: Use iCloud or iTunes/Finder to back up your iPhone XR before transferring data to your iPhone 13.

Transfer Data to iPhone 13: When setting up your iPhone 13, choose to restore from an iCloud backup or use the Quick Start feature to transfer data directly from your iPhone XR.

By following these steps, you can free up significant space on your iPhone XR and ensure a smooth transition to your new iPhone

Continue Reading

Trending

Copyright © 2024 Simplexplainer.com. Designed by mypworld@gmail.com