TECHNOLOGY
Benefits of AI
BENEFITS OF AI
Benefits of AI. Let us first examine the definition of artificial intelligence (AI) before moving on to its benefits and drawbacks. AI, seen from a broad perspective, gives a computer program the capacity for independent thought and learning. In order to perform tasks for which we often rely on humans, it simulates human intelligence in machines. This technical miracle goes beyond simple automation by integrating a wide range of artificial intelligence (AI) talents, which allow machines to comprehend, reason, learn, and interact similarly to humans.

BENEFITS OF AI
Advantages of Artificial Intelligence
1.Decrease in Human Error
Reducing errors and improving accuracy and precision are two of artificial intelligence’s most important advantages. Every decision made by AI is based on a specific set of algorithms and previously collected data. Correct programming can decrease these errors to zero.
2. Making Decisions
Making decisions is one of AI’s well-known advantages. AI improves decision-making by using massive data to spot trends and patterns that are frequently missed by humans. Businesses and people may make well-informed decisions fast and precisely by using machine learning algorithms, which can evaluate past data and forecast future events.
3. No Hazards
By allowing AI robots handle numerous dangers for us, humans can overcome them, which is another important advantage of AI. Machines having metal bodies can withstand hostile atmospheres and endure missions such as bomb defusing, space travel, and underwater exploration.
4. Online Support
In order to reduce the need for human labor, some of the most modern organizations deploy digital assistants to engage with users. Conversational searches are made possible by the usage of digital assistants by many websites, which provide content in response to user inquiries. Sometimes chatbots are so intelligent that it’s hard to know if we’re speaking to a human or a machine.
5. Novelty
AI is the driving force behind many advances in almost every industry that enable people to solve the most difficult problems. For instance, new developments in AI-based technology have made it possible for medical professionals to identify breast cancer in women early.
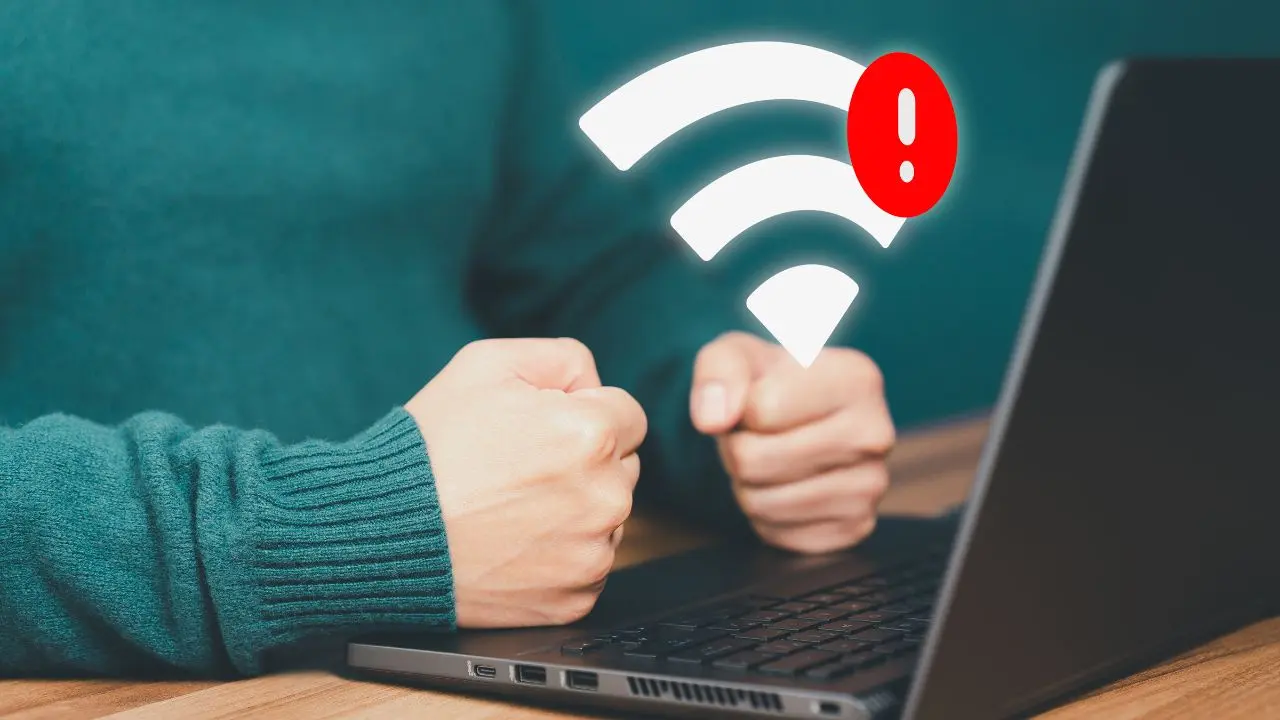

Review of wifi and laptop. The internal hardware and software of a laptop have a significant impact on its Wi-Fi performance; the most recent standards, such as Wi-Fi 6 or 6E, provide faster and more dependable connections. Though its hardware limits its gaming potential, reviews for particular laptops, such as the Primebook Wifi, emphasize its strong performance for daily tasks like browsing and streaming. A general review of “WiFi and laptop” depends on the specific laptop being examined, as reviews of laptops differ greatly depending on the model.
REVIEW OF WIFI AND LAPTOP
Identifying and fixing the root cause of your laptop’s Wi-Fi problems requires a methodical approach. You can frequently get a steady Wi-Fi connection back by making sure the network is operating properly, checking to see if Wi-Fi is enabled, updating drivers, reviewing network settings, and resolving interference or range problems. If the issue continues, it would be worthwhile to get expert technical assistance in order to identify and resolve any more complicated problems.
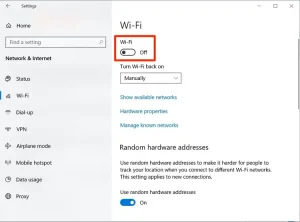
1. Wi-Fi is Disabled on Your Laptop;
REVIEW OF WIFI AND LAPTOP
Reason:
Sometimes, the Wi-Fi on your laptop might be disabled either through a physical switch or a function key.
Solution:
– Check Physical Switch: Some laptops have a physical switch or button to turn Wi-Fi on and off. Ensure it’s turned on.
– Use Function Keys: Look for the Wi-Fi icon on the function keys (usually F1-F12) and press the corresponding key, often in combination with the “Fn” key.
2. Wi-Fi Network Issues;

REVIEW OF WIFI AND LAPTOP
Reason:
The problem might not be with your laptop but with the Wi-Fi network itself.
Solution:
– Restart Router/Modem: Turn off your router and modem, wait for about 30 seconds, and then turn them back on.
– Check Other Devices: Ensure other devices can connect to the same Wi-Fi network. If not, the issue is likely with the network.
3. Incorrect Network Settings;

REVIEW OF WIFI AND LAPTOP
Reason:
Your laptop might have incorrect network settings, such as a wrong IP address or DNS server.
Solution:
– Forget and Reconnect to Network: Go to your Wi-Fi settings, select the problematic network, choose “Forget,” and then reconnect by entering the password again.
– Renew IP Address: Open Command Prompt and type ipconfig /release followed by ipconfig /renew to refresh your IP settings.
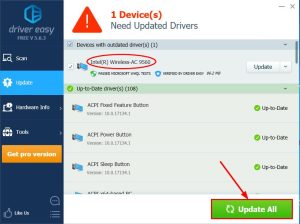
4. Outdated Wi-Fi Drivers;
Reason:
Outdated or corrupt drivers can prevent your laptop from connecting to Wi-Fi.
Solution:
– Update Wi-Fi Drivers: Go to Device Manager, find your Wi-Fi adapter under “Network adapters,” right-click, and select “Update driver.” Follow the prompts to search for updated drivers.
– Reinstall Wi-Fi Drivers: If updating doesn’t work, uninstall the driver and restart your laptop. It should automatically reinstall the correct drivers.
5. Interference or Range Issues;

Reason:
Physical obstructions or interference from other electronic devices can affect Wi-Fi connectivity.
Solution:
– Move Closer to Router: Ensure your laptop is within a reasonable range of your Wi-Fi router, ideally in the same room or within a clear line of sight.
– Reduce Interference: Keep your laptop and router away from other electronic devices that might cause interference, such as microwaves or cordless phones.
Summary
Experiencing issues with your laptop’s Wi-Fi connection can be frustrating, especially when you need to be online for work or leisure. Here are five common reasons why your laptop might not connect to Wi-Fi and solutions to resolve each issue.

Iphone storage tips. You are aware of the inconvenience that comes with having insufficient space on your device. Receiving messages, installing new apps, taking pictures, syncing media files, installing iOS upgrades, and doing other tasks that require storage space are all rendered impossible when your iPhone’s storage is full. Additionally, your photos and apps may become erratic, and your iPhone may begin to erase messages on its own.
IPHONE STORAGE TIPS
To ensure a seamless transition and increase the efficiency of your new phone, free up storage on your iPhone XR before moving data to an iPhone 13. Here are a few ways to make room on your iPhone XR. You can guarantee a seamless transfer to your new iPhone and clear up a substantial amount of space on your iPhone XR by following these instructions.
1. Delete Unnecessary Apps;
• Review Installed Apps: Go through your apps and delete any that you no longer use.
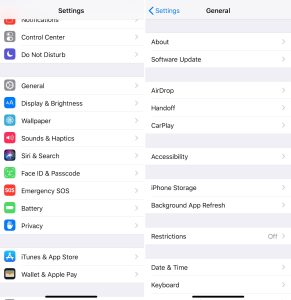
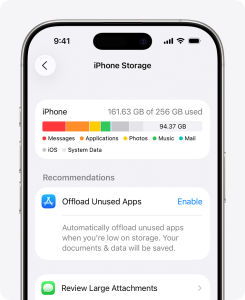
• Offload Unused Apps: This feature, found under Settings > General > iPhone Storage, removes the app but keeps its documents and data. You can reinstall the app later if needed.
2. Clear Cache and Data
• Safari Cache: Clear your Safari cache by going to Settings > Safari > Clear History and Website Data.
• App Cache: For some apps, you may need to go into the app’s settings to clear cached data.
3. Manage Photos and Videos on the storage;
– iCloud Photos: Enable iCloud Photos in Settings > [Your Name] > iCloud > Photos. Select “Optimize iPhone Storage” to store smaller versions on your device while keeping the originals in iCloud.
– Delete Unwanted Media: Go through your Photos app and delete any photos or videos you no longer need. Remember to empty the “Recently Deleted” album.
– Use Third-Party Storage: Transfer photos and videos to services like Google Photos or Dropbox and then delete them from your device.
4. Remove Old Messages;
– Message Attachments: Review large attachments in Messages by going to Settings > General > iPhone Storage > Messages and deleting any large attachments you don’t need.
– Message History: Set messages to delete automatically after a certain period. Go to Settings > Messages > Keep Messages and select either 30 days or 1 year.
5. Review Downloads and Documents;
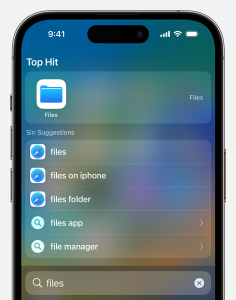
• Files App: Go through the Files app and delete any downloaded documents you no longer need.
• Email Attachments: Delete large email attachments or old emails with large attachments.
6. Manage Music and Podcasts;
• Music: Delete songs or albums you no longer listen to. You can also stream music instead of downloading it.
• Podcasts: Delete old podcast episodes that you have already listened to. Go to Settings > Podcasts to manage your download settings.
7. Use Storage Management Recommendations;

Iphone storage tips
• iPhone Storage Recommendations: Go to Settings > General > iPhone Storage to see recommendations from Apple on how to save space. Follow these suggestions to free up additional space.
Final Steps to get more storage:
Backup and Transfer;

Iphone storage tips
– Backup Your iPhone XR:
Use iCloud or iTunes/Finder to back up your iPhone XR before transferring data to your iPhone 13.
– Transfer Data to iPhone 13:

Iphone storage tips
When setting up your iPhone 13, choose to restore from an iCloud backup or use the Quick Start feature to transfer data directly from your iPhone XR.
Summary
Manage apps by removing or unloading those that aren’t being used, and remove big data like attachments and videos to increase iPhone capacity. Optimize your Photos library by managing huge downloads from streaming and podcast apps, clearing the cache in Safari, and turning on iCloud Photos or offloading original files.


YouTube live streaming gears. Organizations in almost every industry now rely heavily on video content to grow. By 2025, 82% of all consumer internet traffic will consist of video content, according to research. Additionally, according to 85% of marketers, video is a powerful internet marketing tool. Therefore, it should come as no surprise that companies are using live streaming more and more as their go-to strategy for audience engagement and event delivery.
YOUTUBE LIVE STREAMING GEARS
For influencers, companies, and content producers that want to interact with their audience in real time, YouTube live streaming has become a vital tool. Having the proper equipment may significantly improve the quality of your broadcast, whether you’re streaming gaming sessions, hosting live Q&A sessions, or doing product demos. This post will discuss the necessary equipment you’ll need to take your YouTube live streams to the next level, from cameras and microphones to lighting and accessories.
1. Camera:

YOUTUBE LIVE STREAMING GEARS
A high-quality camera is the foundation of any successful live stream. While many content creators opt for webcams or smartphone cameras for their broadcasts, investing in a dedicated camera can significantly improve the quality of your video. Look for a camera with features such as 4K resolution, clean HDMI output, and autofocus capabilities for crisp, clear footage. Popular options include the Sony A7 III, Canon EOS M50, and Panasonic Lumix GH5.
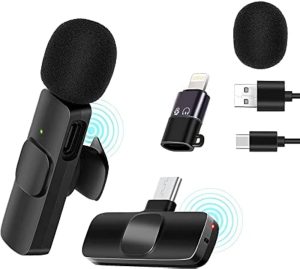
2. Microphone:
YOUTUBE LIVE STREAMING GEARS
Good audio quality is just as important as video quality when it comes to live streaming. Investing in a high-quality microphone can make your voice sound clear and professional, enhancing the overall viewer experience. Consider using a lavalier microphone for hands-free operation, a shotgun microphone for directional audio capture, or a USB microphone for simplicity and ease of use. Popular choices include the Rode Wireless Go, Blue Yeti, and Audio-Technica AT2020.
3. Lighting:

YOUTUBE LIVE STREAMING GEARS
Proper lighting can dramatically improve the look of your live stream, making your video appear more polished and professional. Invest in a set of LED lights or softbox lights to illuminate your set evenly and reduce harsh shadows. You can also use accessories like reflectors and diffusers to control the intensity and direction of light for a flattering effect. Popular lighting kits include the Neewer 660 LED Video Light, Godox SL-60W, and Elgato Key Light.4. Tripod or Mount:
A stable camera mount is essential for keeping your camera steady and secure during your live streams. Invest in a sturdy tripod or camera mount that can support the weight of your camera and accessories while allowing for flexible positioning and angle adjustments. Look for features such as height adjustment, pan and tilt functionality, and compatibility with your camera model. Popular options include the Manfrotto PIXI Mini Tripod, Joby GorillaPod, and Neewer Heavy Duty Video Tripod.
5. Internet Connection:

A reliable internet connection is crucial for streaming high-quality video without buffering or interruptions. Make sure you have access to a fast and stable internet connection with sufficient bandwidth for your live stream. Consider using a wired Ethernet connection for the most reliable performance, or invest in a high-quality Wi-Fi router with advanced features like MU-MIMO and beamforming for improved coverage and speed.
Summary
You may improve the caliber of your YouTube live streams and produce captivating, polished material that appeals to your audience by making the appropriate equipment purchases. Having the necessary equipment listed in this post will help you create exceptional live broadcasts that stand out from the competition and entice viewers to return for more, regardless of your level of experience as a content creator.
Multiple System Atrophy

Key Relevance of Monounsaturated Fats

Best Proteinous Fruits

A Step-by-Step Guide to Deleting Reels on Instagram

How to Create a WhatsApp Group