
TECHNOLOGY
Guidelines for Shutting Down Laptops

Guidelines for shutting down laptops. The proper shutdown technique for your laptop protects your files and maintains the system. Many users make mistakes by closing their laptop lids without following the correct system shutdown processes or by using force shutdowns. Correct laptop shutdown techniques assist avoid hardware problems and data loss. A proper shutdown preserves system integrity, permits proper update installations, and allows your laptop to properly terminate programs.
GUIDELINES FOR SHUTTING DOWN LAPTOPS
Shutting down your laptop may seem like a simple task, but doing it properly can help maintain its performance and prolong its lifespan. Whether you’re a seasoned tech enthusiast or a novice user, this comprehensive guide will walk you through the steps to shut down your laptop safely and efficiently.
Step 1:
Save Your Work

Before shutting down your laptop, it’s essential to save any open documents, projects, or applications to prevent data loss. Take a moment to close all programs and ensure that any unsaved changes are saved.
Step 2:
Close All Applications
Once your work is saved, close all open applications and programs running on your laptop. This not only frees up system resources but also ensures that no processes are interrupted during the shutdown process.
Step 3:
Disconnect External Devices

GUIDELINES FOR SHUTTING DOWN LAPTOPS
If you have any external devices connected to your laptop, such as USB drives, external hard drives, or peripherals, it’s a good idea to disconnect them before shutting down. This prevents potential data corruption and ensures a clean shutdown.
Step 4:
Start the Shutdown Process
To initiate the shutdown process, locate the power button on your laptop. Depending on your laptop model and operating system, the power button may be located on the keyboard, near the screen, or on the side of the laptop. Press and hold the power button for a few seconds until you see the shutdown options menu appear on the screen.
Step 5:
Select the Shutdown Option

Guidelines for Shutting Down Laptops
Once the shutdown options menu appears, you’ll typically see several options, including “Shut down,” “Restart,” and “Sleep.” Use the arrow keys on your keyboard or the touchpad to navigate to the “Shut down” option and press the Enter key to select it.
Step 6:
Wait for the Laptop to Power Off

After selecting the shutdown option, your laptop will begin the shutdown process. Depending on your laptop’s hardware and the number of programs running, this process may take a few moments. Be patient and wait for your laptop to power off completely.
Step 7:
Verify the Power Off
Once your laptop has powered off, verify that all lights on the laptop, including the power indicator light, have turned off. This indicates that the laptop has shut down completely and is no longer drawing power.
Step 8:
Close the Lid

If you prefer, you can close the lid of your laptop after it has powered off. This helps protect the screen and keyboard from dust and debris when the laptop is not in use.
Summary
Shutting down your laptop properly is a simple yet essential task that helps maintain its performance and prolong its lifespan. By following these steps, you can ensure a safe and efficient shutdown process, allowing you to power off your laptop with confidence and peace of mind.


Understanding chatgpt. In today’s digital age, artificial intelligence has become an integral part of our lives, simplifying tasks and enhancing productivity. Among the myriad AI-powered tools available, ChatGPT stands out as a versatile and resourceful assistant, capable of aiding users in various domains. “Chat Generative Pre-training Transformer,” or ChatGPT, is a language model created by OpenAI. It is a kind of artificial intelligence that has been taught to comprehend and produce human language. Large volumes of text data are used to train the model, which enables it to comprehend the complexities and intricacies of human language. Whether you’re seeking information, generating ideas, or simply engaging in casual conversation, harnessing the full potential of ChatGPT can greatly enrich your online experience. In this article, we’ll delve into the intricacies of using ChatGPT effectively, covering key strategies and best practices to maximize its utility.
UNDERSTANDING CHATGPT
Before diving into practical tips, it’s essential to grasp the fundamentals of it. Developed by OpenAI, it is a state-of-the-art language model trained on vast datasets, enabling it to comprehend and generate human-like text across diverse topics. It operates based on a “prompt-response” mechanism, where users input queries or statements, and ChatGPT generates relevant and coherent responses in real-time. Whether you’re conversing on the ChatGPT app, website, or integrating it into your platform via APIs, the underlying functionality remains consistent.
Tips for Effective Usage;
1. Provide Clear and Specific Prompts

When interacting with ChatGPT, clarity is key. Clearly articulate your queries or requests, providing as much context as possible. This helps it understand your intentions accurately, leading to more relevant and satisfactory responses.
2. Experiment with Different Prompt Formats
It responds well to various prompt formats, including questions, statements, or even incomplete phrases. Experiment with different styles to uncover the most effective approach for your specific needs.
3. Leverage Keywords and Context

UNDERSTANDING CHATGPT
Incorporating relevant keywords and context into your prompts can significantly enhance the quality of ChatGPT’s responses. By guiding the conversation and providing additional information, you empower it to generate more accurate and insightful outputs.
4. Utilize Conversation History
If you’re engaging in a prolonged conversation with ChatGPT, leverage the conversation history feature to maintain context and continuity. Referencing previous exchanges helps ChatGPT deliver more coherent responses and fosters a more seamless interaction experience.
5. Fine-tune Responses

UNDERSTANDING CHATGPT
In instances where ChatGPT’s responses require refinement or clarification, don’t hesitate to provide feedback and guide the conversation accordingly. It continuously learns from user interactions, and constructive input contributes to its ongoing improvement.
6. Explore Specialized Models and Features
OpenAI offers specialized versions of ChatGPT tailored for specific applications, such as programming or generating creative content. Explore these specialized models and features to leverage ChatGPT’s capabilities in specialized domains.
Etiquette and Responsible Usage;

While ChatGPT provides a wealth of opportunities for engagement and assistance, it’s imperative to exercise responsible usage and adhere to ethical guidelines. Avoid soliciting or engaging in activities that promote harm, misinformation, or unethical behavior. Additionally, respect it’s capabilities and limitations, refraining from exploiting it for malicious purposes or deceptive practices.
Summary
Mastering ChatGPT entails a combination of strategic input, experimentation, and responsible usage. By following the tips outlined in this guide and approaching interactions with ChatGPT thoughtfully, you can unlock its full potential as a reliable assistant and creative collaborator. Whether you’re seeking information, brainstorming ideas, or simply enjoying casual conversation, ChatGPT offers a versatile and invaluable resource in the digital landscape. Embrace the possibilities, and embark on a journey of discovery and innovation with ChatGPT by your side.

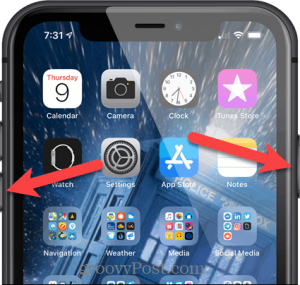
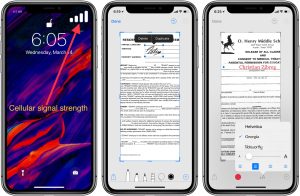
Tips for screenshotting on iphoneX. In iOS 26, the screenshot is automatically shown on your device with the available quick tools. To save your screenshot on your device, you can touch the save button, trim your image, send it to contacts or other apps, or draw on it using Markup. The lower-left corner of your screen displays a thumbnail for a brief period of time with iOS 18 and earlier. Swipe left to dismiss it, or tap the thumbnail to open it.
TIPS FOR SCREENSHOTTING ON IPHONEX
Capturing what’s on your iPhone screen can be incredibly useful for various purposes, whether you want to share a moment from a conversation, save important information, or demonstrate a feature. With the introduction of the iPhone X and subsequent models, the process of taking a screenshot has evolved slightly due to the removal of the Home button. In this guide, we’ll walk you through the steps to effortlessly capture screenshots on iPhone X and above models.
1. Locate the Side Button and Volume Up Button
On iPhone X and newer models, such as iPhone XS, iPhone XR, iPhone 11, iPhone 12, and their variations, the side button takes on additional functions previously handled by the Home button. The side button is located on the right side of the device, while the volume up button is on the left side.
2. Prepare the Screen to Capture
Navigate to the screen or content you want to capture in the screenshot. Ensure that everything you want to include in the screenshot is visible on the screen.
3. To Screenshot Press and Hold Side Button and Volume Up Button
TIPS FOR SCREENSHOTTING ON IPHONEX
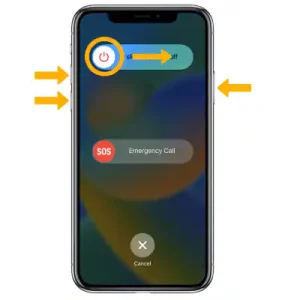
Simultaneously press and hold the side button (located on the right side of the device) and the volume up button (located on the left side) at the same time. Press and hold both buttons for a brief moment, but be careful not to press them for too long, as this may activate other functions like Siri or Emergency SOS.
4. To screenshot, Release the Buttons

TIPS FOR SCREENSHOTTING ON IPHONEX
After pressing and holding the side button and volume up button simultaneously, quickly release both buttons. You should hear a camera shutter sound (if your device is not in silent mode) and see a brief flash on the screen, indicating that the screenshot has been successfully captured.
5. View and Edit the Screenshot
TIPS FOR SCREENSHOTTING ON IPHONEX
After taking the screenshot, a thumbnail preview of the captured image will appear in the bottom left corner of the screen. You can tap on this thumbnail to immediately edit, annotate, or share the screenshot using the built-in Markup tools. Alternatively, you can let the preview disappear, and the screenshot will be automatically saved to your Photos app.
Summary
Also, taking a screenshot on iPhone X and above models is a simple and straightforward process, thanks to the intuitive button layout and seamless integration with iOS. Whether you’re capturing memorable moments, saving important information, or documenting a conversation, mastering the art of screenshotting on your iPhone can greatly enhance your productivity and communication capabilities. By following the steps outlined in this guide, you can effortlessly capture and share content from your iPhone with ease.

imessage connection on apple device. Navigate to Settings > Messages, then select iMessage to activate it. The switch is a slider. There’s another problem if that’s not what you’re seeing or, in my experience, doesn’t seem to function. You may need to restart your device or log out of iCloud and back in again. Your phone will try to activate iMessage after you have enabled it. It could take several minutes. In the same menu, you can also adjust additional iMessage settings, like Send & Receive settings, which let you select which email addresses and phone numbers are allowed to send and receive iMessages on your device.
IMESSAGE CONNECTION ON APPLE DEVICE
iMessage, Apple’s built-in messaging service, offers a seamless way for users to communicate with fellow Apple device owners. Whether you’re using an iPhone, iPad, or Mac, setting up iMessage is a straightforward process that allows you to send text messages, photos, videos, and more, all within the Apple ecosystem. If you’re new to Apple devices or need a refresher on how to connect to iMessage, this step-by-step guide will walk you through the process.
1. Check Device Compatibility

IMESSAGE CONNECTION ON APPLE DEVICE
Make sure your device supports iMessage before you start. Mac computers running macOS and iPhones, iPads, and iPod Touch devices can all use iMessage. For the greatest iMessage experience, make sure your device is running the most recent version of either macOS or iOS.
2. Enable iMessage:
On iPhone or iPad:
1. Open Settings: Tap on the Settings app on your home screen.
2. Navigate to Messages: Scroll down and tap on “Messages.”
3. Enable iMessage: Toggle the switch next to “iMessage” to turn it on. The switch will turn green when enabled.
On Mac:

IMESSAGE CONNECTION ON APPLE DEVICE
1. Launch Messages: Open the Messages app from your Dock or Applications folder.
2. Access Preferences: Click on “Messages” in the menu bar at the top of your screen and select “Preferences.”
3. Sign in with Your Apple ID
If you’re setting up iMessage for the first time, you’ll be prompted to sign in with your Apple ID. Your Apple ID is the same account you use for iCloud, the App Store, and other Apple services. Enter your Apple ID email address and password, then follow any additional prompts to complete the sign-in process.
4. Verify Contact Information

You might be prompted to confirm your phone number and email address after logging in to your Apple ID. Sending and receiving iMessages requires this information. Make sure the contact information displayed is correct, and follow the prompts to verify if necessary.
5. Customize iMessage Settings
You can alter the settings to tailor your messaging experience after iMessage is activated. Options include setting up read receipts, choosing a display name, and adjusting notification preferences. Explore the settings within the Messages app to tailor iMessage to your preferences.
6. Start Messaging

With iMessage set up and activated, you’re ready to start sending messages to friends, family, and colleagues who also use Apple devices. Open the Messages app, select a contact or enter a phone number or email address, compose your message, and hit send. iMessage will automatically detect if the recipient is also using iMessage and send the message accordingly.
Summary
Connecting to iMessage on your Apple device is a simple process that unlocks a world of convenient communication options. Whether you’re sending a quick text or engaging in a group conversation, iMessage offers a seamless experience for staying in touch with loved ones. To get started with or connect to iMessage and take advantage of all its features, follow the instructions provided in this tutorial.
Factors to Consider for e-commerce
Online Payment Gateways in Africa
Pregnant Women and Sleeping Positions

A Step-by-Step Guide to Deleting Reels on Instagram

A Comprehensive Guide to Setting Up a YouTube Premiere
