Uncategorized
Proper Eyelid Hygiene: Why It Matters and How to Do It Right

Your eyelids play an important role in protecting your eyes from dust, debris, and bacteria. But like the rest of your body, they need regular cleaning. Practicing proper eyelid hygiene can help prevent eye infections, irritation, and conditions like blepharitis, dry eyes, or styes.
Here’s everything you need to know about keeping your eyelids clean and healthy.
Why Eyelid Hygiene Is Important
The base of your eyelashes and eyelid margins can collect:
– Oil and dead skin
– Dust and makeup residue
– Bacteria and mites
If not cleaned properly, this buildup can lead to:
– Blepharitis (inflammation of the eyelids)
– Styes (painful lumps caused by blocked oil glands)
– Dry eyes (due to clogged glands)
– Itching, redness, and discomfort
When Should You Clean Your Eyelids?
– Once daily if you wear makeup or have oily skin
– Twice daily if you have blepharitis or dry eyes
– After wearing contact lenses
– Before and after eye surgery (if recommended by your doctor)
Step-by-Step Guide to Eyelid Cleaning
What You’ll Need:
– Clean cotton pads or gauze
– Eyelid wipes (store-bought or homemade)
– Warm water
– Gentle baby shampoo or eyelid cleanser
Steps:

1.Wash Your Hands
Always start by washing your hands to avoid introducing germs to your eyes.
2.Apply Warm Compress (Optional)
Use a clean, warm cloth over your closed eyes for 5 minutes to loosen debris and oil.
3.Use a Cleanser
Mix a drop of baby shampoo with warm water or use an eyelid cleanser. Dip a clean cotton pad in the solution.
4.Clean the Eyelid Margins
•Gently wipe along the lash line with the pad, keeping your eyes closed.
•Clean from the inner corner (near your nose) outward.
5.Rinse (If Needed)
Use a fresh pad with clean water to gently wipe away any leftover cleanser.
6.Dry with a Clean Towel
Pat the area gently—don’t rub.
Extra Tips for Healthy Eyelids

Always take off eye makeup before bed using a gentle remover. Leftover mascara or eyeliner can clog glands and irritate your eyes.
– Avoid Touching or Rubbing Your Eyes
This spreads bacteria and increases the risk of infection or irritation.
– Don’t Share Eye Products
Never share eye makeup, brushes, or towels with others to prevent the spread of bacteria or infections.
– Replace Eye Makeup Regularly
Old mascara or eyeliner can harbor bacteria. Replace them every 3–6 months.
– Be Careful with Eyelash Extensions
If you wear lash extensions, clean around the base carefully and follow aftercare advice to avoid infections.
– Visit an Eye Doctor if Problems Persist
If you experience persistent redness, swelling, crusting, or pain, consult an eye specialist. You might have an underlying condition like blepharitis or a blocked gland.
Final Thoughts
Proper eyelid hygiene is a small habit that can make a big difference in your overall eye health. Whether you wear makeup, contact lenses, or simply want to avoid irritation, keeping your eyelids clean protects your vision and prevents uncomfortable eye problems. Just a few minutes a day can help keep your eyes fresh, clear, and healthy.


Tips for creating Youtube channel. Google owns YouTube, an American website where users can share videos. On February 14, 2005, Chad Hurley, Jawed Karim, and Steve Chen—all former PayPal employees founded YouTube. With its headquarters located in San Bruno, California, it is the second most popular website worldwide, after Google.
TIPS FOR CREATING YOUTUBE CHANNEL
A watermark is a small image that shows up in the lower-right corner of every video. When people click or hover over the image, they will be prompted to subscribe to your YouTube channel. This image can be used as the logo for your channel or for any other branding reason you think would be appropriate for your content.
1. Create a Google Account;
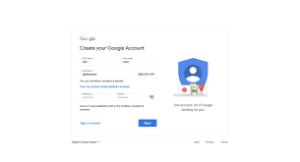
Here’s where it all starts. It’s really easy to create a Google account if you haven’t already. All you have to do is fill in your nam
You next need to submit a few additional basic details about yourself.
2. Create a YouTube Channel in 4 Steps;
Setting up your YouTube channel won’t require much time. Simply adhere to the instructions below!
2. From the menu that appears, click your profile photo in the upper right corner and choose Create a Channel
3. Enter the name of your channel and upload a profile image.
4. In the lower right corner, select “Create Channel.”
Verify Your Phone Number with YouTube;
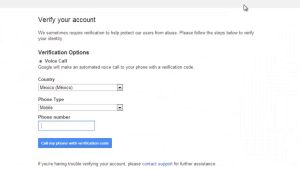
Verifying your phone number is the next step after creating your channel. You can now upload custom thumbnails, live stream, make films longer than fifteen minutes, and contest Content ID claims.
1. Click your profile image once more, then choose YouTube Studio from the menu to confirm your phone numbe
2. From the navigation bar on the left, select Settings
3. Click the Channel tab, then select Feature Eligibility
4. Select Verify Phone Number under Intermediate Features, then adhere to the on-screen instructions.
3. Find Your YouTube Niche;
The primary subject you’ll cover on your YouTube channel is your niche. The majority of viewers will watch your content for this reason as well, since certain viewers are drawn to particular subjects.
4. Identify Your Target Audience;
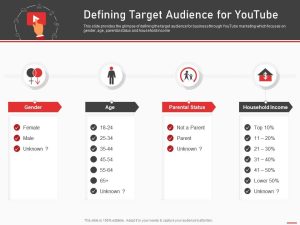
Tips for creating Youtube channel
Identifying your target audience for your videos becomes lot simpler once you’ve located your niche. You should take action on that as soon as possible.
5. Create a Value Proposition for Your Viewers;
You now know the subject matter of your channel and who your audience is. It’s time to promise everyone who views your material what you intend to do now.
6. Find Your Competitors on YouTube;
It’s critical for YouTube video creators to be aware of their rivals. It’s not like you have to fight with them constantly. Alternatively, attempt to outshine their films so that your channel receives more views than theirs.
7. Create a List of Video Ideas;
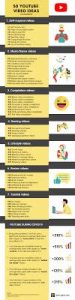
Tips for creating Youtube channel
After compiling a list of potential videos, it’s time to see how popular each one is on YouTube. Researching potential keywords is one approach to achieve this. This is how you find out what terms people use to look for videos on YouTube.
8. Test Your Video Ideas with Keyword Research;
Having compiled a list of potential videos, it’s time to see how well-liked they are on YouTube. Researching keywords is one method you can accomplish this. This is the procedure for identifying the terms that users use to look for videos on YouTube.
Summary
A channel banner is an extended, horizontal image that appears at the top of your YouTube channel’s website. It will immediately communicate the subject of your videos if it is well-designed.

Bladder and kidney cancer treatment. Millions of people worldwide suffer from kidney and bladder cancers, which are among the most common types of urologic malignancies. Despite the fact that both malignancies start in the urinary system, there are particular difficulties with diagnosis, treatment, and prognosis. We will examine the complexities of kidney and bladder cancer in this thorough guide, providing information on risk factors, symptoms, diagnostic techniques, and potential treatments. People can increase their chances of survival and quality of life by being aware of certain illnesses and taking proactive measures for early detection and efficient treatment.
BLADDER AND KIDNEY CANCER TREATMENT
Cancers of the kidney and bladder provide serious difficulties for both patients and medical professionals. However, prompt action and early discovery can significantly enhance results. by being aware of the symptoms, risk factors, and available treatments for these illnesses. People can actively pursue early diagnosis, effective treatment, and prevention. The prognosis for patients with kidney and bladder cancer is improving due to continuous research and advances in medical technology, providing optimism for a better future in the battle against these cancers.
Risk Factors;

1. Smoking: Tobacco use is a significant risk factor for both kidney and bladder cancer. With smokers being at a higher risk compared to non-smokers.
2. Occupational Exposures: Certain occupations involving exposure to chemicals such as aromatic amines and polycyclic aromatic hydrocarbons (found in industries like dyeing, painting, and rubber manufacturing) increase the risk of bladder cancer.
3. Age: The risk of kidney and bladder cancer increases with age, with the majority of cases diagnosed in individuals over 50 years old.
4. Obesity:

Being overweight or obese is associated with an increased risk of kidney cancer.
5. Family History: A family history of kidney or bladder cancer can elevate an individual’s risk of developing these diseases.
6. Chronic Kidney Disease: Individuals with chronic kidney disease are at a higher risk of developing kidney cancer.
7. Gender: Men are more likely to develop kidney and bladder cancer compared to women.
Symptoms;

1. Blood in the Urine (Hematuria): One of the most common symptoms of both kidneys and bladder cancer is blood in the urine, which may be visible to the naked eye or detected through urine tests.
2. Persistent Pain: Persistent pain in the side or lower back can be a symptom of kidney cancer, while pain in the pelvic area may indicate bladder cancer.
3. Changes in Urinary Habits: This includes frequent urination, urgency, and difficulty urinating.
4. Fatigue and Weight Loss:

Unexplained fatigue and weight loss may occur in advanced stages of kidney or bladder cancer.
5. Swelling: Kidney cancer can sometimes cause swelling in the legs and ankles due to the buildup of fluid.
Treatment Options:
1. Surgery: Surgical removal of the tumor or the affected kidney (nephrectomy) or bladder (cystectomy) is often the primary treatment for localized kidney or bladder cancer.
2. Radiation Therapy: Radiation therapy may be used to target and destroy cancer cells. Either alone or in combination with surgery or chemotherapy.
3. Chemotherapy:
Chemotherapy drugs may be administered orally or intravenously to kill cancer cells or shrink tumors.
4. Immunotherapy: This treatment option uses drugs that stimulate the body’s immune system to recognize and attack cancer cells.
5. Targeted Therapy: Targeted therapy drugs specifically target cancer cells’ vulnerabilities, inhibiting their growth and spread.
Summary
Treatments for bladder cancer include radiation, chemotherapy, intravesical immunotherapy (BCG), TURBT (tumor removal), and cystectomy (bladder removal). Treatments for kidney cancer include immunotherapy, targeted treatments, ablation (freezing or heating tumors), and partial or radical nephrectomy. For individualized treatment approaches, both frequently need multidisciplinary care.
How to restore deleted videos on Iphones. Although losing priceless images can be upsetting, lost photos on iPhones can be recovered with the correct information and resources. There are ways to restore those treasured memories, whether you’re using third-party software, iCloud, iTunes, or the “Recently Deleted” album. To ensure that your images are always safe and secure and to prevent potential data loss, don’t forget to routinely backup your iPhone.
HOW TO RESTORE DELETED VIDEOS ON IPHONES
In the age of smartphones, our devices serve as our digital albums, capturing cherished memories in the form of photos and videos. But what happens when those precious moments are accidentally deleted? Don’t fret – if you’re an iPhone user, there are ways to restore deleted photos and retrieve those special memories. In this comprehensive guide, we’ll walk you through the step-by-step process of recovering deleted photos on iPhones.
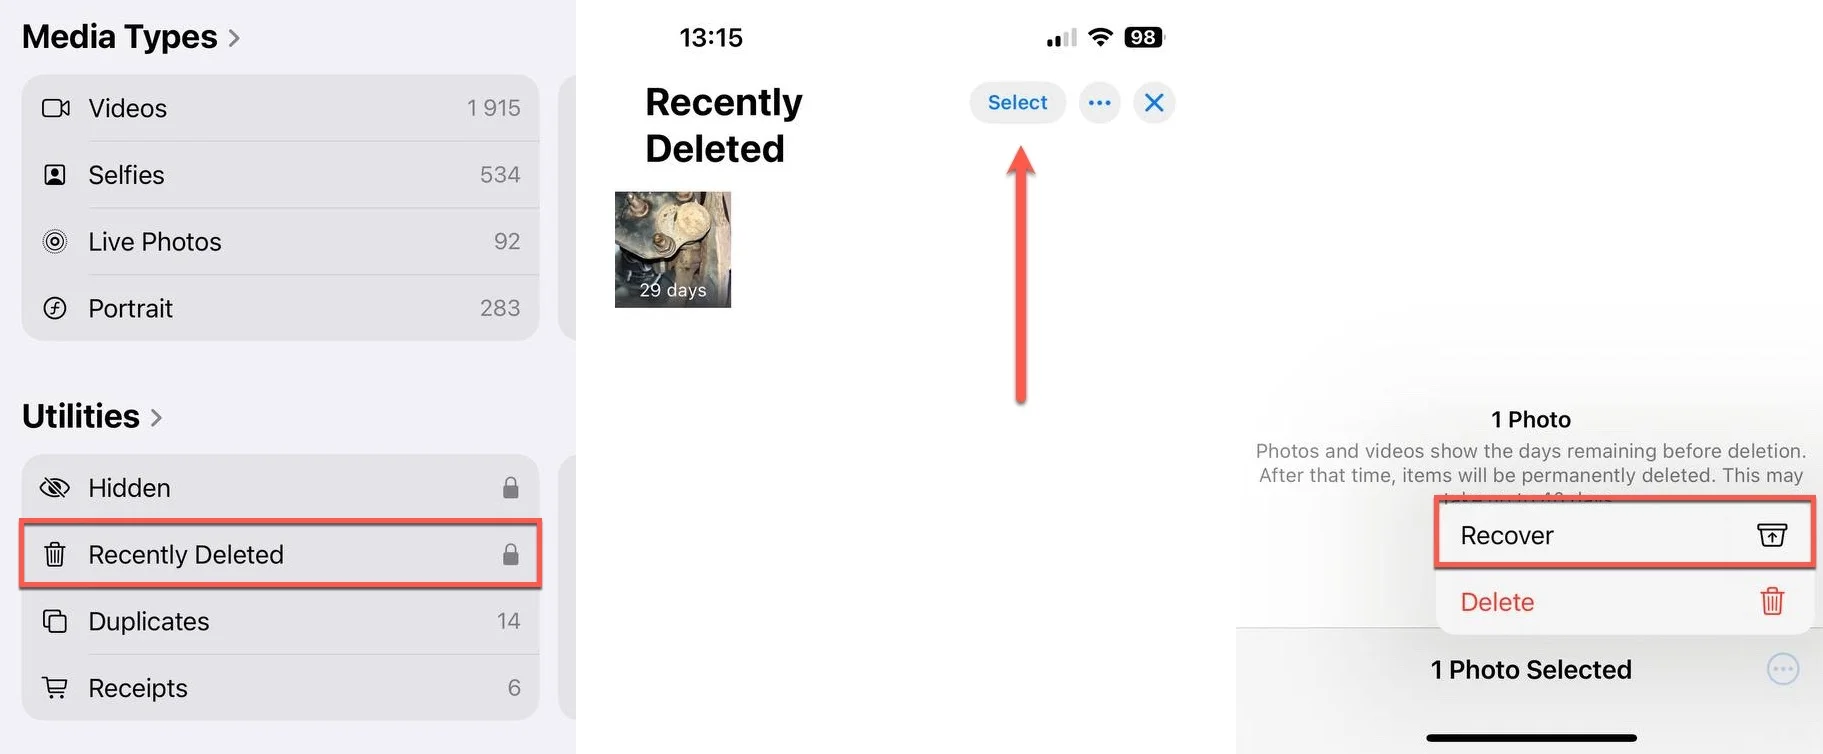
1. Check Recently Deleted Album:

– When you delete a photo on your iPhone, it doesn’t immediately disappear permanently. Instead, it gets moved to the “Recently Deleted” album, where it stays for a specified period before being permanently deleted.
– Open the Photos app on your iPhone and navigate to the “Albums” tab.
– Scroll down and look for the “Recently Deleted” album. Tap on it to open.
2. Restore Photos from Recently Deleted Album:
– In the “Recently Deleted” album, you’ll find all the photos and videos you’ve deleted within the last 30 days.
– Tap on the photo(s) you want to restore.
– Tap on the “Recover” option located at the bottom-right corner of the screen.
– Confirm by tapping “Recover Photo” to restore the selected photo(s) to their original album.
3. Restore from iCloud Photos:
– If you use iCloud Photos to sync your photos across devices, deleted photos may still be recoverable from your iCloud account.
– Open the Photos app and go to the “Albums” tab.
– Scroll down and select “Recently Deleted.”
– Tap on “Select” in the upper-right corner, then choose the photos you want to recover.
– Tap on “Recover” to restore the selected photos.
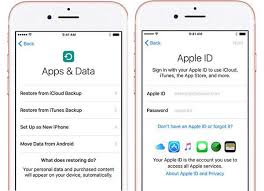
4. Use iCloud Backup:
– If you have an iCloud backup that includes the deleted photos, you can restore your iPhone from that backup to recover them.
– Go to Settings > [your name] > iCloud > Manage Storage > Backups.
– Select the relevant backup that contains the deleted photos.
– Erase your iPhone by going to Settings > General > Reset > Erase All Content and Settings.
– Set up your iPhone again and choose to restore from iCloud Backup during the setup process.
5. Use iTunes Backup:
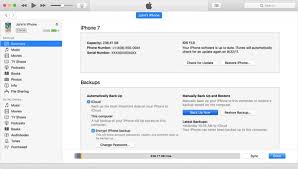
How to restore deleted videos on Iphones
– If you regularly back up your iPhone to iTunes on your computer, you can restore deleted photos from a previous backup.
– Connect your iPhone to your computer and open iTunes.
– Select your device when it appears in iTunes.
– Choose “Restore Backup” and select the backup that contains the deleted photos.
– Click “Restore” and wait for the process to complete.
6. Third-Party Data Recovery Software:
– If you don’t have an iCloud or iTunes backup and the photos are not in the “Recently Deleted” album, you can try using third-party data recovery software.
– There are various software options available, such as Dr.Fone, PhoneRescue, and iMyFone D-Back, which can help recover deleted photos from iPhones. Ensure to choose a reputable software and follow the instructions provided.
Tips for Preventing Photo Loss in the Future:
How to restore deleted videos on Iphones
– Regularly back up your iPhone using iCloud or iTunes to ensure that your photos are safely stored.
– Enable iCloud Photos to automatically sync your photos and videos across all your Apple devices.
– Be cautious when deleting photos, and double-check before confirming deletion to avoid accidental loss.
Summary
Check the Recently Deleted album in the Photos app, which retains files for 30 days, to recover deleted videos on an iPhone. Choose the video and click “Recover” after opening Photos > Albums > Recently Deleted. Restore from a prior iCloud or computer backup if it’s not there.

Teenage girls fashion guide

Review for La Vie Est Belle

Reviewing Dior J’adore

A Step-by-Step Guide to Deleting Reels on Instagram

A Comprehensive Guide to Setting Up a YouTube Premiere