
Agriculture
Steps to Deadhead Flowers
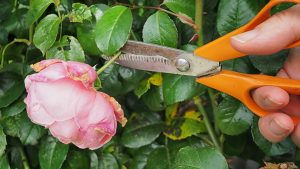
STEPS TO DEADHEAD FLOWERS
Steps to deadhead flowers. Keeping your garden and yard lush and full of lovely blooms all season may appear to be a big task, but it’s quite simple.
What does it mean to Deadhead Flowers?
Deadheading is just removing dead flower heads from plants. If you’re new to gardening and want to know how to deadhead a flower.
STEPS TO DEADHEAD FLOWERS
Tips for Deadheading Flowers;
1. Plan your Deadheading
Deadheading flowers does not require precise time. This garden duty can be completed throughout the growing season, from spring to fall. You can deadhead flowers whenever they begin to fade. This is visible in single blossoms on single stems.
2. Select a Deadhead Cutting Point
It can be difficult to decide which location to deadhead. If you cut near the bottom of the bloom, you will most likely end up with a dry and unsightly stem. Where to deadhead or trim a plant varies based on the species.
3. Make a Deadhead Cut
Although certain plants can be pinched, I prefer to use my Micro-Tip Snips to deadhead most of them. They let me rapidly reach into a plant and make a neat, tidy cut with no damage to the plant.
4. Cleaning up is Quick and Easy
The primary goal of deadheading plants is to make your flower beds, so don’t leave your fallen blossoms on the ground. It’s just as simple to gather them in a little bucket.
5. Fertilize your Main Development
Deadheading flowers and trimming promote fresh growth. Remember to follow a regular fertilizing program to keep
your plants growing strong and healthy. Annuals are particularly heavy feeders.
Why should I deadhead?
Flowering plants perform several functions besides adorning our surroundings.


Tips for compost manure. How to produce manure from compost. One of the finest methods for managing livestock manure and converting it into a beneficial soil additive is composting. A farmer can save a lot of money by producing their own compost manure because fertilizer prices are increasing almost every month. Therefore, compost manure is made up of worms and decomposing animal feces. Composting helps produce high-nutrient organic fertilizer that improves soil performance while managing organic waste on farms.
TIPS FOR COMPOST MANURE
In contrast to raw manure, compost manure is animal waste (such as cow, chicken, or horse dung) that has been biologically broken down through controlled decomposition (composting) into a stable, nutrient-rich soil amendment. This process requires balanced carbon (browns), nitrogen (greens), moisture, and aeration to produce a valuable fertilizer that improves soil health, reduces volume, kills weed seeds and pathogens, and provides slow-release nutrients for plants.
What’s a compost?
It is the end product of the biological breakdown of organic waste. Because it gives the soil the nutrients it needs to support plant.
How to;

1. Conditions for Composting Organic waste materials (manure, grass or hay, sawdust.
and cautious management are the fundamental needs.
2. Manure composting procedure Manures naturally contain the bacteria that facilitate composting. By handling compost correctly, the producer encourages these bacteria to break down.
3. Degree of Heat Turn the pile of composted manure if the temperature falls below 110 F, or roughly 43 degrees Celsius, for optimal results.
More Guidelines;

TIPS FOR COMPOST MANURE
The manure should be composted after three to five. However, Temperature readings must be made at different depths and places.
4. Typical composting difficulties include:
* Meanwhile, An excessively damp pile indicates insufficient oxygen for the microorganisms to breathe. The process is subsequently slowed down by a lack of oxygen,
Other Guidelines;

TIPS FOR COMPOST MANURE
and when the pile is very damp, odor problems arise. Compost should have a moisture content that is similar to that of a wrung-out sponge.
* Although, Controlling oxygen Make sure you sometimes mix the compost pile thoroughly.
When will it be completed? The compost will be ready in three to four months. If that’s not the case, let it alone; it will likely take 6 months.
When you’re done; you can utilize it for farming, gardening, or pasture.
Compost has advantages over raw manure. Any pathogens, parasites, or weed seeds.
Summary
Effective composting requires balancing nitrogen-rich manure with carbon materials (such as leaves or straw) in a 30:1 C:N ratio, maintaining 50–60% moisture (like a wrung sponge), ensuring aeration by turning it frequently (every few weeks), aiming for high temperatures (120–160°F) to kill pathogens, keeping it covered to control moisture and heat, and producing dark, earthy-smelling compost in months rather than years.


Fertilizers spreader. Fertilizers are synthetic or natural materials that are added to soil or plants to provide vital nutrients, mainly nitrogen (N), phosphorus (P), and potassium (K). By refilling what crops absorb from the earth, fertilizers increase plant growth, yield, and health. They come in the form of organic matter or concentrated chemicals like urea, DAP, or NPK mixes, which increase soil fertility and guarantee that plants receive the components they need to produce protein, DNA, and chlorophyll—all of which are essential for productive agriculture.
FERTILIZERS SPREADER
Calibrate your spreader, walk at a steady, consistent pace, start at the edges, close the spreader for turns, utilize a crisscross pattern, and always completely clean your equipment after use to minimize buildup and guarantee even application and plant health. Keep an eye on the weather, particularly the wind and humidity, and adjust the spreader settings according to the particular fertilizer product.
How to use fertilizer spreader. Uniform coverage is essential for success with any of it and the quality of the spreader is what determines this.
Definition;
Fertilizer spreaders are crucial tools for any do-it-yourself homeowner looking to keep their yard healthy. It evenly distributes fertilizers over lawns and gardens, ensuring that your grass and plants receive the nutrients they require to remain healthy.
Types of Spreaders;

FERTILIZERS SPREADER
There are two types: rotary spreaders and drop spreaders.
1. Rotary spreaders: These measure the granules and spread them out in a broad swath that is general.
2. Drop spreaders: measure out fertilizer and then drop it into a space as wide as.
3. Liquid spreaders: Liquid fertilizer spreaders use a pump or pressurized tank, resulting in a fine mist across your lawn.
How to Setup;

If your spreader’s label contains guidelines for setting;
follow the steps below:
1. Switch the spreader to OFF.
2. Arrange the setting as advised by the manufacturer. turn off the spreader to confirm that the fertilizer gate closes and opens properly.
3. Fill the spreader. Do this on a driveway or sidewalk, not your yard.
4. Determine the amount of fertilizer required for 1,000 square feet of lawn to attain the necessary nitrogen levels.
More Steps Include;

FERTILIZERS SPREADER
Divide this number by two. For example, if you want to apply 5 pounds of fertilizer to 1,000 square feet of lawn, put 2.5 pounds in the hopper.
1. Halve the spreader’s bottom opening.

FERTILIZERS SPREADER
2. Add fertilizer to the hopper. commence by using coverage recommendations
3. Fertilize your grass according to the coverage guidelines below.
4. Determine the size of the lawn you covered. If this area (width x length) is near 500 square feet, you’ve done it right. Continue to fertilize. Begin spreading by snaking up and down your lawn, paddock,
Summary
In order to prevent waste and ensure consistent plant nutrition, a fertilizer spreader is an essential agricultural tool. Common types include handheld, drop (precise for gardens/edges), and broadcast (rotary for large areas), all of which are made for effective application in farming or lawn care.


Uses of garden tools. The usage of gardening equipment. Regardless of the size of your backyard, these suggestions are designed to give you a strong foundation for your gardening endeavors. But let this guide be your companion as you venture into the rewarding realm of gardening. It will not only help you produce plants, but it will also help you hone your skills and enthusiasm for this ancient profession. Gardening tools are equipment used for planting and caring for seeds and plants, as well as for preparing and cultivating soil.
USES OF GARDEN TOOLS
When buying landscaping equipment, it’s simple to go crazy. Although they might be expensive and take up a lot of room, you can prevent your shed or storage area from getting overcrowded by concentrating on the essentials. While there are always better and bigger options, making the most of your investment may be achieved by purchasing and keeping the highest-quality instruments within your means.
1. Spade Tool;

spade Earth is dug up and broken apart using a shovel.
How to use Tools and Applications:
As you rise with your legs, maintain a straight back and a solid grasp. For instance, to avoid overworking yourself when edging garden beds. work at a steady pace and take rests.
2. Shovel;

This is used for material scooping that is loose.
How to Apply:
To avoid putting tension on your back, raise your legs and maintain a straight back. As an illustration, pace yourself when digging and make sure there are no subterranean services nearby.
3. Garden Fork;

USES OF GARDEN TOOLS
Meanwhile, This works well for loosening up clumps and turning soil.
How to Use:
However, To avoid back pain when lifting, keep your back straight and bend your knees. Example: When turning soil, lift using your knees rather than your back while maintaining a tight grasp on the handle.
4. Hoe;

USES OF GARDEN TOOLS
These are employed in soil preparation and weeding.
How to Apply Tools and Applications:
Make sure the area is free of pebbles and debris before using, and adopt the right stance to avoid back strain. Example: To keep your balance when weeding, chop the vegetation without going too far.
5. Rake;

USES OF GARDEN TOOLS
Meanwhile, These are tools for collecting leaves and other trash and leveling soil.
How to Use:
Also, To prevent back pain, keep your back straight and refrain from overreaching. 12 Helpful Tips For The Beginning Gardener.
Summary
By offering leverage, accuracy, and efficiency for soil preparation, planting, maintenance, and harvesting, garden tools make gardening easier and more productive. Examples of these tasks include digging (spades, trowels, forks), weeding (hoes, hand weeders), pruning (shears, loppers), watering (hoses, cans), and lawn care (mowers, rakes, scarifiers).

Water Contaminants

Rain Water Relevance

Amethyst Importance

A Step-by-Step Guide to Deleting Reels on Instagram

How to Create a WhatsApp Group


Pingback: DIY Potpourri: A Natural Way to Scent Your Home - SimplExplainer