Social media
How to link whatsapp and facebook page
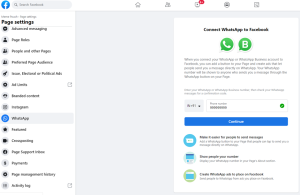
How to link whatsapp and facebook page. These instructions will allow you to easily connect your WhatsApp account to your Facebook page, facilitating effective audience engagement and communication on both networks. Integrating WhatsApp with Facebook can improve your online visibility and expedite your communication efforts, regardless of your role as a social media influencer, digital marketer, or small business owner.
HOW TO LINK WHATSAPP AND FACEBOOK PAGE
In today’s interconnected digital landscape, integrating different communication channels can streamline your online presence and enhance your reach. Linking your WhatsApp account to your Facebook Page is a strategic move that allows you to leverage the power of both platforms for seamless communication and engagement with your audience. In this guide, we’ll walk you through the process of linking your WhatsApp account to your Facebook Page step by step.
1. Ensure Compatibility:
Before proceeding, ensure that your WhatsApp account is compatible with linking to a Facebook Page. This feature is available for WhatsApp Business accounts, so if you haven’t already, consider upgrading your personal WhatsApp account to WhatsApp Business.
2. Access WhatsApp Business Settings:
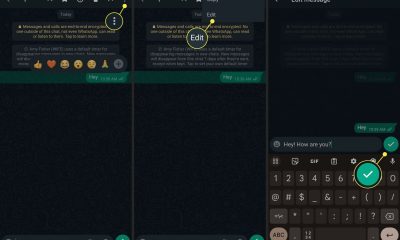
Open the WhatsApp Business app on your smartphone and navigate to the settings menu. This can usually be accessed by tapping on the three vertical dots in the top-right corner of the screen.
3. Tap on Business Tools:
Within the settings menu, locate and tap on the “Business Tools” option. This section contains a variety of tools and integrations designed to enhance your business’s communication capabilities.
4. Select Facebook:
In the Business Tools section, you’ll find an option labeled “Facebook.” Tap on this option to proceed with linking your WhatsApp account to your Facebook Page.
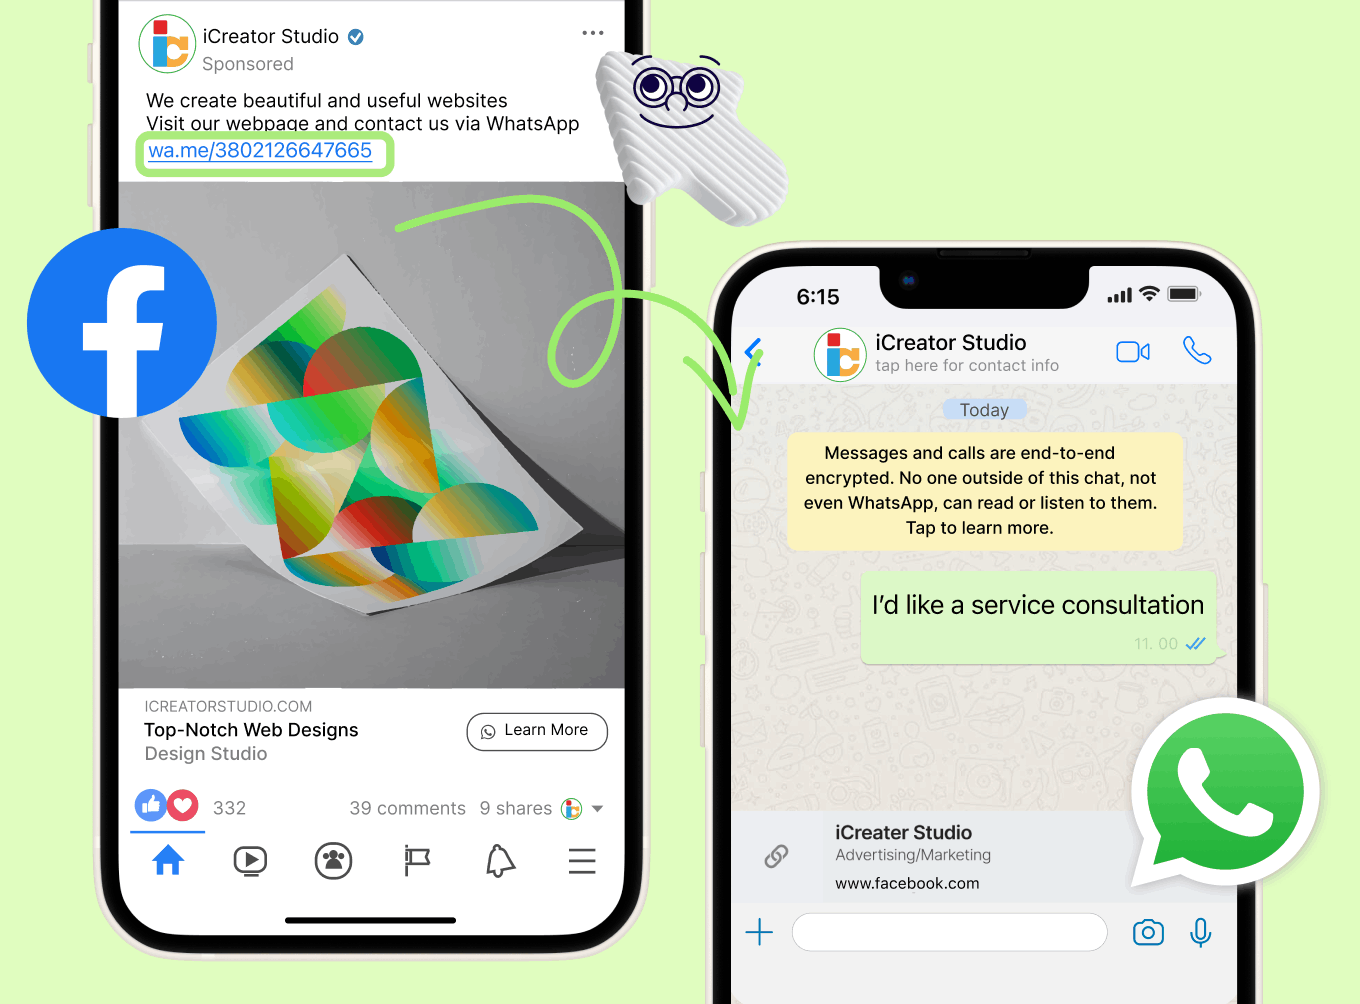
5. Log in to Facebook:

You’ll be prompted to log in to your Facebook account. Enter your Facebook credentials (email address and password) to proceed. Make sure you have administrative access to the Facebook Page you want to link with your WhatsApp account.
6. Choose Your Page:
After logging in, you’ll be presented with a list of Facebook Pages associated with your account. Select the Page that you want to link to your WhatsApp account from the list.
7. Confirm the Link:
Following your selection of the relevant Facebook Page, you will be prompted to verify the connection between your WhatsApp account and the chosen Page. Check the details and authorization needed for the integration, then click “Proceed.”
8. Customize Settings:
How to link whatsapp and facebook page
Depending on your preferences and business needs, you may have the option to customize various settings related to the integration between WhatsApp and Facebook. Explore the available options and adjust them according to your requirements.
9. Test the Integration:
After linking your WhatsApp account to your Facebook Page, it’s a good idea to test the integration to ensure that messages and communication flow smoothly between the two platforms. Send a test message from your Facebook Page’s inbox to your linked WhatsApp account, and vice versa, to verify the connection.
10. Monitor and Manage Interactions:
How to link whatsapp and facebook page
Track and manage WhatsApp and Facebook conversations inside their respective platforms after the linkage is configured. Respond promptly to messages, inquiries, and customer interactions to maintain a high level of engagement and satisfaction.
Summary
Use the WhatsApp Business app and connect it to your Facebook Page through the business tools or your Page Settings. Both a Facebook business page and a business (not personal) WhatsApp account are required. Through the connection, you can put a “WhatsApp” button to your page so that others can message you immediately.
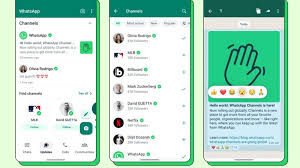
Whatsapp channels creation. You may build a profitable WhatsApp channel that successfully engages your audience, connects you with them, and advances your company’s or organization’s objectives by following these steps. Your WhatsApp channel can become a useful tool in your digital marketing toolbox with the correct approach and persistent work.
WHATSAPP CHANNELS CREATION
WhatsApp has become a commonplace communication tool in today’s linked world. With more than two billion users globally, it’s the perfect platform for companies, groups, and individuals to engage with their target audience. Building a community around your company or cause, sharing updates, and interacting with your fans can all be accomplished with the help of a WhatsApp channel. We’ll walk you through the entire process of setting up a WhatsApp channel in this article.
1. Define Your Purpose:
Before diving into creating your WhatsApp channel, it’s essential to define your purpose. Ask yourself: What do you aim to achieve with this channel? Whether it’s providing customer support, sharing news and updates, or fostering a community, having a clear purpose will guide your content strategy and engagement efforts.
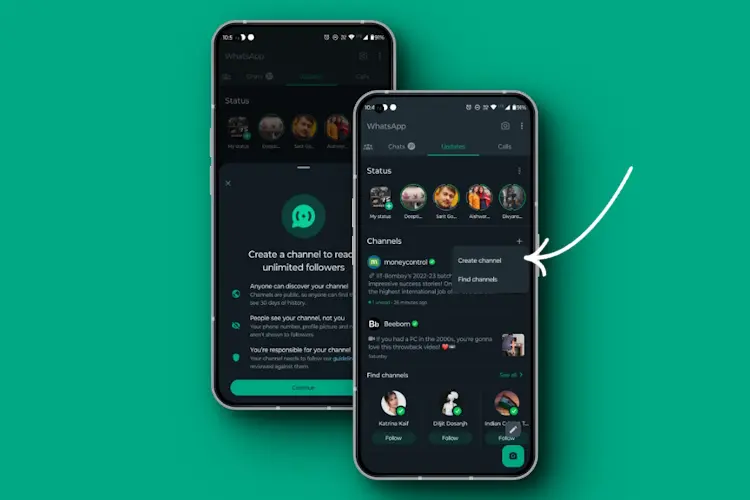
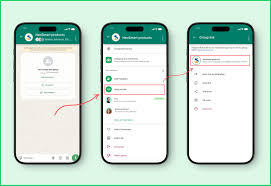
2. Create your channel :
WhatsApp offers a dedicated solution for businesses called WhatsApp Business. It provides features like business profiles, messaging tools, and statistics to help you manage your interactions efficiently. Download the WhatsApp Business app from the App Store or Google Play Store and follow the prompts to set up your business profile.
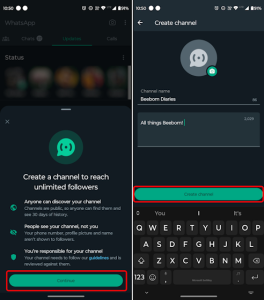
After that, click on the status bar of the Whatsapp app, you will see channels available.
3. Click on create channel and customise Your channel:
Click on the + sign and you’ll see where it is written “create channel, after that it’s time to customize your profile to reflect your brand identity. Upload a profile picture, add your name and possibly a description. A complete and professional-looking profile will instill trust and credibility among your audience.
4. Create Engaging Content:
Now that your profile is set up, it’s time to start creating content for your WhatsApp channel. Whether it’s text updates, images, videos, or links to relevant resources, make sure your content is engaging, informative, and adds value to your audience. Consider using multimedia formats to make your messages more visually appealing and interactive.
5. Promote Your Channel:
Whatsapp channels creation
Building an audience for your WhatsApp channel requires proactive promotion. Share your WhatsApp number and a brief description of your channel on your website, social media profiles, email newsletters, and other marketing channels. Encourage your existing followers to join your WhatsApp channel to stay updated and engaged.
6. Engage with Your Audience:
Engagement is key to the success of your WhatsApp channel. Respond promptly to messages, address inquiries, and foster discussions within your community. Use WhatsApp’s features like broadcast lists, group chats, and automated responses to streamline your communication and provide timely assistance to your audience.
7. Analyze and Iterate:
Whatsapp channels creation
Regularly monitor the performance of your WhatsApp channel using the built-in analytics provided by WhatsApp Business. Track metrics like message delivery, open rates, and response times to gauge the effectiveness of your efforts. Use these insights to refine your content strategy, optimize your engagement tactics, and continuously improve the overall experience for your audience.
Summary
Open the app, pick the Updates tab, tap the plus symbol next to Channels, and choose Create Channel to start a WhatsApp channel. Add a channel name, description, and icon by following the instructions. Channels are free, have an infinite amount of followers, and don’t reveal your phone number to them.

Whatsapp group creation tips. A quick and easy method to remain in touch with your network and have important conversations is to create a WhatsApp group. WhatsApp groups provide an easy way to communicate and work together, whether for personal or professional reasons.
WHATSAPP GROUP CREATION TIPS
WhatsApp groups are a convenient way to connect with friends, family, colleagues, or like-minded individuals. Whether you want to plan events, discuss topics of interest, or simply stay in touch, creating a WhatsApp group is quick and easy. In this guide, we’ll walk you through the steps to create your own WhatsApp group.
1. Open WhatsApp:
Begin by opening the WhatsApp application on your smartphone. WhatsApp is available for both iOS and Android devices and can be downloaded from the App Store or Google Play Store if you haven’t already installed it.
2. Navigate to Chats:
Once you’re in the WhatsApp interface, navigate to the “Chats” tab located at the bottom of the screen. This is where you’ll find all your existing chats and groups.
3. Tap on the New Chat Icon:
In the Chats tab, look for the icon or button that allows you to start a new chat. On most versions of WhatsApp, this is represented by a chat bubble icon with a “+” sign or a “New Chat” button. Tap on it to proceed.
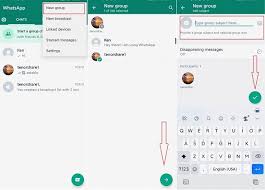
4. Select “New Group”:
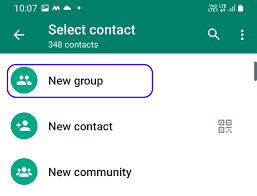
After tapping on the new chat icon, you’ll be presented with several options, including “New Group” and “New Broadcast.” Since we’re creating a group, select “New Group.”
5. Add Participants:
Next, you’ll need to select the participants you want to add to your group. You can choose from your WhatsApp contacts list by tapping on their names. As you select participants, their names will appear at the top of the screen under “Participants.”
6. Set a Group Name:
Whatsapp group creation tips
Once you’ve selected all the participants, tap on the “Next” or “OK” button, depending on your device. You’ll then be prompted to set a name for your group. Choose a descriptive and memorable name that reflects the purpose or theme of the group.
7. Customize Group Settings:
WhatsApp allows you to customize various group settings, such as group description, group icon (profile picture), and group privacy settings. You can access these options by tapping on the group name at the top of the chat screen and then selecting “Group Info” or “Group Settings,” depending on your device.
8. Create Your Group:
Whatsapp group creation tips
Once you’ve set the group name and customized the settings to your liking, tap on the “Create” or “Done” button to create your WhatsApp group. The group will be instantly created, and all selected participants will be added to it.
9. Start Chatting:
Congratulations! You’ve successfully created a WhatsApp group. You can now start chatting with the members of your group by sending messages, sharing photos and videos, or making voice and video calls directly from the group chat interface.
10. Manage Your Group:

Whatsapp group creation tips
As the group admin, you have the ability to manage the group by adding or removing participants, changing group settings, and moderating discussions. Be mindful of group guidelines and ensure that all members adhere to them to maintain a positive and productive group environment.
Summary
Establish a clear goal for your WhatsApp group, give it a short name (no more than 100 characters), and include a recognizable group icon. Establish community rules early on to keep things focused, designate several administrators for larger groups, and use tools like “[Disappearing Messages)” to make discussion interesting.
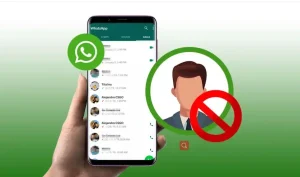
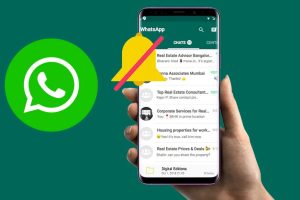
Tips for blocking someone on whatsapp. You may prevent someone from calling, chatting, or viewing your updates on WhatsApp by blocking them using the conversation settings (three dots > More > Block) or profile view. If you decide to report the individual, you will have to manually remove them from your phone’s contact list even though it will conceal your status.
TIPS FOR BLOCKING SOMEONE ON WHATSAPP
Although, there are a number of benefits of blocking someone on WhatsApp that are centered on improving personal peace of mind, safety, and privacy.
Through WhatApp settings, blocking unknown or objectionable contacts is simple. In a similar vein, it is possible to determine whether someone has blocked you. However, its a good idea to learn the consequences of blocking a contact on whatsapp and how to unblock them again before you block them
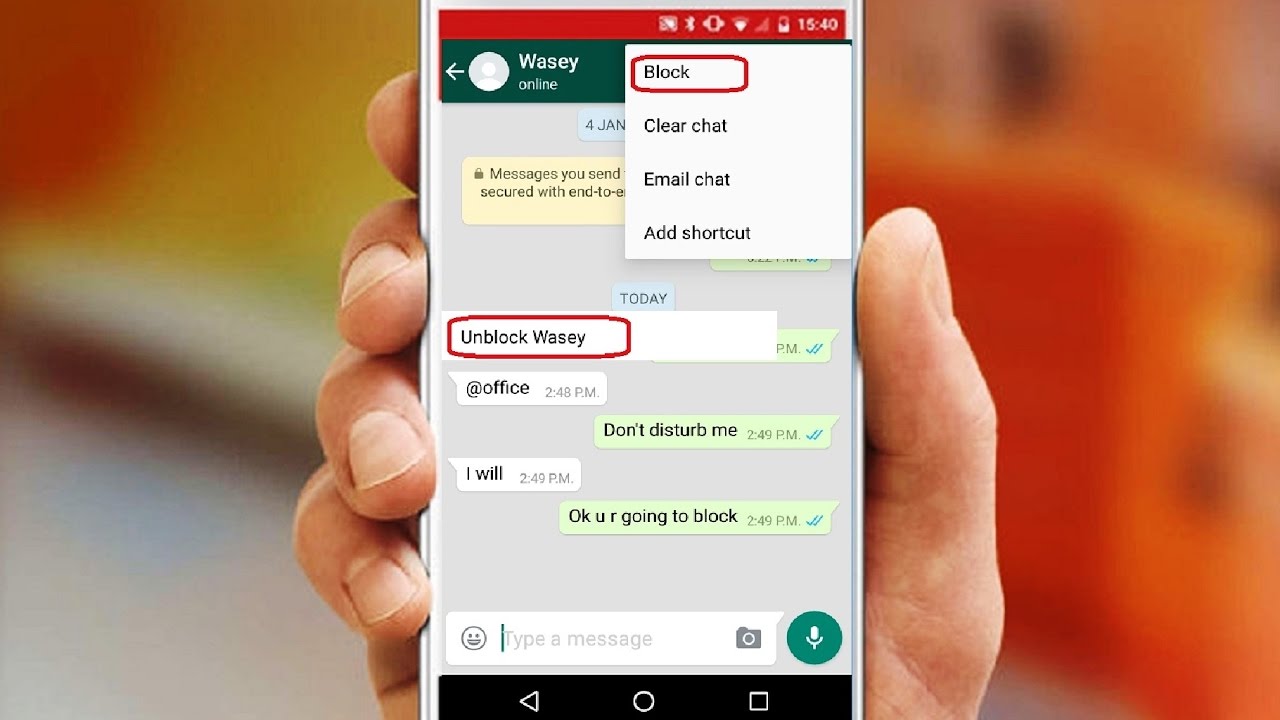
How to block a number on WhatsApp quickly;
Step 1: In the chat, navigate to the profile name of the contact you wish to block.
Step 2: Scroll down in the profile information to “(Block contact)”.
Step 3: To remove a contact, the “Block” option is sufficient. If the number seems malicious or you consider it spam, “Report and block” is recommended to block the contact from the WhatsApp servers too.
What happens if I mute someone on WhatsApp?
Tips for blocking someone on whatsapp
However, yes, even if you mute someone on WhatApp, you can still receive calls from them. Muting only stops message notifications, not call alerts. Does Someone Know When You Mute Their WhatApp Status? You won’t see their updates in your frontline feed, but they won’t know you’ve done it.
How to spot if you’ve been blocked on WhatsApp;
Tips for blocking someone on whatsapp
Also, whatsApp doesn’t notify users once they’ve been blocked. But there are a few signs that indicate if you’ve been blocked by someone:
- You can no longer view their status updates nor online status.
- You’ll no longer see the profile picture of a contact.
- Sent messages receive only a single check mark.
- You can no longer call them.
Summary
With WhatsApp, users may report spam and block contacts to stop getting calls and messages. Blocked individuals only receive a single checkmark in messages and are unable to access “last seen,” online status, or profile image updates. Chat settings allow you to block, and these actions are private.

Reasons for water pollution

Tips for washing hair

Relevance of water consumption

A Step-by-Step Guide to Deleting Reels on Instagram

A Comprehensive Guide to Setting Up a YouTube Premiere