Connect with us

Social media

How to start a live broadcasting on Facebook

Published

on

In today’s digital age, live video has emerged as a powerful tool for connecting with audiences in real-time and engaging with them on a personal level. Facebook Live, in particular, provides a convenient platform for individuals, businesses, and organizations to broadcast live video content to their followers. Whether you’re looking to host a Q&A session, share behind-the-scenes footage, or broadcast a live event, going live on your Facebook page can help you connect with your audience in a meaningful way. In this guide, we’ll walk you through the steps to successfully go live on your Facebook page.

Step 1: Access Your Facebook Page

To go live on your Facebook page, you’ll first need to log in to your Facebook account and navigate to your page. You can do this by clicking on the page’s name in the left sidebar of your Facebook homepage.


Step 2: Click on the Live Video Option

Once you’re on your page, look for the “Live” option, typically located near the top of the page. Click on this option to start the process of going live.
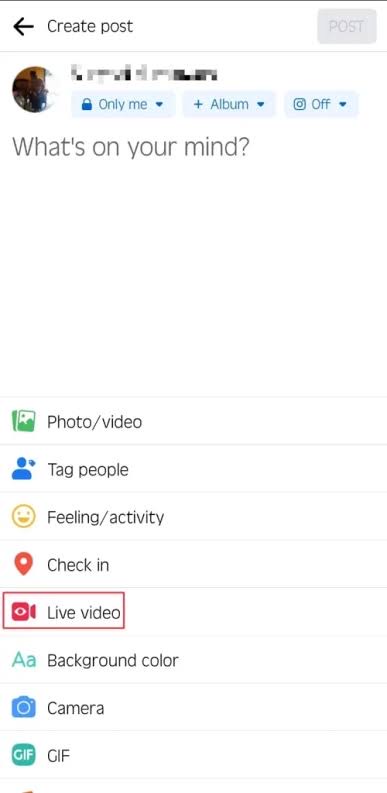
Live broadcast on Facebook


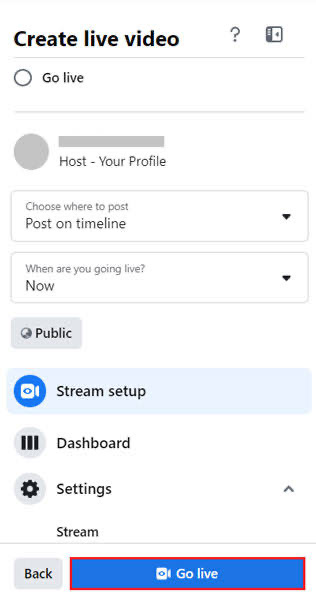
Step 3: Configure Your Live Video Settings

Before you start broadcasting, Facebook will prompt you to configure your live video settings. Here, you can add a description for your live video, choose who can see it (public, friends, specific groups, etc.), and select any additional settings, such as allowing viewers to comment or react during the broadcast.
 

Step 4: Set Up Your Camera and Microphone

Next, make sure your camera and microphone are set up and working correctly. You can use your device’s built-in camera and microphone or connect external equipment for higher quality audio and video.

Step 5: Choose Your Audience and Privacy Settings

Once your camera and microphone are set up, you’ll need to choose your audience and privacy settings. Decide whether you want to broadcast to the public, specific friends, or a custom audience, and adjust your settings accordingly.

Step 6: Add a Compelling Description

Before you go live, take a moment to add a compelling description for your video. This description will appear alongside your live video and can help attract viewers to tune in.

Step 7: Click on the “Go Live” Button
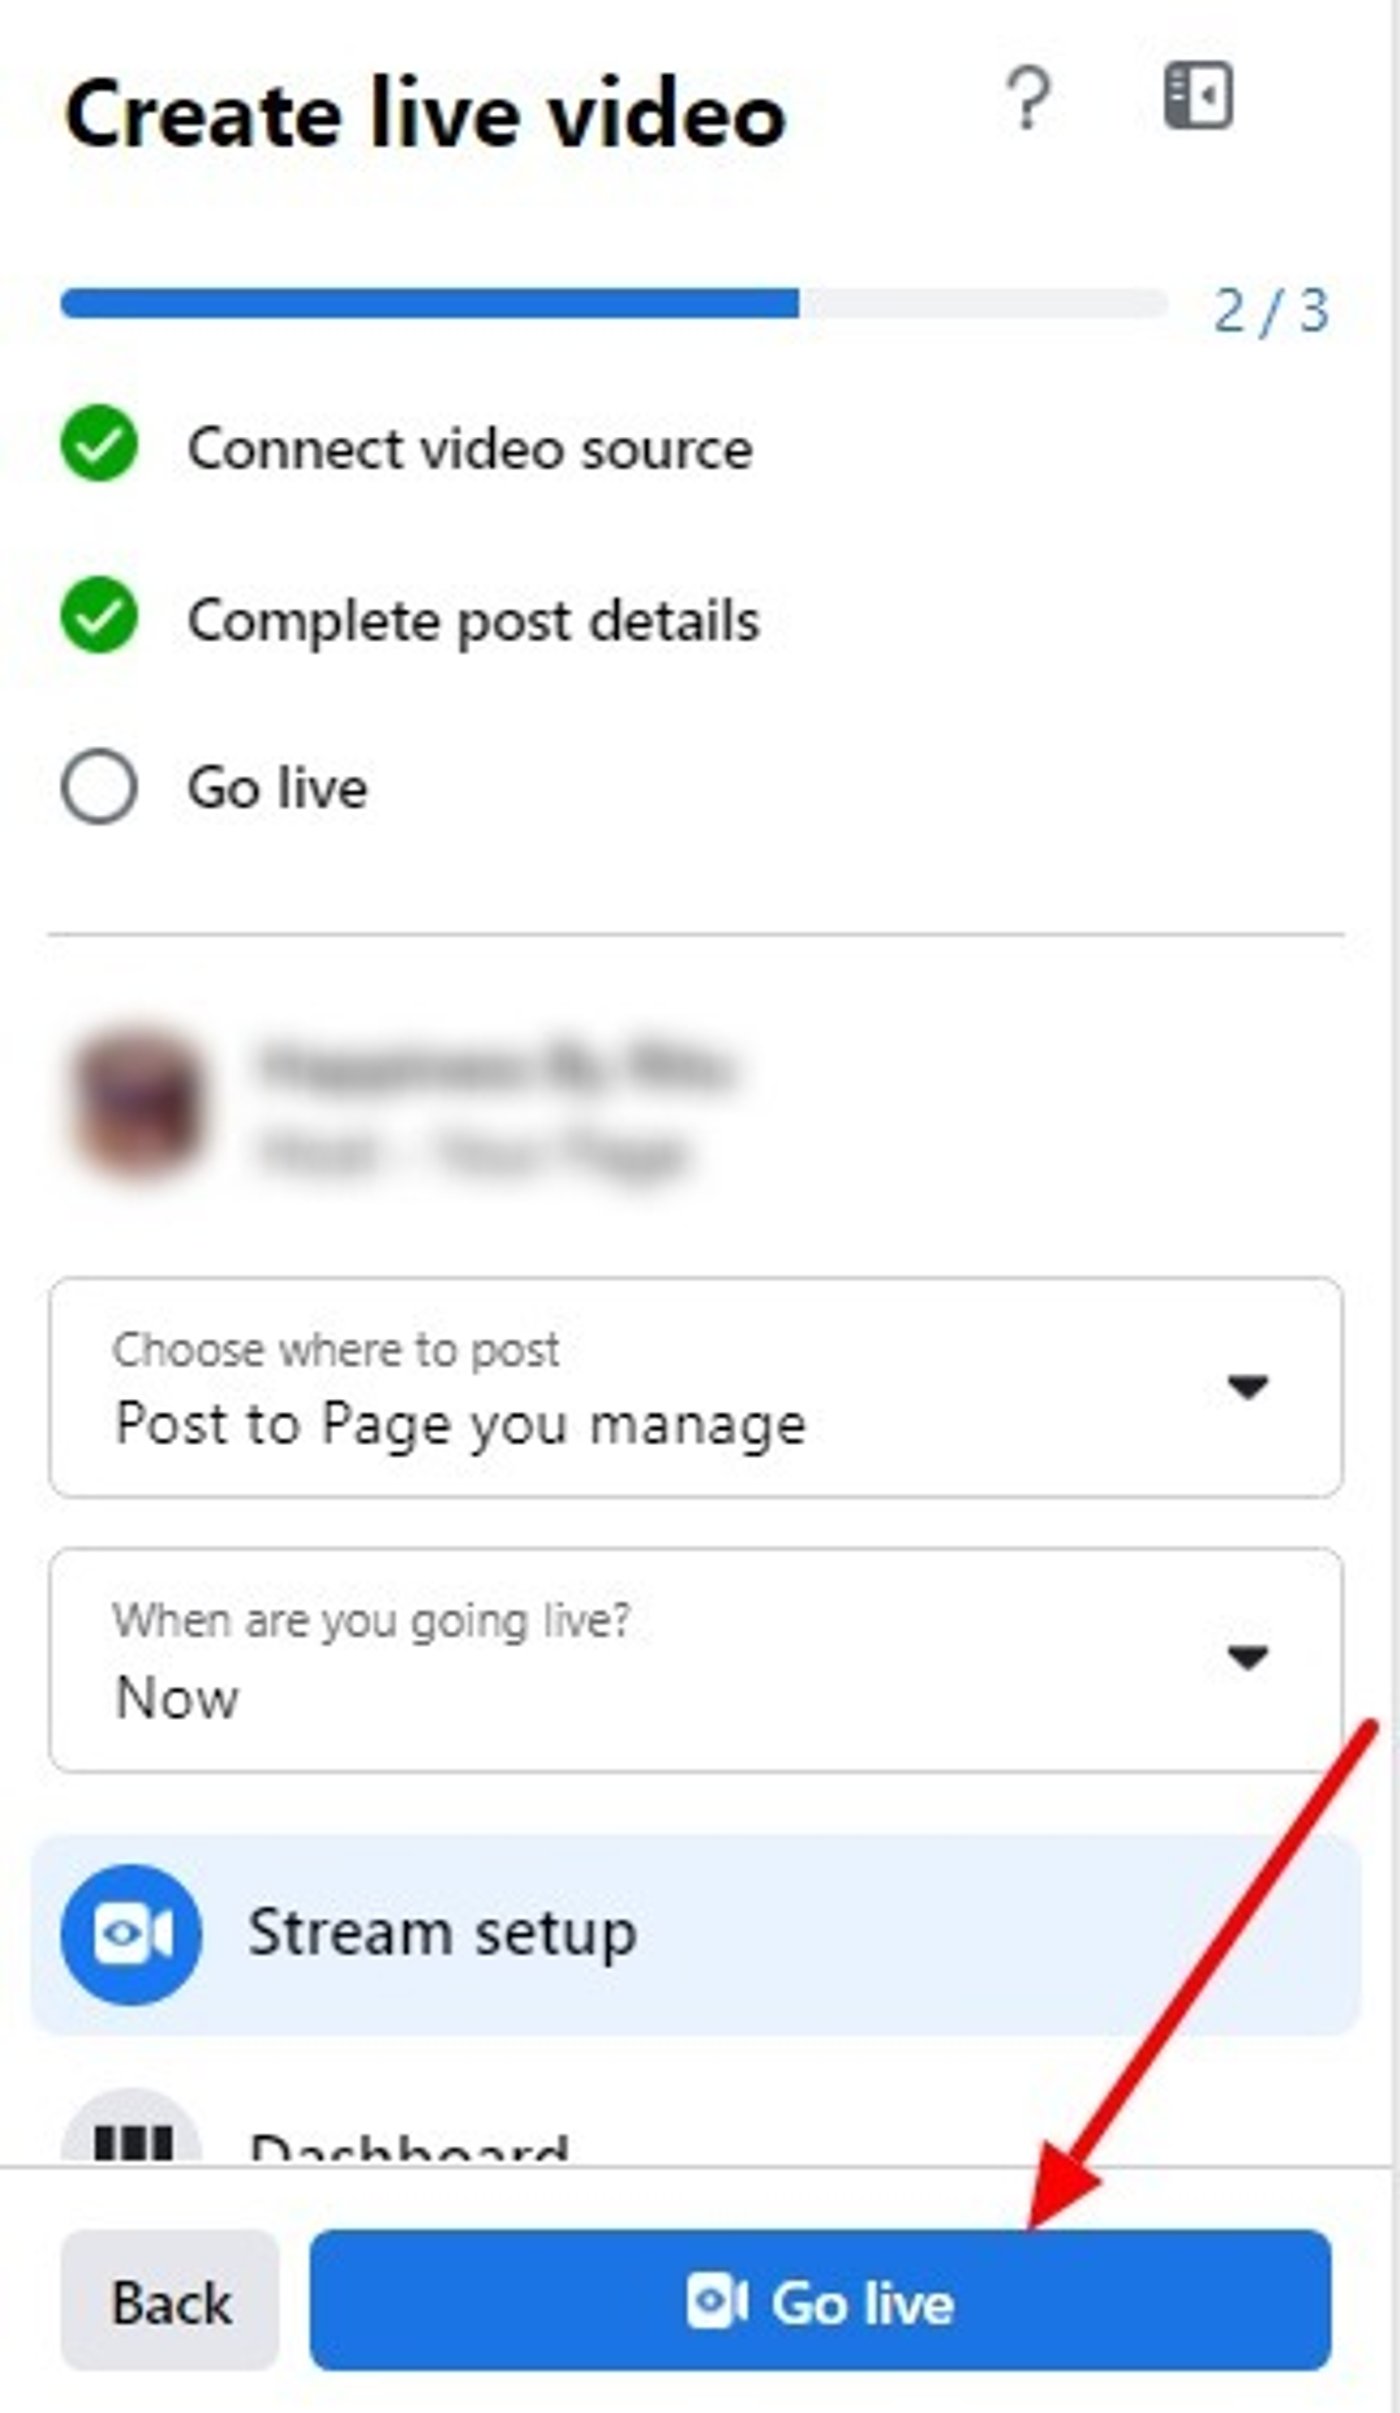
When you’re ready to start broadcasting, click on the “Go Live” button. Facebook will count down from three, giving you a final chance to prepare before your live video begins.

Step 8: Interact with Your Audience

Once you’re live, take advantage of the opportunity to interact with your audience in real-time. Respond to comments, answer questions, and engage with viewers to make the experience more interactive and engaging.

Step 9: End Your Broadcast

When you’re ready to end your live broadcast, simply click on the “Finish” button. Facebook will give you the option to save your video to your page for later viewing or delete it if you prefer.

Step 10: Review Your Performance

After your live broadcast ends, take some time to review your performance using Facebook Insights. Insights provide valuable data on your video’s reach, engagement, and audience demographics, allowing you to learn from your experience and improve future broadcasts.

By following these steps and leveraging the power of Facebook Live, you can connect with your audience in a meaningful way, share valuable content, and strengthen your online presence on the world’s largest social media platform.

Continue Reading
1 Comment

1 Comment

  1. Pingback: Essential Gear for Facebook Live Streaming - SimplExplainer

Leave a Reply

Your email address will not be published. Required fields are marked *

Social media

Merits and Demerits of Facebook

Published

on

MERITS AND DEMERITS OF FACEBOOK

Merits and demerits of Facebook. This social media handle has become a potent instrument in the field of education, with benefits and drawbacks for institutions, teachers, and students alike.

MERITS AND DEMERITS OF FACEBOOK

MERITS AND DEMERITS OF FACEBOOK

Merits

1. Establishing contact

It is possible to communicate with students worldwide using Facebook. Friends and relatives can stay in touch with you no matter where you are in the world. Students can utilize it to communicate with fellow students..

2. Information

The most popular medium for people to regularly share information is Facebook. The same is applicable to educational settings as well. By setting up a Facebook group, kids will be able to communicate with their peers.

3. News Unlike our ancestors,

students can watch news without turning on the TV or reading the morning papers. Students only need to follow a Facebook page to get the most recent headlines and news.

4. Expressing Talent

Students can use Facebook as a forum to display both their academic work and other talents. It may be a means of revealing your latent abilities. For example, students can make a Facebook page where they showcase their photographic abilities.

Demerits

1. Substance abuse

Facebook has many positive consequences on our access to news and information, but it can also have detrimental affects on students’ education. It is well known that Facebook is an extremely addictive platform.

2. Intolerant

The majority of Facebook users are teenagers who are more interested in their own world. In their haste to get more friends and followers, they may neglect to engage with the actual world.

3. Profanity

There is still some vulgarity on Facebook. It is possible for minors, especially teens, to be exposed to such offensive content without their parents’ awareness. Facebook makes every precaution to avoid vulgarity, yet some sites and groups continue to disseminate obscene content and encourage violence.

4. Bullying on the Internet

On Facebook, some students also experience cyberbullying. Online, people can engage in the same kinds of body-shaming, racial, and religious abuses that occur in communities and schools. Children are more frequently subjected to these forms of harassment than adults.

Continue Reading

Lifestyle

Photography as a Source of Income

Published

on

PHOTOGRAPHY AS A SOURCE OF INCOME

Photography as a source of income. Photography as a source of income is the art of using a camera to capture light, usually on film or a digital sensor, to generate. There are many different reasons why people become photographers. Most of them begin as hobbyists and don’t think about money at all when they initially start. The appeal of photography is that it appeals to people who want to accomplish something enjoyable, worthwhile, and creative. While some artists don’t consider finances when working in photography, it’s something to keep in mind when things go tight.

What is photography?

The Greek words “photo” (light) and “graph” (to draw) are the roots of the English word “photography,” which means “drawing with light.”

However, Joseph Nicéphore Niépce took the first ever permanent photograph in France in 1826 (other accounts date it to 1827). It depicts the sun shining on a building’s roof.

Photography in StoneAge

PHOTOGRAPHY AS A SOURCE OF INCOME

PHOTOGRAPHY AS A SOURCE OF INCOME

Below indicates an example  of photography in modern world;

Photography in Modern Era

However, there are different types of photography;

Types of photography

Nature photography; This involves taking pictures of wildlife and the great outdoors

Landscape photography: This entails lighting requirements of taking pictures of expansive deserts, deep forests, or stunning vistas.


Astography: long exposure photography, is an excellent type of photography to go into if you find yourself gazing up at the night sky in awe.

Pet photography: Get up close and personal with animals and take photos of people’s pets. Animal photography comes with its special challenges,

  How can photography be a source of income?

  • Sell prints on your website
  • sell prints with a curated online shop
  • offer digital editing services
  • become an affiliate for brands you love to promote
  • create digital downloads of your photography for passive income.


Continue Reading

Social media

A Beginner’s Guide to Using Google Blogger

Published

on

By

In the vast landscape of blogging platforms, Google Blogger stands out as a user-friendly and versatile option for aspiring bloggers and seasoned content creators alike. Offering a straightforward interface, seamless integration with Google services, and robust customization options, Blogger makes it easy to create and manage a blog. In this guide, we’ll walk you through the essential steps to get started with Google Blogger.

Getting Started

1. Sign Up for a Google Account: If you don’t already have one, sign up for a Google account. This will give you access to Blogger and other Google services.

2. Access Blogger: Once you have a Google account, visit the Blogger website (blogger.com) and sign in using your Google credentials.

3. Create Your Blog: Click on the “Create New Blog” button to begin the process of setting up your blog. You’ll be prompted to choose a title for your blog and a unique URL (web address).

Designing Your Blog

1. Choose a Theme: Blogger offers a selection of customizable themes to choose from. Browse through the options and select a theme that suits your style and niche.

2. Customize Your Theme: Once you’ve chosen a theme, you can customize it to match your preferences. This includes changing colors, fonts, and layout options to create a unique look for your blog.

Creating and Publishing Content

1. Write a New Post: To create a new blog post, click on the “New Post” button in the Blogger dashboard. This will open a text editor where you can write and format your post.

2. Add Images and Multimedia: Enhance your blog posts by adding images, videos, and other multimedia content. Blogger makes it easy to upload and embed media directly into your posts.

3. Preview and Publish: Before publishing your post, preview it to ensure everything looks as intended. Once you’re satisfied, click the “Publish” button to make your post live on your blog.

Managing Your Blog

1. Dashboard: The Blogger dashboard is your central hub for managing your blog. From here, you can view your blog’s stats, manage comments, and access various settings.

2. Customize Settings: Explore the settings menu to customize various aspects of your blog, such as privacy settings, search preferences, and mobile settings.

3. Monitor Analytics: Track the performance of your blog using Google Analytics integration. This will provide valuable insights into your audience demographics, traffic sources, and more.

Engaging with Your Audience

1. Enable Comments: Encourage interaction by enabling comments on your blog posts. Engage with your audience by responding to comments and fostering discussions.

2. Promote Your Blog: Share your blog posts on social media platforms and engage with other bloggers in your niche. Building a community around your blog will help increase visibility and attract more readers.

3. Stay Consistent: Consistency is key to building a successful blog. Establish a posting schedule and stick to it to keep your audience engaged and coming back for more.

Google Blogger provides an accessible platform for anyone looking to start a blog. With its intuitive interface, customizable themes, and seamless integration with Google services, Blogger makes it easy to create, publish, and manage content online. By following the steps outlined in this guide and staying committed to your blogging journey, you’ll be well on your way to building a thriving online presence with Google Blogger.

Continue Reading

Trending

Copyright © 2024 Simplexplainer.com. Designed by mypworld@gmail.com