Connect with us

Mechanical

Rode Wireless Go Microphone

Published

on

In the rapidly evolving world of podcasting, audio quality remains paramount. Among the myriad of microphone options available, the Rode Wireless Go has emerged as a favorite for many podcasters. Here are five compelling reasons why this wireless microphone system is a top choice.

1. Portability and Convenience

Rode wireless go

The Rode Wireless Go is renowned for its compact and lightweight design, making it incredibly easy to transport and set up. Each unit is roughly the size of a matchbox, which means podcasters can carry it anywhere without the bulk typically associated with high-quality audio equipment. This portability is particularly beneficial for podcasters who frequently record on the go or in various locations, ensuring they can maintain professional sound quality without being tethered to a studio.

2. Exceptional Sound Quality

Despite its small size, the Rode Wireless Go delivers impressive sound quality. It features a built-in omnidirectional condenser microphone, which captures clear and natural audio. Additionally, it offers a high signal-to-noise ratio, reducing background noise and ensuring that voices come through crisply and cleanly. This level of audio fidelity is crucial for podcasters aiming to provide their audience with a professional listening experience.

3. User-Friendly Operation

One of the standout features of the Rode Wireless Go is its ease of use. The system includes a transmitter and receiver that pair instantly upon activation. There’s no need for complicated setups or technical know-how, making it accessible for beginners and experienced podcasters alike. The intuitive LCD screen on the receiver displays all essential information, such as battery life and signal strength, allowing users to monitor their setup effortlessly.

4. Versatile Connectivity

The Rode Wireless Go offers versatile connectivity options, which is a significant advantage for podcasters. It can be used with a variety of devices, including DSLR cameras, smartphones, tablets, and computers. This flexibility is facilitated by the 3.5mm TRS output on the receiver, which can be connected to a wide range of recording devices with the appropriate cables. Whether recording directly into a camera for video podcasts or using an audio interface for studio-quality sound, the Wireless Go adapts seamlessly to different setups.

5. Reliable Performance

For podcasters, reliability is key. The Rode Wireless Go boasts a stable and robust wireless connection with a range of up to 70 meters (about 230 feet) in optimal conditions. This ensures that the audio remains consistent and uninterrupted, even when the podcaster moves around. The built-in rechargeable batteries provide up to 7 hours of operation on a single charge. Which is more than sufficient for most podcast recording sessions. Moreover, the system operates in the 2.4GHz spectrum. Which is less susceptible to interference compared to traditional UHF systems, ensuring a clear signal.


The Rode Wireless Go has carved out a niche in the podcasting world due to its combination of portability. Sound quality, ease of use, versatile connectivity, and reliable performance. These features make it an ideal choice for podcasters looking to elevate their audio production. Without the complexities and constraints of traditional wired systems. As podcasting continues to grow as a medium, tools like the Rode Wireless Go will likely remain essential for creators striving to produce top-notch content.

Continue Reading
Click to comment

Leave a Reply

Your email address will not be published. Required fields are marked *

Mechanical

A Step-by-Step Guide to Resetting Your Refrigerator Compressor

Published

on

By

A malfunctioning refrigerator compressor can be a real headache, causing your food to spoil and your energy bills to soar. Fortunately, many compressor issues can be resolved by simply resetting the unit.

In this guide, we’ll walk you through the steps to reset your refrigerator compressor safely and effectively.

Step 1: Unplug the Refrigerator
Before attempting any repairs or resets, always unplug the refrigerator from the power source. This step is crucial for your safety and prevents any electrical mishaps.

Step 2: Locate the Compressor


The compressor is typically located at the back of the refrigerator, near the bottom. It’s a large, cylindrical component with metal tubes and wires attached to it. Once you’ve located the compressor, take a moment to inspect it for any visible signs of damage or wear.

Step 3: Access the Reset Button
Some refrigerators come equipped with a reset button on the compressor itself. Look for a small button or switch near the base of the compressor. If your compressor has a reset button, proceed to step 4. If not, skip to step 5.


Step 4: Press the Reset Button

Refrigerator compressor button

Using a small tool such as a pen or pencil, press and hold down the reset button for approximately 10-15 seconds. You may hear a clicking sound as the compressor resets. Once you’ve held the button down for the specified time, release it and proceed to step 6.


Step 5: Power Cycle the Refrigerator
If your refrigerator does not have a reset button on the compressor, you can perform a manual reset by power cycling the unit. To do this, leave the refrigerator unplugged for at least 10-15 minutes. This allows the compressor to fully discharge any built-up electrical charge. After the waiting period, plug the refrigerator back in and proceed to step 6.

Step 6: Test the Refrigerator
Once the compressor has been reset, plug the refrigerator back in and wait for it to power up. Listen for any unusual noises or vibrations coming from the compressor. Additionally, monitor the temperature inside the refrigerator to ensure that it begins to cool properly.

Step 7: Monitor for Continued Issues
After resetting the compressor, keep an eye on your refrigerator for any signs of recurring problems. If the compressor continues to malfunction or if you notice any other issues with your refrigerator, it may be time to consult a professional technician for further diagnosis and repair.

Resetting your refrigerator compressor is a relatively simple process that can help resolve many common issues with your appliance. By following the steps outlined in this guide, you can safely reset your compressor and get your refrigerator back up and running smoothly. Remember to always prioritize safety and consult a professional if you encounter any difficulties or persistent problems with your refrigerator.

Continue Reading

Mechanical

Air conditioner gas refill warning signs

Published

on

By

Knowing when your air conditioner (AC) needs a gas refill (often referred to as refrigerant or coolant) is crucial for maintaining its efficiency and longevity. Here are some signs that indicate your AC might need a gas refill:

1. Reduced Cooling Efficiency

Gas refill signs

• One of the most common signs is that the AC is not cooling the room as effectively as it used to. If you notice that it takes longer to cool the room or the air isn’t as cold as it should be, this could be a sign that the refrigerant level is low.

2. Increased Electricity Bills

• Low refrigerant levels can cause the AC to work harder to achieve the desired temperature, leading to higher energy consumption. If you notice a sudden spike in your electricity bills without a corresponding increase in usage, it might be due to your AC needing a gas refill.

3. Ice Buildup on the Evaporator Coils
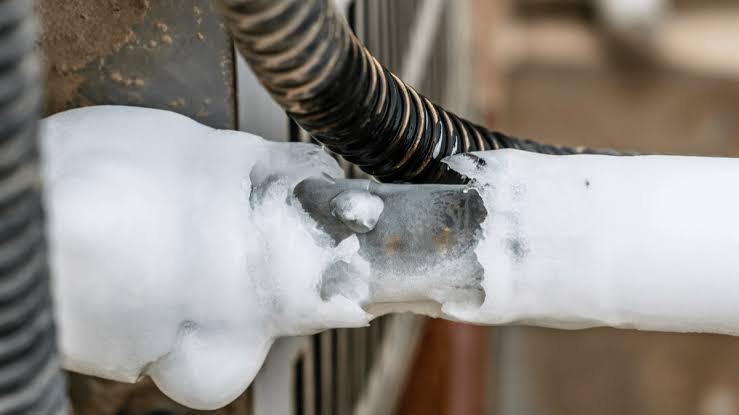
AC gas refill signal

• When the refrigerant level is low, the evaporator coils can become too cold, causing moisture in the air to freeze on the coils. This ice buildup can reduce the efficiency of your AC and is a clear indicator that you might need a gas refill.

4. Hissing or Bubbling Noise

• A hissing or bubbling noise from your AC unit can indicate a refrigerant leak. If there’s a leak, the refrigerant level will drop, leading to the need for a refill. This noise is often heard when the AC is running.

5. AC Blows Warm Air

• If your AC is blowing warm or room-temperature air instead of cold air, this is a strong sign that the refrigerant level is low and the system is unable to cool the air effectively.

6. Visible Refrigerant Leaks

• Sometimes, you might be able to see refrigerant leaks around the unit. This could appear as oily residue around the refrigerant lines or components. Leaks need to be repaired, and the refrigerant needs to be refilled.

7. AC Runs Continuously

If the AC unit runs continuously without shutting off, it could be struggling to reach the set temperature due to low refrigerant levels. Normally, the AC should cycle on and off once it reaches the desired temperature.

What to Do If You Suspect Low Refrigerant

1. Professional Inspection
• If you suspect your AC needs a gas refill, it’s essential to contact a professional HVAC technician. They can check for leaks, repair them if necessary, and refill the refrigerant to the correct level.

2. Regular Maintenance
• Regular maintenance can help prevent low refrigerant levels. Have your AC serviced annually to ensure it’s operating efficiently and to catch potential issues early.

3. Avoid DIY Refill
• Refilling refrigerant is not a DIY task. It requires specialized knowledge and equipment, as well as adherence to safety and environmental regulations. Always rely on a certified professional for this job.

By being aware of these signs and acting promptly, you can ensure your air conditioner operates efficiently, providing reliable cooling when you need it most.

Continue Reading

Mechanical

Generator engine replacement signs

Published

on

By

Recognizing when a generator engine should be replaced is crucial to ensure reliable power supply and avoid costly repairs. Here are five signs that indicate your generator engine might need replacement:

1. Frequent Breakdowns and Repairs

• If your generator frequently breaks down and requires constant repairs, it may be a sign that the engine is nearing the end of its lifespan. When repair costs start to approach or exceed the cost of a new engine, it is more economical to replace the engine entirely.

2. Excessive Oil Consumption and Smoke

• An engine that consumes excessive oil or emits large amounts of smoke (blue, black, or white) can indicate serious internal problems such as worn-out piston rings, valve guides, or head gaskets. Persistent smoke and oil consumption issues often mean that the engine is severely worn and may need replacement.

3. Reduced Power Output and Performance

Engine replacement

• If the generator is no longer able to produce its rated power output or struggles to handle loads it previously managed with ease, this can be a sign of significant engine wear. Reduced performance can stem from internal wear and tear that impacts the engine’s efficiency and power generation capabilities.

4. Loud, Unusual Noises

• Unusual noises such as knocking, banging, or grinding sounds coming from the engine can indicate serious mechanical issues. These noises often suggest that there are problems with internal components like bearings, pistons, or the crankshaft, which might require engine replacement.

5. High Hours of Operation and Age

• Generators, like all machines, have a finite lifespan. If your generator engine has accumulated high operating hours (typically over 10,000 hours for many industrial engines) and is quite old, it might be time to consider replacement. Age and extensive use lead to natural wear and tear that eventually necessitates engine replacement to ensure reliable operation.

Additional Considerations

– Increased Fuel Consumption: Noticeably higher fuel consumption can indicate inefficiency due to engine wear.

– Difficulty Starting: Persistent starting issues, even after regular maintenance and troubleshooting, can be a sign that the engine is failing.

– Metal Shavings in Oil: Finding metal shavings in the engine oil during an oil change is a serious sign of internal engine damage.

– Overheating: Frequent overheating issues, despite a functioning cooling system, can suggest significant engine problems.


Regular maintenance and timely inspections can help identify these signs early. If you notice any of these issues with your generator engine, it’s advisable to consult with a professional technician to assess whether a replacement is necessary. Investing in a new engine can prevent unexpected power failures and ensure the reliability and efficiency of your generator.

Continue Reading

Trending

Copyright © 2024 Simplexplainer.com. Designed by mypworld@gmail.com